DI in SwiftUI
V
Senior iOS Engineer at Skip
Search for a command to run...
Senior iOS Engineer at Skip
No comments yet. Be the first to comment.
Structured vs. Unstructured Tasks Explained
Learn how Swift Concurrency really works
Don’t overlook these edge cases in your code
Can we apply Coordinator approach for SwiftUI?
If you prefer to watch video you can find it here. Hey iOS folks! If your application has grown in complexity over time, modularization can be a good strategy to improve development efficiency, build time, scalability, maintainability, and etc. Tod...
In the previous posts about Dependency Injection, we learned about the importance of DI in building scalable, maintainable, and testable iOS applications. We also learned that the Factory library can be a modern solution for DI.
NOTE: In this post, I assume you are already familiar with the concept of DI (but you can learn more about it from this post).
In SwiftUI, Apple introduces a slightly different approach to DI compared to traditional UIKit development. In this article, we will explore the fundamentals of how DI works in the context of SwiftUI.
We will cover two different approaches for DI we have in SwiftUI:
Constructor injection
Environment injection
Let’s consider both options more carefully.
This approach should already be familiar to you from previous posts. It is a reliable and widely-used method for implementing DI, which you likely have utilized extensively in iOS development prior to the introduction of SwiftUI.
class LoginViewModel {
    let authService: AuthenticationService

    init(authService: AuthenticationService) {
        self.authService = authService
    }
}

// Somewhere in your code later
LoginViewModel(authService: authservice)
This is a classic example of constructor injection, where the dependency is injected through the constructor (also known as the initializer).
Even though we may feel confident with this pattern, when we begin using views in SwiftUI, we realize that it becomes slightly more complex due to the various property wrappers available. However, the good news is that the main principle remains the same for views.
struct LoginView: View {

    @ObservedObject var viewModel: LoginViewModel

    var body: some View {
        <...>
    }
}

// Somewhere in your code later
LoginView(viewModel: vm)
Even though we didn't explicitly create the initializer to pass the viewModel into LoginView, Swift automatically generates the default initializer for view structs. However, you can still write your own initializer if needed. The same approach can be applied to any view dependency, regardless of its type or the property wrapper used.
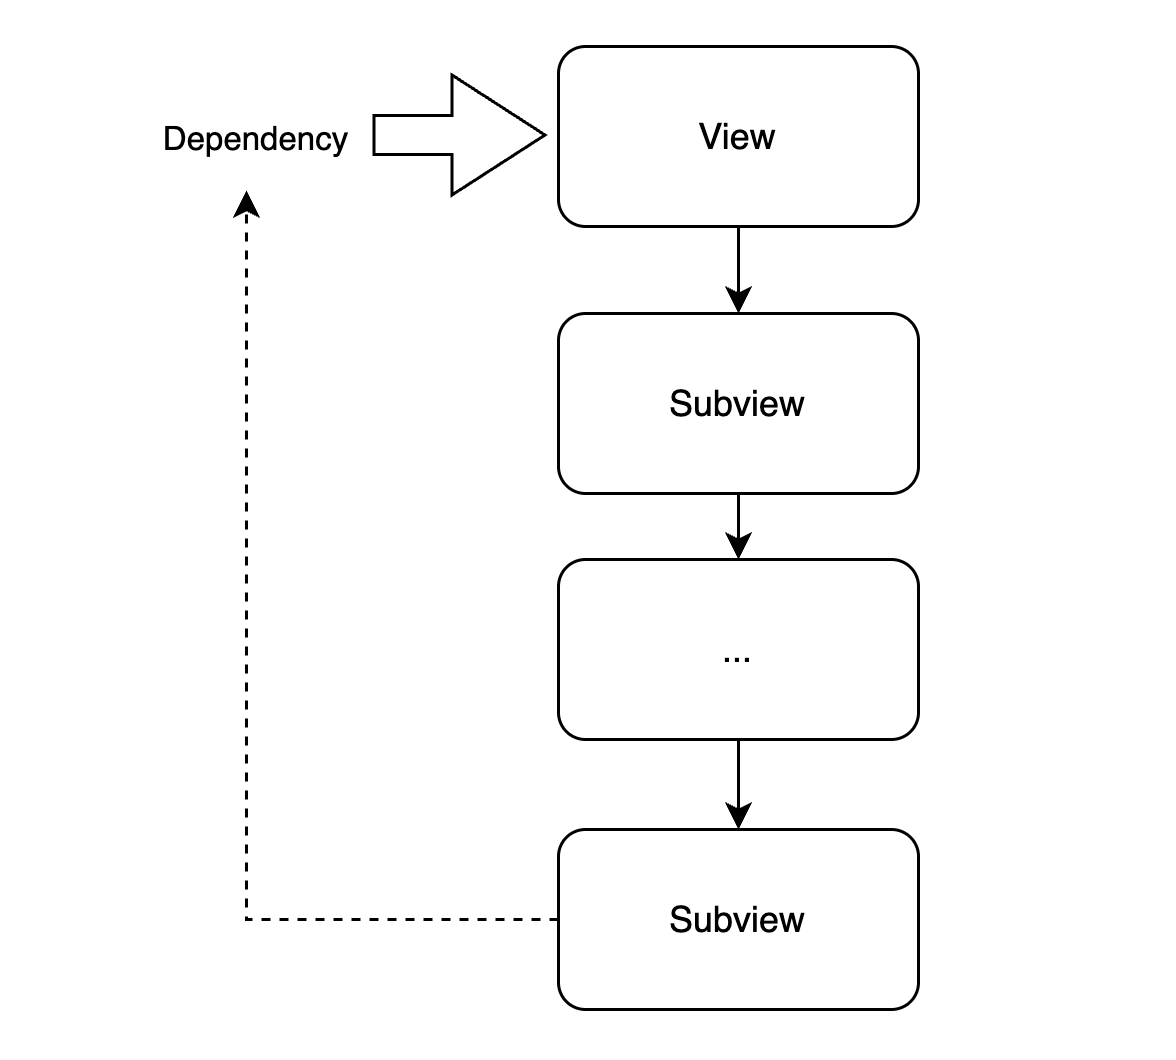
Environment injection allows us to inject dependencies into a view within the view hierarchy and access them from any lower-level view if necessary.
In fact, there are two property wrappers available for this purpose: @EnvironmentObject and @Environment.
@EnvironmentObject enables the injection of an object of a specific type into the environment.
@Environment allows the injection of dependencies using a key/value approach.
If this is still unclear, don't worry. We will provide examples to further explain these concepts.
The @EnvironmentObject property wrapper allows you to inject an object instance, identified by its type, into the environment.
To inject a dependency using environment objects, follow these steps:
Create an instance of your dependency that conforms to the ObservableObject protocol (meaning it should be a class).
Inject the dependency into the environment by using the .environmentObject() modifier on the root view or an intermediate container view.
Access the injected dependency in any child view that requires it by using the @EnvironmentObject property wrapper.
class MyDependency: ObservableObject {
    <...>
}

@main
struct MyApp: App {
    let dependency = MyDependency() // 1: Create an instance

    var body: some Scene {
        WindowGroup {
            ContentView()
                .environmentObject(dependency) // 2: Inject the instance
        }
    }
}

struct ContentView: View {
    var body: some View {
        SubView()
    }
}

struct SubView: View {
    @EnvironmentObject private var myDependency: MyDependency // injected

    var body: some View {
        <...>
        // 3: Access the injected dependency in your view
    }
}
The @EnvironmentObject property wrapper proves to be extremely useful when dealing with complex views where you need to inject dependencies into the lowest view within the hierarchy. Unlike the constructor injection approach, which requires passing the dependency through multiple views in the chain, @EnvironmentObject simplifies the process significantly.
NOTE 1: If you need to inject a value type, @EnvironmentObject is not suitable. It only works with ObservableObject. However, you can use @Environment for injecting value types.
NOTE 2: It's crucial to be cautious when using environment objects as their usage can be unsafe. If an object is not available in the environment because you forget to inject it, the app will crash. This scenario is similar to using reflection-based libraries like Swinject, where forgetting to register a dependency before resolving it leads to a crash in runtime. Therefore, make sure you use @EnvironmentObject carefully.
NOTE 3: The environment can hold only one type of environmentObject instance at a time. If you inject an object of the same type lower in the hierarchy, it will replace the old one.
The @Environment property wrapper allows you to inject key/value pairs into the environment.
Here's a summary of how you can use it:
Create an EnvironmentKey with a default value.
Add the value property to an extension of EnvironmentValues.
Inject the dependency into the environment by using the .environment(\.{key}, value) modifier on the root view or an intermediate container view.
Access the injected dependency in any child view that requires it by using the @Environment property wrapper with the corresponding key.
struct ValueKey: EnvironmentKey { // 1: Created EnvironmentKey
    static var defaultValue = 1
}

extension EnvironmentValues { // 2: Add EnvironmentValues property
    var value: Int {
        get { self[ValueKey.self] }
        set { self[ValueKey.self] = newValue }
    }
}

@main
struct MyApp: App {
    var body: some Scene {
        WindowGroup {
            ContentView()
                .environment(\.value, 123) // 3: Inject the dependency
        }
    }
}

struct ContentView: View {
    var body: some View {
        SubView()
    }
}

struct SubView: View {
    @Environment(\.value) var value // injected

    var body: some View {
        <...>
        // 4: Access the injected dependency in your view
    }
}
NOTE 1: The @Environment property wrapper is particularly useful for accessing existing system-related values such as the app's appearance mode (light or dark), Core Data's managed object context, size classes, and more. Refer to the documentation for EnvironmentValues to see the full list of available properties. In this article, we focus more on injecting our own dependencies.
NOTE 2: With the @Environment property wrapper, you can add both value and reference types to the environment. This makes it more versatile compared to @EnvironmentObject.
NOTE 3: An @Environment dependency always has a default value, so if you forget to inject it at the root level, your app will not crash. This makes it more safe compared to @EnvironmentObject.
NOTE 4: @Environment injection can hold multiple instances of the same type but with different keys.
Two approaches for dependency injection in SwiftUI were discussed: Constructor injection and Environment injection.
Constructor injection involves injecting dependencies via the initializer, following a similar pattern as in traditional UIKit development.
Environment injection allows for injecting dependencies into the view hierarchy and accessing them from any view lower in the hierarchy.
The @EnvironmentObject property wrapper is used to inject an object of a specific type into the environment.
The @Environment property wrapper is used to inject dependencies using key/value pairs.
Dependency Injection is a simple concept that can greatly benefit SwiftUI code, just like any other codebase. While there may be other approaches to DI in SwiftUI, mastering the two options described above is sufficient for effective DI implementation.