Behind the scenes of UI: Part 2 - SwiftUI
Senior iOS Engineer at Skip
if you prefer to watch video you can find it here.
You can say that UIKit is great, but SwiftUI is a future. But don’t hurry up to burry UIKit, as you will understand soon, it is still very useful to understand how SwiftUI works under the hood.

SwiftUI is a declarative data-driven UI framework.
Declarative means that you describe the desired UI and its behavior by providing the view’s body, and SwiftUI handles the internal implementation details.
Data-driven (or state-driven) means that the UI is closely tied to the underlying data or state, and any changes in the state will be automatically reflected in the UI.
SwiftUI conceals its entire render loop process behind the body of the view provided to us for constructing the View.
struct ContentView: View {
    var body: some View {
        Text("Hello, world!")
    }
}
Structure of the body defines both layout and content of the view. Let’s try to figure out what stands behind the body.
DISCLAIMER: Things we will discuss next are not documented and we have no access to the actual SwiftUI code/implementation. So I will try to give a guess how it can possibly work to help you build your own mental model about it.
View and Render tree
Similarly to UIKit, SwiftUI has its view tree. However, in contrast to UIKit, where UIView is an object, views in SwiftUI are structs, making the view tree ephemeral. This implies that view values in SwiftUI are transient and can be recreated whenever the state changes. Direct manipulation of the view tree isn't possible in SwiftUI. Instead of mutating the view tree directly as in UIKit, we modify the state, prompting SwiftUI to calculate a new view graph from this state. Views are recreated upon state changes, and the body is re-evaluated. SwiftUI optimizes this process by avoiding re-execution of a subview's body when it remains unchanged. To determine when to re-evaluate the body, SwiftUI utilizes the Attribute Graph. This is an internal component that builds a dependency graph for your data and its associated view tree. Unlike the view tree, the Attribute Graph is persistent and remains even when the body re-executes. And it has to, because it stores the state that must remain after view tree recreation. With each new generation of the view tree, SwiftUI performs a diff against the current state of the render tree, efficiently applying the necessary changes by adding and removing nodes from the render tree.
Chris Eidhof refers to the Attribute Graph as the Render Tree to simplify the understanding of the concept. This makes sense to me because it serves as a sort of source of truth for rendering. Additionally, it's a fitting analogy with the render tree in UIKit.
View Render Loop
We can split render loop into several phases:
Evaluation Phase
Layout Phase
Rendering Phase
Evaluation Phase
Let’s highlight again: the view tree is ephemeral, while the render tree is persistent. Initially, the root node of the render tree should be created first, and it is probably something like node for ContentView to start with. Next, the view tree should be constructed. To initiate this process, ContentView's body should be evaluated. Step by step, from superviews to subviews in the hierarchy, SwiftUI prepares the view tree, composing it into a complex generic structure hidden beneath some View. View tree is used to construct the render tree. Once render tree construction is complete, SwiftUI can discard and throw away the entire view tree.
When the state is changed for a render tree node, the affected render sub-tree is invalidated. SwiftUI then rebuilds the corresponding view subtree and re-evaluates the bodies if necessary to update the render tree structure. As a result of this phase, SwiftUI should have the render tree rebuilt and ready for the subsequent phases.
Layout phase
After Attributed Graph is (re)constructed and ready, SwiftUI performs layout calculations to determine the position, size, and arrangement of each view within the parent view or container.
Layout phase is very well explained in articles from Alex Grebenyuk and Paul Hudson:
Layouts proceed top down: parent views offer their available space to their children, which decide their size based on that.
There are three steps in SwiftUI layout process:
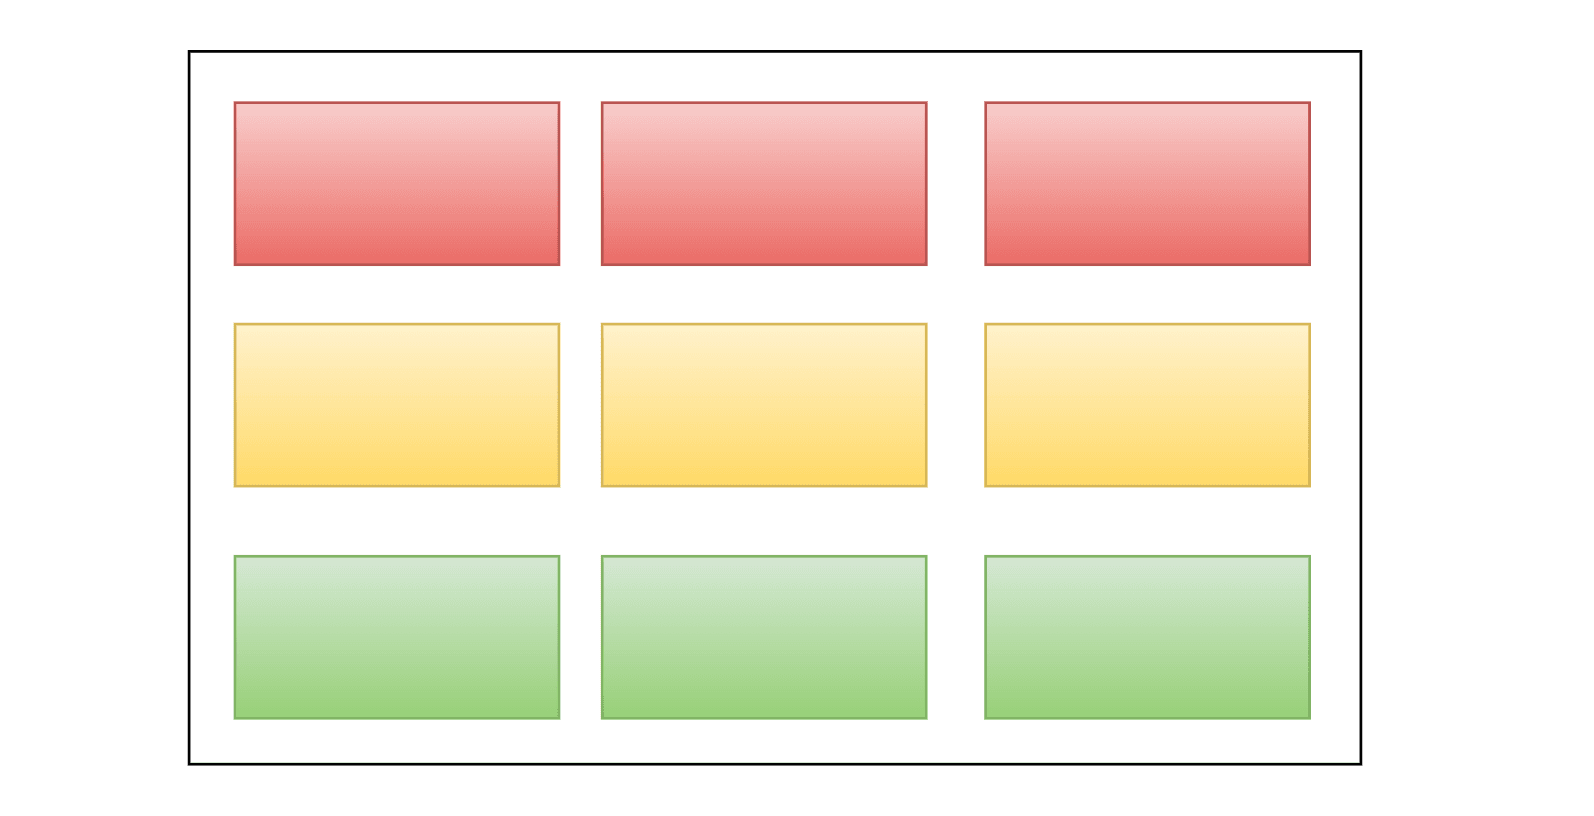
1. Parent Proposes Size for Child
First, the root view offers the text a proposed size – in this case, the entire safe area of the screen, represented by an orange rectangle.
2. Child Chooses its Size
Text only requires that much size to draw its content. The parent has to respect the child's choice. It doesn't stretch or compress the child.
3. Parent Places Child in Parent’s Coordinate Space
And now the root view has to put the child somewhere, so it puts in right in the middle. That means views set the position of child’s, but not by SwiftUI externally.
NOTE: Layout in SwiftUI is easy until it's not.
Steps sound pretty easy but what sometimes makes layouts in SwiftUI complex (especially after years of UIKit development) is that each view (or view modifier) behaves differently when it comes to determining the actual size from the proposed size. For example, a shape always fits itself into the proposed size; a horizontal stack takes on the size that’s needed for its children (up to the proposed size); and a text view takes on the size needed to render its text, unless its size exceeds the proposed size, in which case the text gets clipped. You need to keep all of that in mind.
Rendering phase
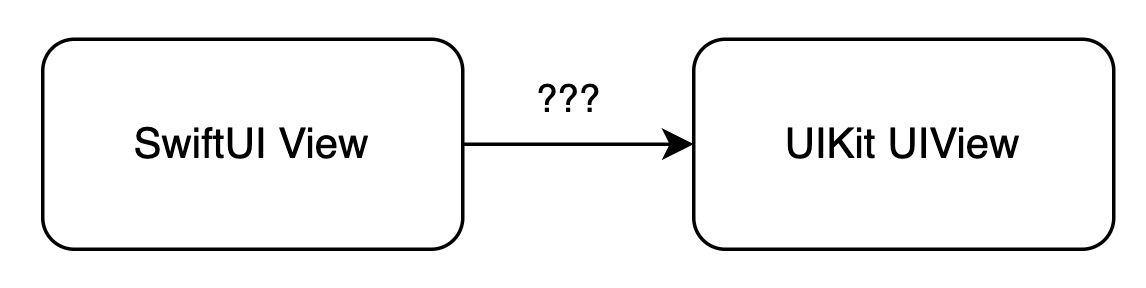
Once layout is completed views are supposed to be rendered on the screen. The exact process SwiftUI uses for rendering remains uncertain. Yet, it's reasonable to assume that SwiftUI relies on underlying UIKit, Core Animation, Core Graphics and Metal to do that. And keeping that in mind there should be some kind of mapping from SwiftUI view/render tree into UIKit view tree. In this case Rendering phase is probably can be better called Mapping to UIKit phase. We'll try to confirm this assumption in the next part of this post.
Behind the render loop
That was a bunch of theory in the previous post. How about exploring some real details we can uncover from the debugger?

Let’s create a new SwiftUI project in the Xcode and try to see what happens before body is called by placing a breakpoint inside the view body.
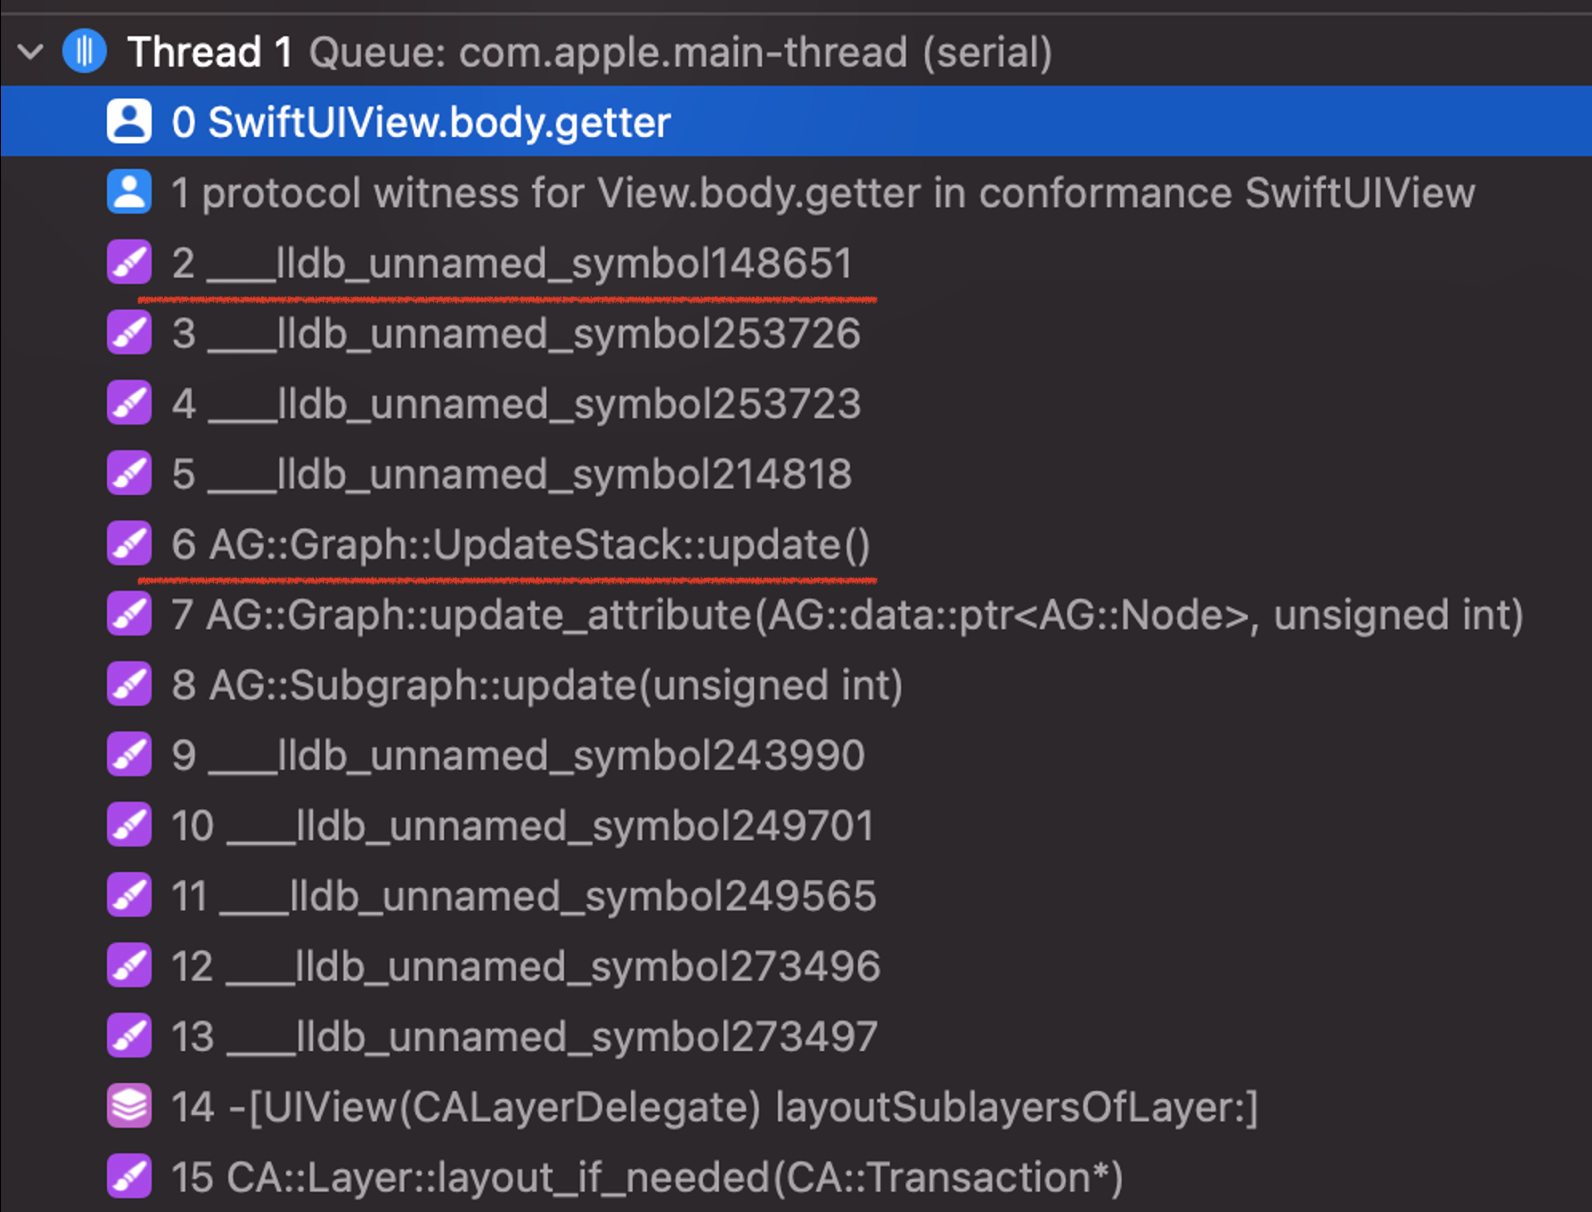
We can make a few observations here:
AG::Graphrepresents the Attribute Graph we previously mentioned. Occasionally, there might be a lengthy stack trace related to AG.__lldb_unnamed_symbol123456denotes parts of the SwiftUI code, which remain hidden from us.
However, our primary interest lies in the lower part of the stack trace. There, we might observe something very interesting:
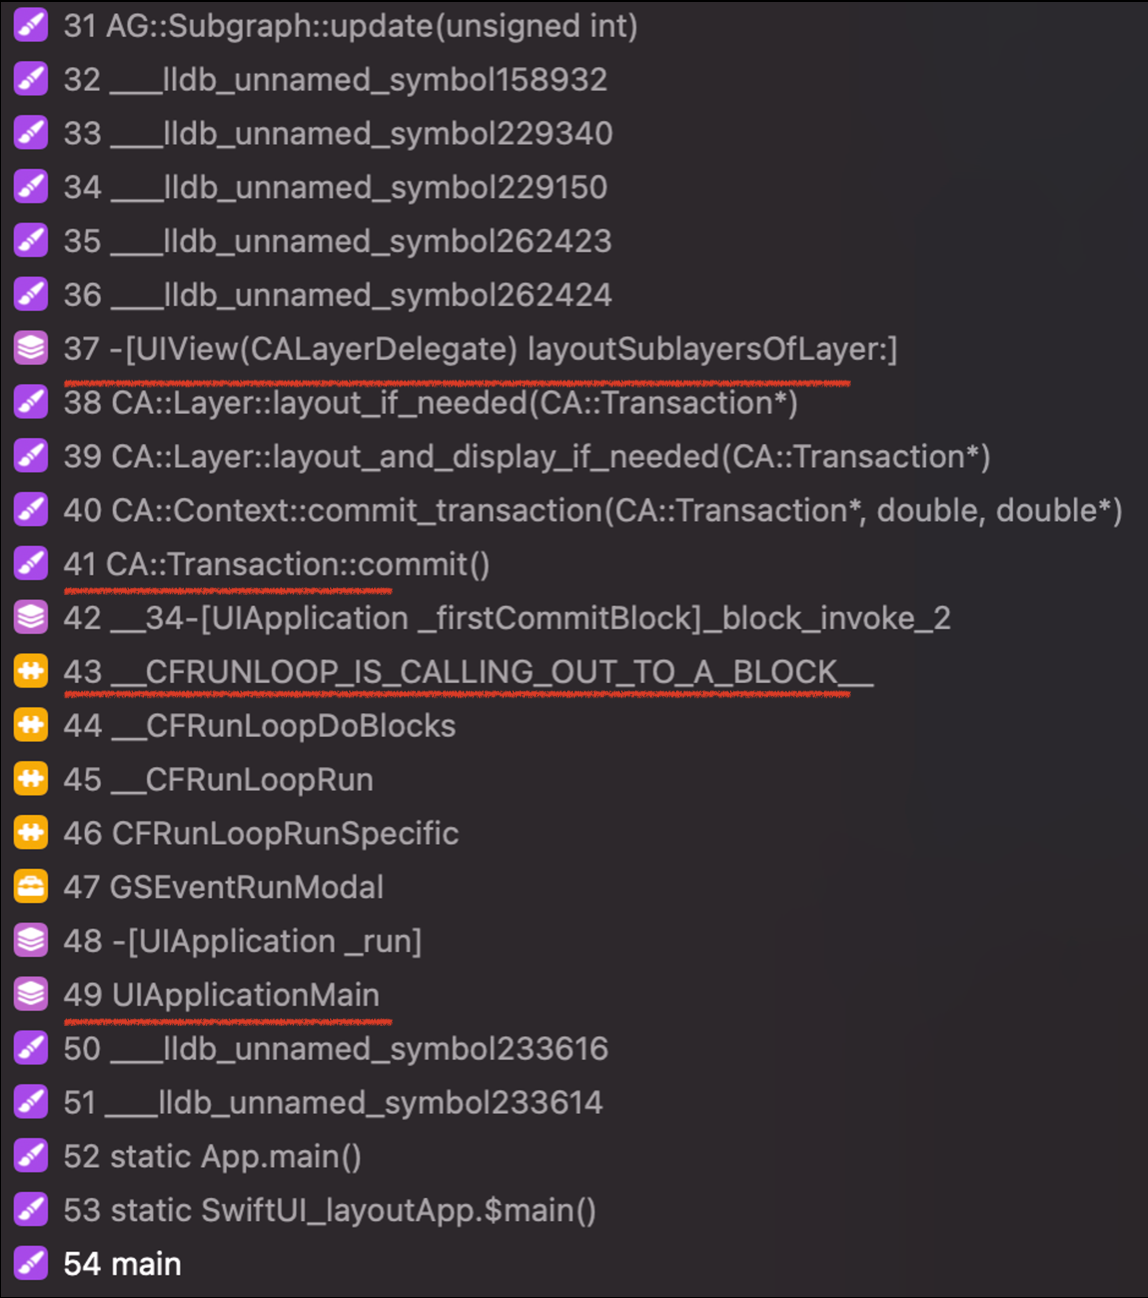
The bottom of the stack should actually provide you with a strong hint of how SwiftUI works internally:
UIApplicationMain→ __CFRUNLOOP_IS_CALLING_OUT_TO_AN_OBSERVER_CALLBACK_FUNCTION__→ CATransaction.commit()→ UIView(CALayerDelegate).layoutSublayersOfLayers
Looks pretty familiar, doesn't it? It's just like the UIKit render loop we discussed in the previous post. This occurs in a pure SwiftUI application without a single UIView added by us. It actually proves that SwiftUI incorporates UIKit and CoreAnimation under the hood, inheriting plain old UIKit’s render loop we previously discussed.
During each runloop iteration, when the CALayer/UIView hierarchy traversal takes place as a part of the implicit CATransaction’s layout phase, SwiftUI conducts its render loop starting from the layoutSublayers(of:) call of the UIView that hosts the SwiftUI view hierarchy (to be precise, _UIHostingView).

Now let’s try to understand connection of SwiftUI and CATransaction better.
Connection with CATransaction
The same way as UIKit, in SwiftUI views will be rendered on screen when the implicit CATransaction is committed. You can observe connection of SwiftUI and CATransaction with simple example. We can add CATransaction.begin() into onTapGesture.
DISCLAIMER: I am strongly recommend you not to use CATransaction with SwiftUI in your codebase. It is just a demonstration example just for fun.
struct SwiftUIView: View {

    @State var color: UIColor = .red

    var body: some View {
        Circle()
            .fill(Color(color))
            .onTapGesture {
                color = .yellow
                CATransaction.begin()
                color = .green
            }
    }
}
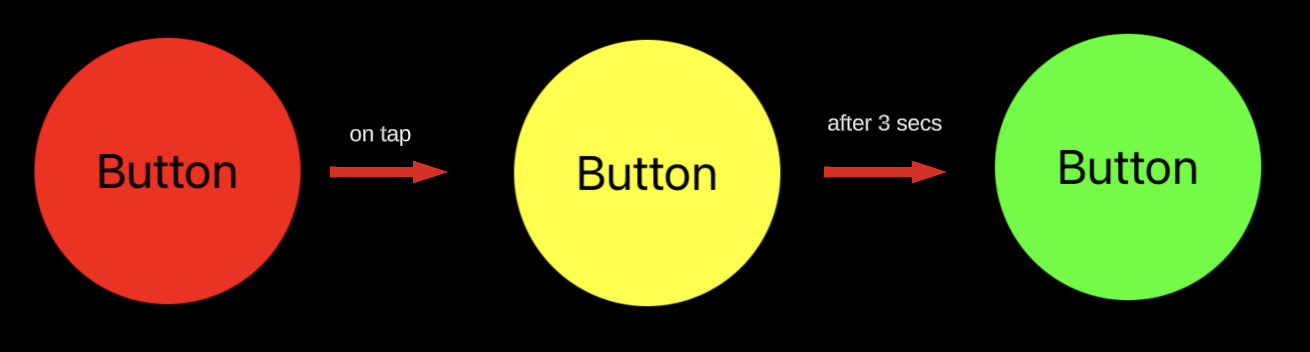
As you probably remember from the post about UIKit, when you call CATransaction.begin(), a new transaction object is created and pushed into the shared transaction stack. So if you don’t do CATransaction.commit() after that, you simply break the transaction stack because of the way how transactions work. No layer tree changes will be committed from your app to the render server after that. So in our example we will not see nether yellow or green color update on the screen after tap. That shows us the connection between SwiftUI and CATransaction. SwiftUI relies on transactions the same way as UIKit does.
If we try to build similar example with explicit transaction as we did for UIKit we will discover another important aspect of SwiftUI.
struct SwiftUIView: View {

    @State var color: UIColor = .red

    var body: some View {
        Circle()
            .fill(Color(color))
            .onTapGesture {
                CATransaction.begin()
                color = .yellow
                CATransaction.commit()
                sleep(3) // blocks the main thread for 3 seconds
                color = .green
            }
    }
}
In similar UIKit example we would see yellow color in the middle once explicit transaction is commited before main thread had beed blocked by sleep().
@objc func buttonTapped() {
    CATransaction.begin()
    button.backgroundColor = .yellow
    CATransaction.commit()
    sleep(3) // blocks the main thread for 3 seconds
    button.backgroundColor = .green
}
But in SwiftUI, it seems to not working the same way, but why? 🤔
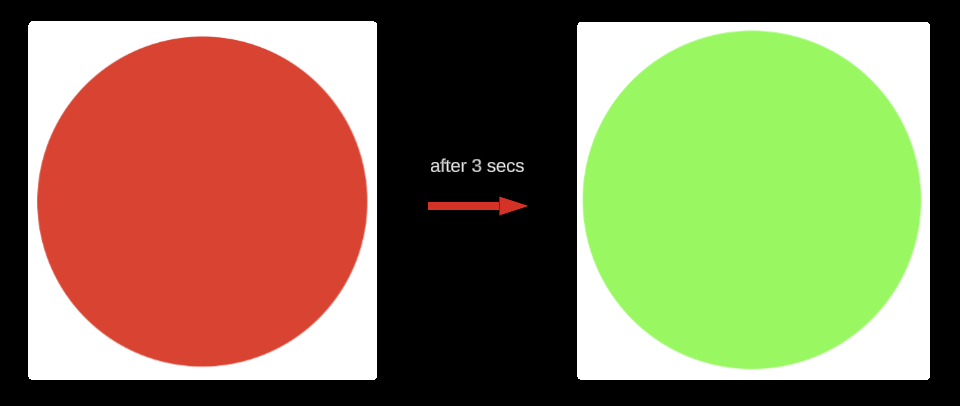
Let’s remember how CATransaction works. It commits the new changes of layer tree to the render server. But in our SwiftUI example we didn’t do any changes to any CALayer inside our explicit transaction (between begin and commit).
CATransaction.begin()
color = .yellow // changes only color state property, no CALayer changed
CATransaction.commit()
We only changed the state of SwiftUIView. And it needs to do another SwiftUI render loop to actually rebuild view tree and render tree to apply changes to underlying layers.
This is actually why none of the changes after the body evaluation or onAppear call aren’t rendered instantly. At the moment of body evaluation/onAppear/onChange underneath CALayer properties are not yet changed so at that moment nothing to commit yet. We need to do a full SwiftUI render loop first to change underlying layers that will be committed with implicit transaction and eventually rendered.
We can extend this example a bit. We already know that in the root of Swift hierarchy lies _UIHostingView. It is UIKit UIView and it has it’s CALayer under the hood. There is no way to access _UIHostingView from SwiftUI code but If we set _UIHostingView to a global variable from UIKit side, we will be able to access it inside onTapGesture. (Never do anything like that in your production code 🙈)
If we change the backgroundColor of hostingView inside the explicit transaction on tap gesture:
var hostingView: UIView? // Set it globally

struct SwiftUIView: View {

    @State var color: UIColor = .red

    var body: some View {
        Circle()
            .fill(Color(color))
            .onTapGesture {
                CATransaction.begin()
                hostingView?.backgroundColor = .yellow
                color = .yellow
                CATransaction.commit()
                sleep(3) // blocks the main thread for 3 seconds
                color = .green
            }
    }
}

Flow will be like that:
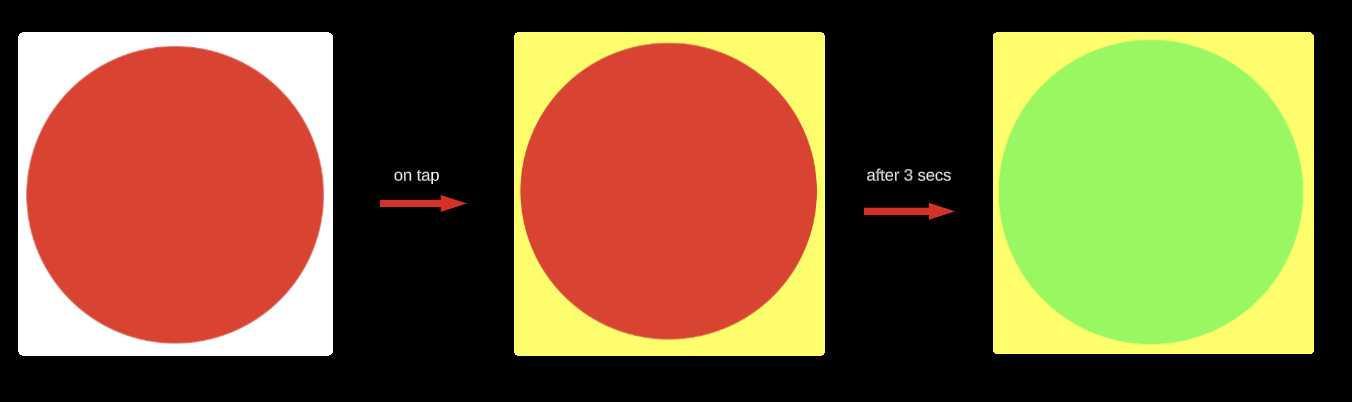
It shows us that CATransaction works with layer tree changes as expected even inside SwiftUI code. But it also shows that it makes no sense to use explicit CATransaction in SwiftUI views once you usually don’t access CoreAnimation layer tree directly from SwiftUI (and you should not).
We used hosting view in the last example, but didn’t talk about it much so far. Let’s discuss it next.
HostingView as a host
If we look in Xcode structure while debugging a new UIKit project we will see:
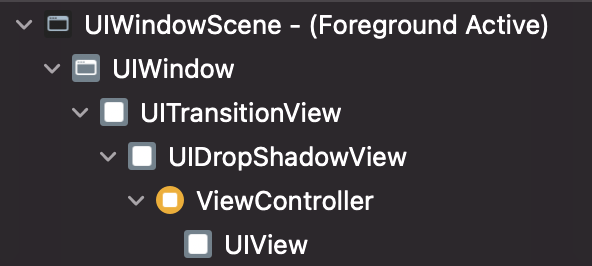
And in the root of a new SwiftUI application you will see exactly the same structure but with HostingViewController with _UIHostingView that hosts SwiftUI ContentView:
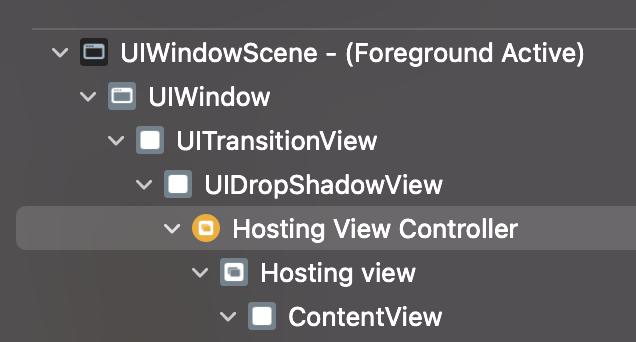
All of SwiftUI's view tree is hosted by _UIHostingView, controlled in turn by the UIHostingController. Any changes to the view structure applied to _UIHostingView and its subviews by SwiftUI internally are rendered by the usual CoreAnimation render loop we discussed earlier.
When you add new SwiftUI views to your ContentView body, SwiftUI will add UIKit subviews to _UIHostingView if needed. I mentioned "if needed" because not every SwiftUI view corresponds directly to a UIKit UIView under the hood. There are multiple ways graphics can be rendered in SwiftUI. SwiftUI can internally create a UIView to display them, or it might not. For instance, while some views like VStack participate in layout, they don't have their own UIView under the hood.
Let’s consider simple SwiftUI view as example:
struct ContentView: View {
        var body: some View {
            VStack {
                Image(uiImage: .strokedCheckmark)
                Text("Text")
                TextField("Title", text: .constant("TextField"))
            }
      }
}
View body generic type hidden behind some View will be following:
VStack<
    TupleView<
        (Image, Text, TextField<Text>)
    >
>
Looking at the above code sample, it’s easy to jump to the conclusion that the resulting UI will consist of:
Vertically aligned
UIStackViewwhich contains:UIImageUILabelUITextField
However, only part of those assumptions is actually true. Unlike CALayer within each UIView, not every SwiftUI view has a UIView behind it. Some SwiftUI views do utilize UIKit under the hood, although not all of them.
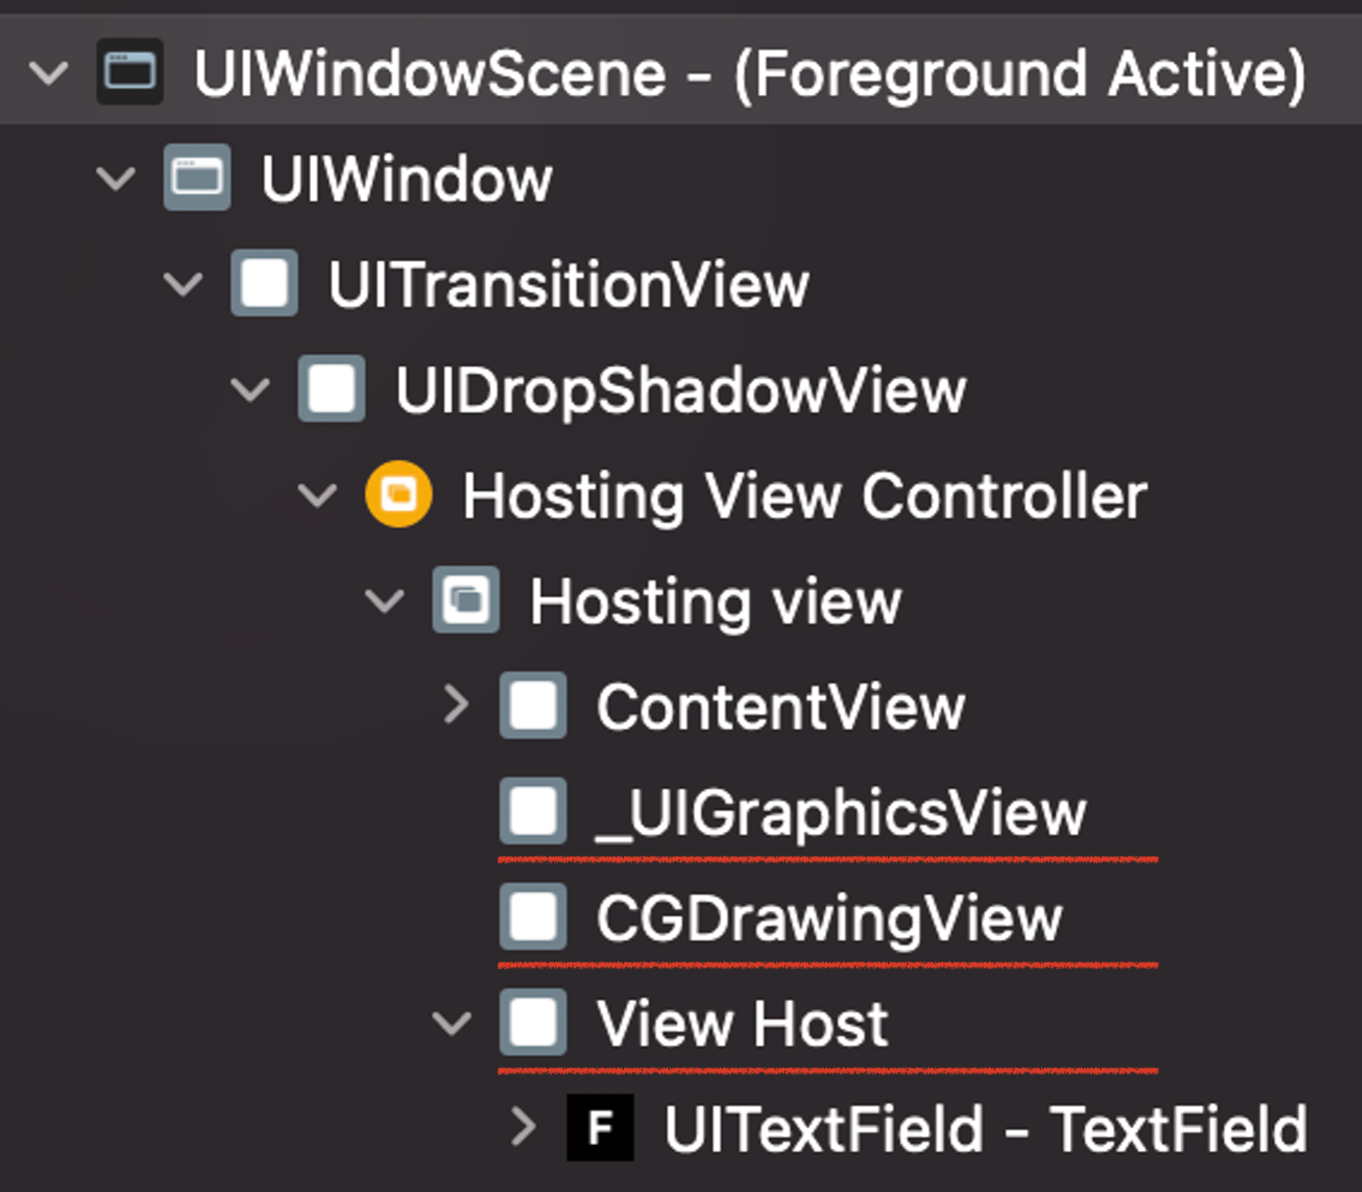
In our example we will see the following structure of subviews added to hosting view:
_UIGraphicsViewforImageCGDrawingViewforTextViewHost(It’s actually justUIViewRepresentable) with hostedUITextFieldforTextField
I'll attempt to group all views based on the way they are backed up by UIKit:
No UIView behind
- Layout/structure based views -
Spacer,V(H/Z)Stack,LazyH(V)Stack
- Layout/structure based views -
Backed by
_UIGraphicsView- Graphics based views -
Color,Image,Divider
- Graphics based views -
Backed by
CGDrawingViewclass (subclass of_UIGraphicsView)Text based views -
Text,Button,TextEditorCGprefix gives us a hint that SwiftUI uses CoreGraphics for text rendering the same way as UIKit does it.
Specific UIKit.UIView hosted by UIViewRepresentable
TextField(with UITextField),ProgressView,Slider,List
Composition of views listed above

IMPORTANT NOTE: You need to keep in mind that underlying implementation of SwiftUI views can change with time. I guess it is the reason why Apple keeps SwiftUI implementation private, they can change it with time but SwiftUI API will remain he same. For now, SwiftUI mostly wraps existing UI frameworks like UIKit, CoreAnimation, Core Graphics. In the future if Apple decides to, they can deprecate UIKit without changing the SwiftUI APIs and rewrite the foundation of it. I see that as a very long way though, so UIKit probably will be there for some time.

Recap
SwiftUI is a declarative and data-driven UI framework.
The Role of the
body:The
bodyof a view defines both its layout and content.Behind the
body, SwiftUI operates through a complex system involving view tree and attribute graph also known as render tree.
View Tree and Render Tree:
SwiftUI has a view tree, but unlike UIKit, views in SwiftUI are transient structs.
Views are recreated when state changes, and SwiftUI optimizes this process by leveraging the attribute graph to track state changes.
View Render Loop:
The view render loop involves three phases:
evaluation phase
layout phase
rendering phase (or mapping to UIKit phase)
Evaluation phase includes rebuilding view tree, diffing and body evaluation.
Layout phase proceed goes top down: parent views offer their available space to their children, which decide their size based on that.
We don’t know much about SwiftUI rendering phase. But we know it relies on underlying UIKit, Core Animation and Core Graphics for that. Rendering phase is probably can be better called Mapping to UIKit phase.
CATransaction and SwiftUI:
- By relying on UIKit/CoreAnimation SwiftUI internally utilizes implicit
CATransactionfor managing changes to the layer tree. Although you don't useCATransactions directly inSwiftUIapps, the framework internally still uses Core Animation andCATransactions for drawing and animations. Together with the render server, Core Animation is very foundational to iOS and SwiftUI.
- By relying on UIKit/CoreAnimation SwiftUI internally utilizes implicit
HostingView and UIKit Integration:
SwiftUI view tree is hosted by
_UIHostingView, controlled byUIHostingController.Some views internally use UIKit views (like i.e
UITextFieldused and hosted byTextField). Even though not all SwiftUI views are mapped to UIKit views internally.SwiftUI currently wraps existing UI frameworks like UIKit, CoreAnimation, and Core Graphics. SwiftUI abstracts away complexities and could potentially allow Apple to evolve underlying implementations in the future without changing the SwiftUI API.
Thank you for reading and see you in the next posts!