Behind the scenes of UI: Part 1 - UIKit

Senior iOS Engineer at Skip
if you prefer to watch video you can find it here.
Intro
As iOS developers, we engage extensively with user interfaces. Understanding of various aspects of UI like lifecycle or layout is crucial for working with UIKit and SwiftUI. Do developers truly need to comprehend the underlying mechanics of UI, or they can solely rely on the provided APIs? I believe that understanding of framework's internal workings can offer significant benefits like avoiding poor performance, sporadic glitches, unexpected animations or layout bugs. Moreover, it is a lot of fun!
The primary objective of this series of posts is to provide you with a comprehensive overview of how UIKit and SwiftUI works under the hood. We will discuss UIKit first and save SwiftUI for the next post.
UIKit
Let's consider an example that often can be seen in UIKit applications. At a certain point in your app, you want to add a subview within your view controller's view.
// Not really long time ago in a far galaxy view controller...
override func viewDidLoad() {
     super.viewDidLoad()
     let subview = QuestionView()
     view.addSubview(subview)
     setupConstraints(for: subview)
}
Example looks trivial, right? But how it actually works?
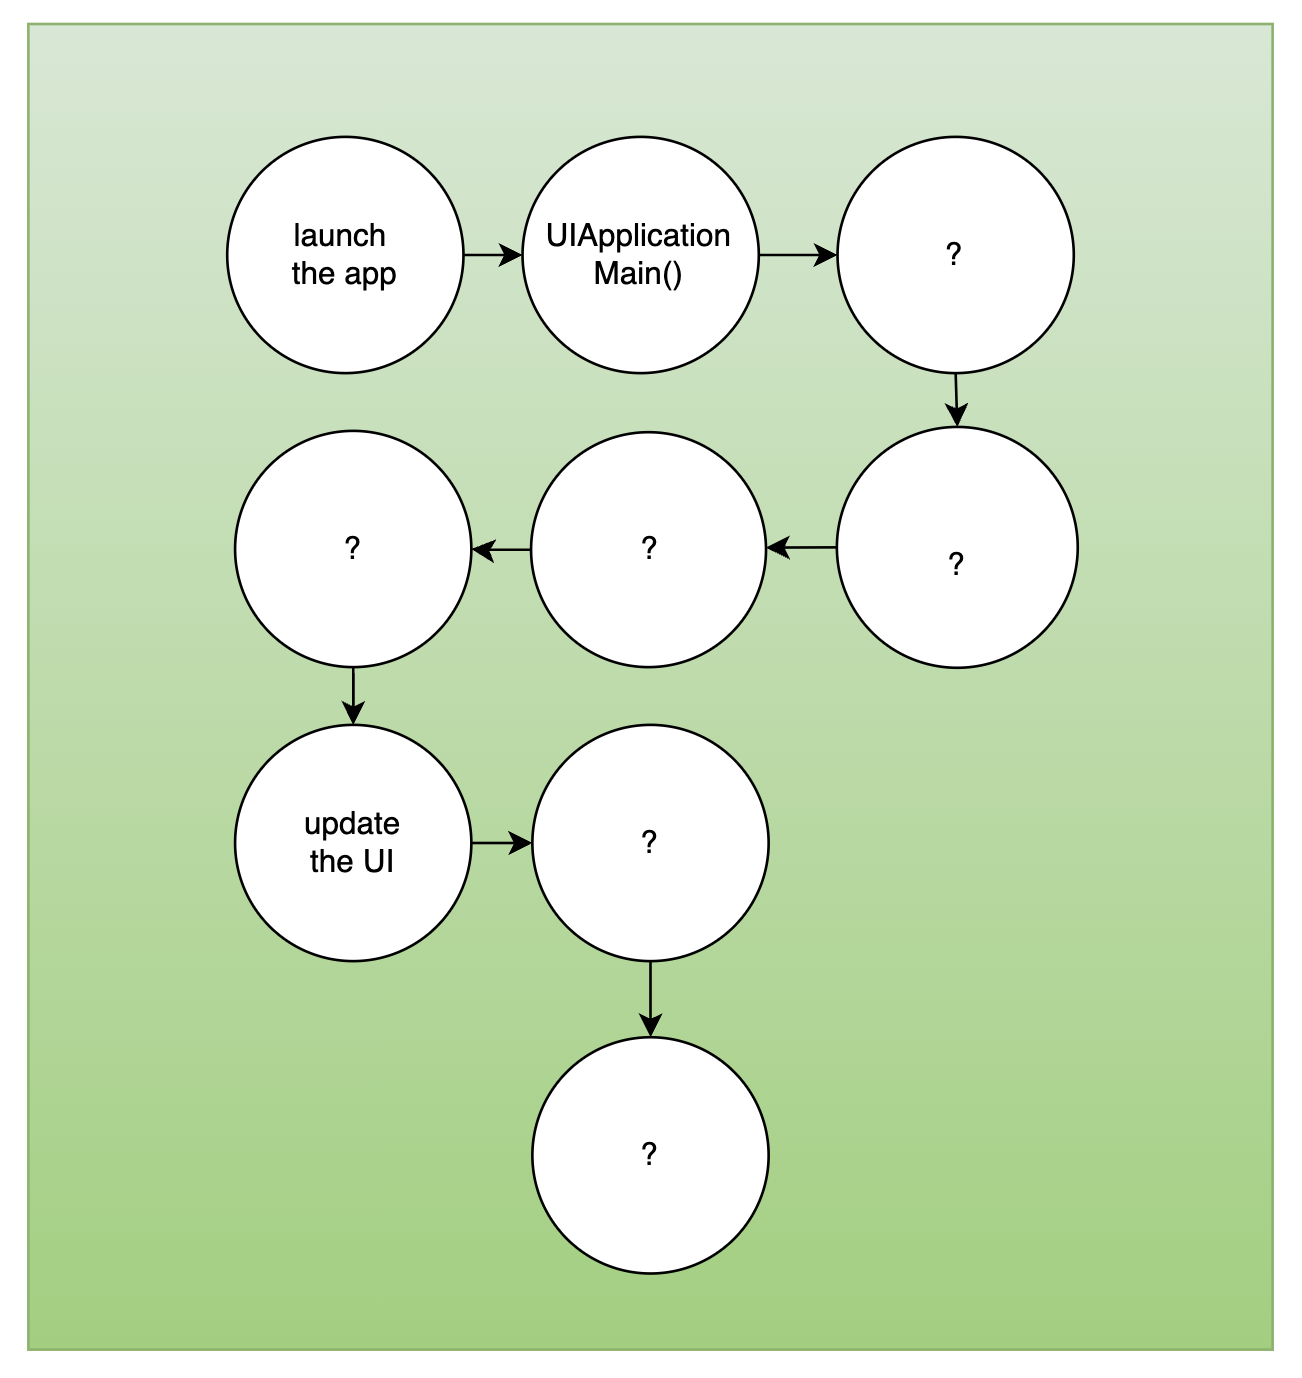
Let’s split the bigger how into smaller questions:
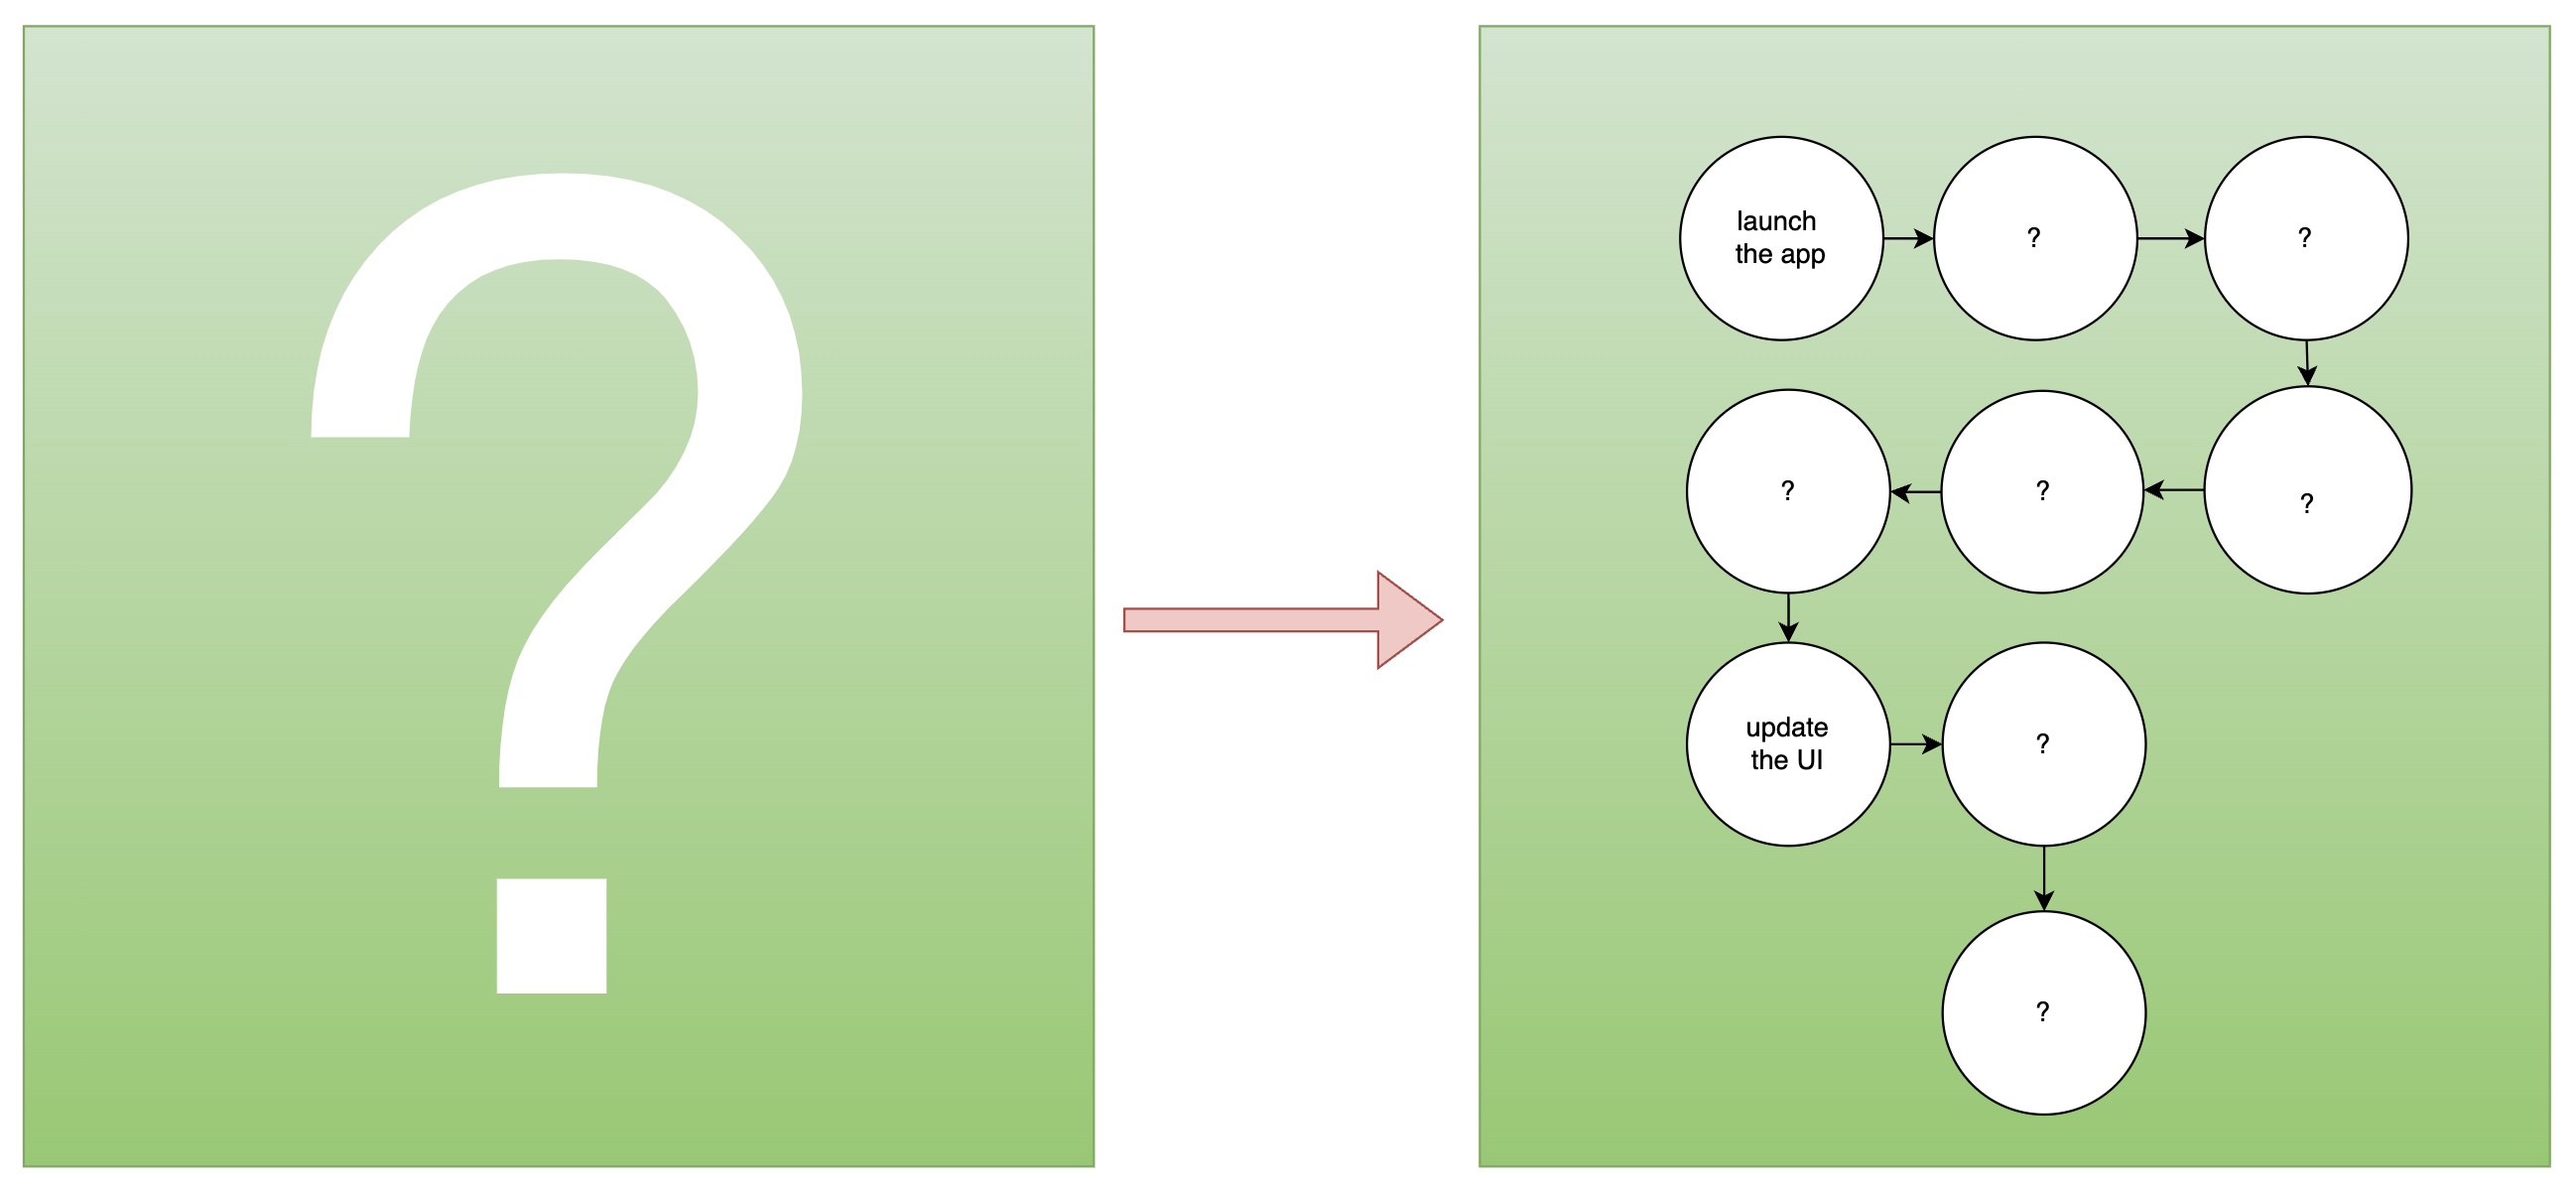
What happens in the app before we update the UI in
viewDidLoad?How the change of UI is applied? How new subview appears on the screen?
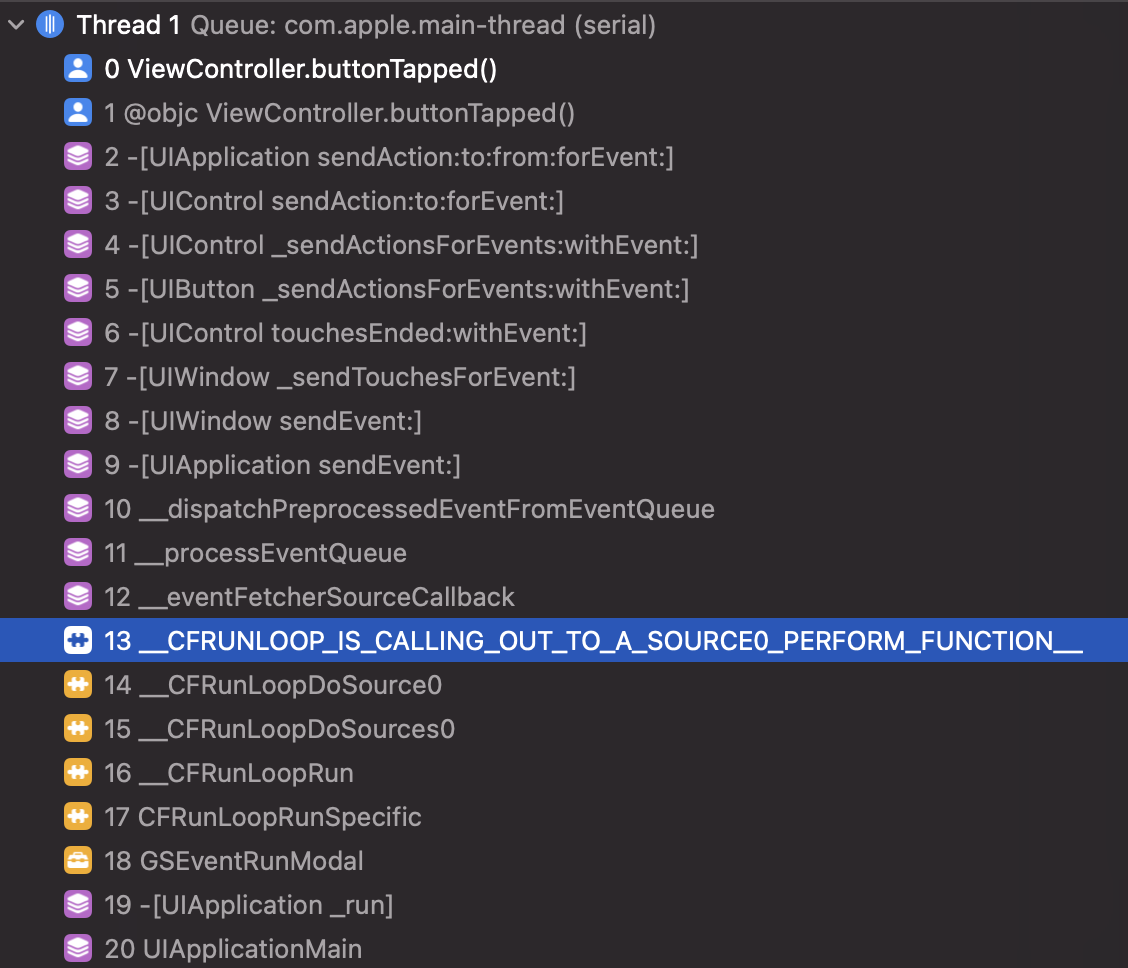
We will go step by step and first of all, let’s start with understanding what happens after we launch the app. Xcode Debugger will be our best friend today. Let’s create empty UIKit Swift project in Xcode and put a break point into viewDidLoad. By default you will see something like this but you can expand the call stack it by tapping on button in the bottom-right side of Debug navigator.
Tap on this button and you will see much more details in the call stack.
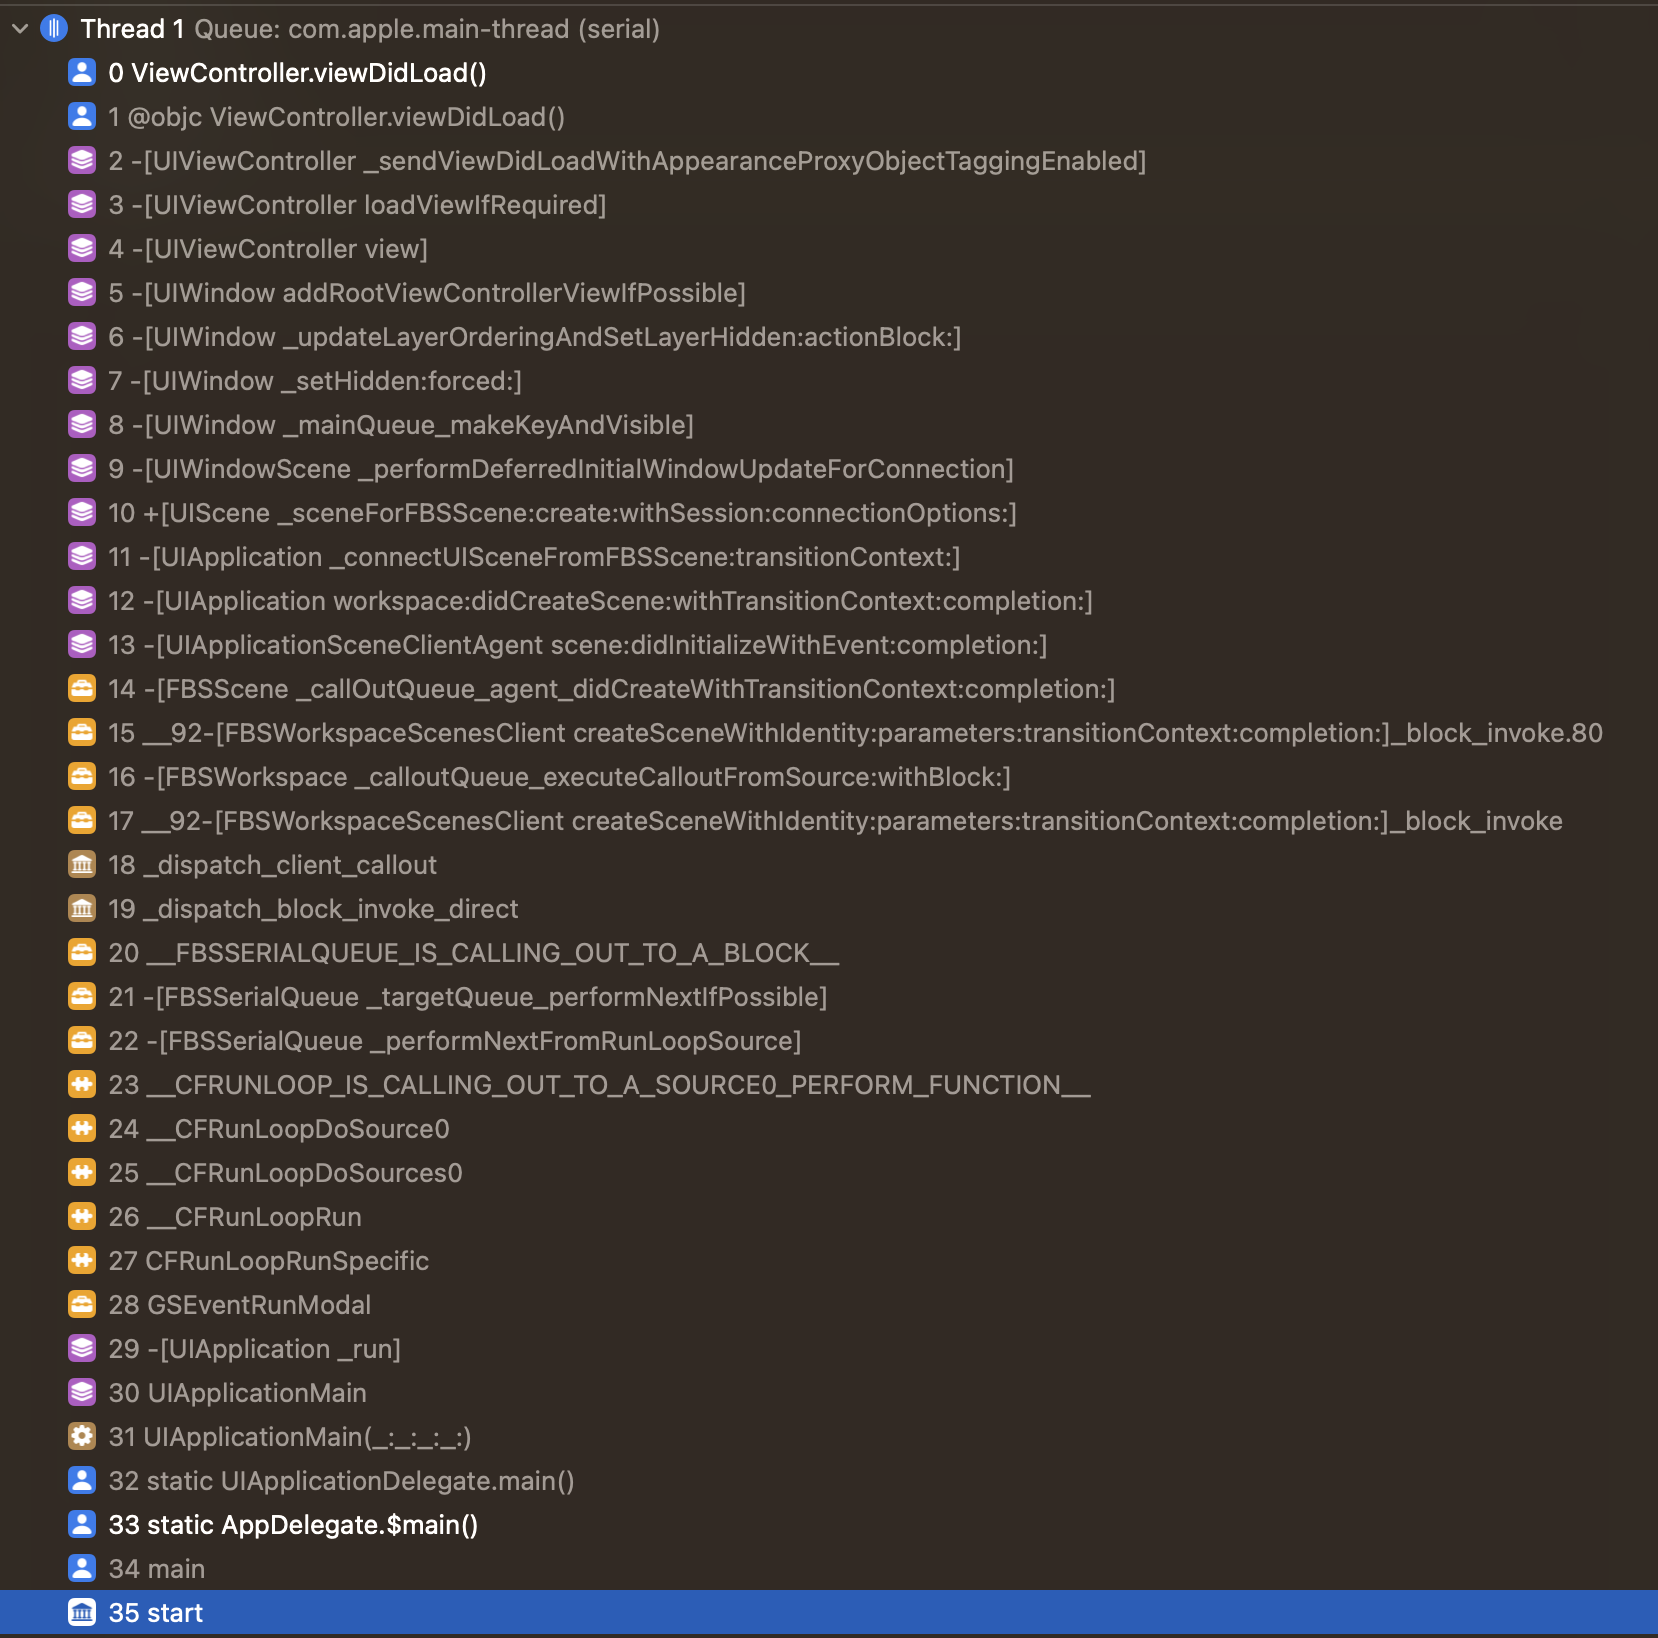
NOTE: Probably obvious and well known fact but we could see here that our UI related code is happening on the main thread. UIKit is not thread-safe, you should work with it on main thread only.
UIApplicationMain
Let’s look on the bottom of the stack on previous screenshot:
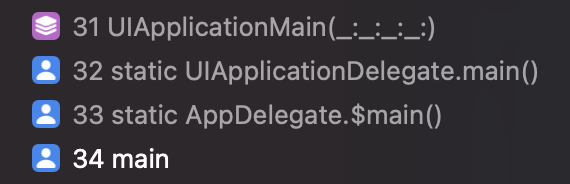
What we see here is the main function. It is called by the operating system's runtime environment when your app launches. The process involves the system initializing your app's environment, setting up the app's main thread, and then calling the main function, which can be considered as an entry point for your app's execution .
For example, if you create an Objective-C (yep you still can) project in Xcode you will see something like this:
int main(int argc, char * argv[]) {
    NSString * appDelegateClassName;
    @autoreleasepool {
        // Setup code that might create autoreleased objects goes here.
        appDelegateClassName = NSStringFromClass([AppDelegate class]);
    }
    return UIApplicationMain(argc, argv, nil, appDelegateClassName);
}
Just imagine, all that happens inside your app, happens inside main function. It’s funny but your entire app is nothing but a single giant call of main function.
But main function itself doesn’t do much. It’s main purpose is to call UIApplicationMain() function.
NOTE: You can read more about
UIApplicationMainhere and here
UIApplicationMain in it’s turn does a lot to setup our iOS app:
creates the UIApplication shared instance and application delegate;
runs the UIApplication that triggers creation of scene, scene delegate and etc;
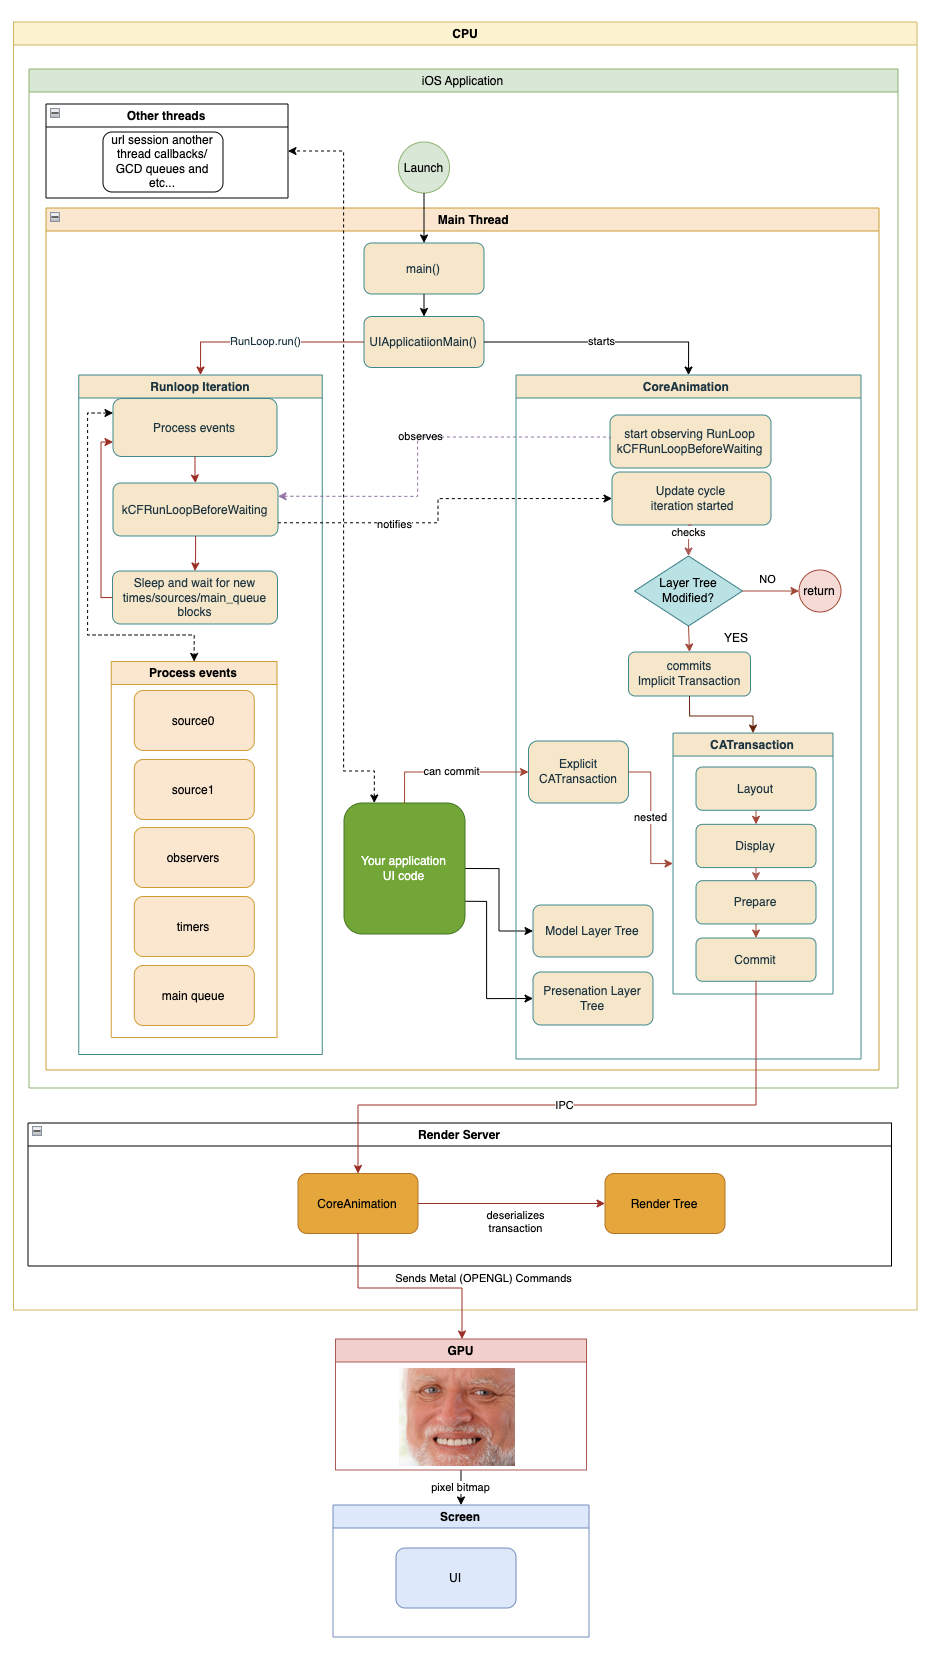
[MOST IMPORTANT FOR US NOW] It runs the main event loop by calling Runloop.run().
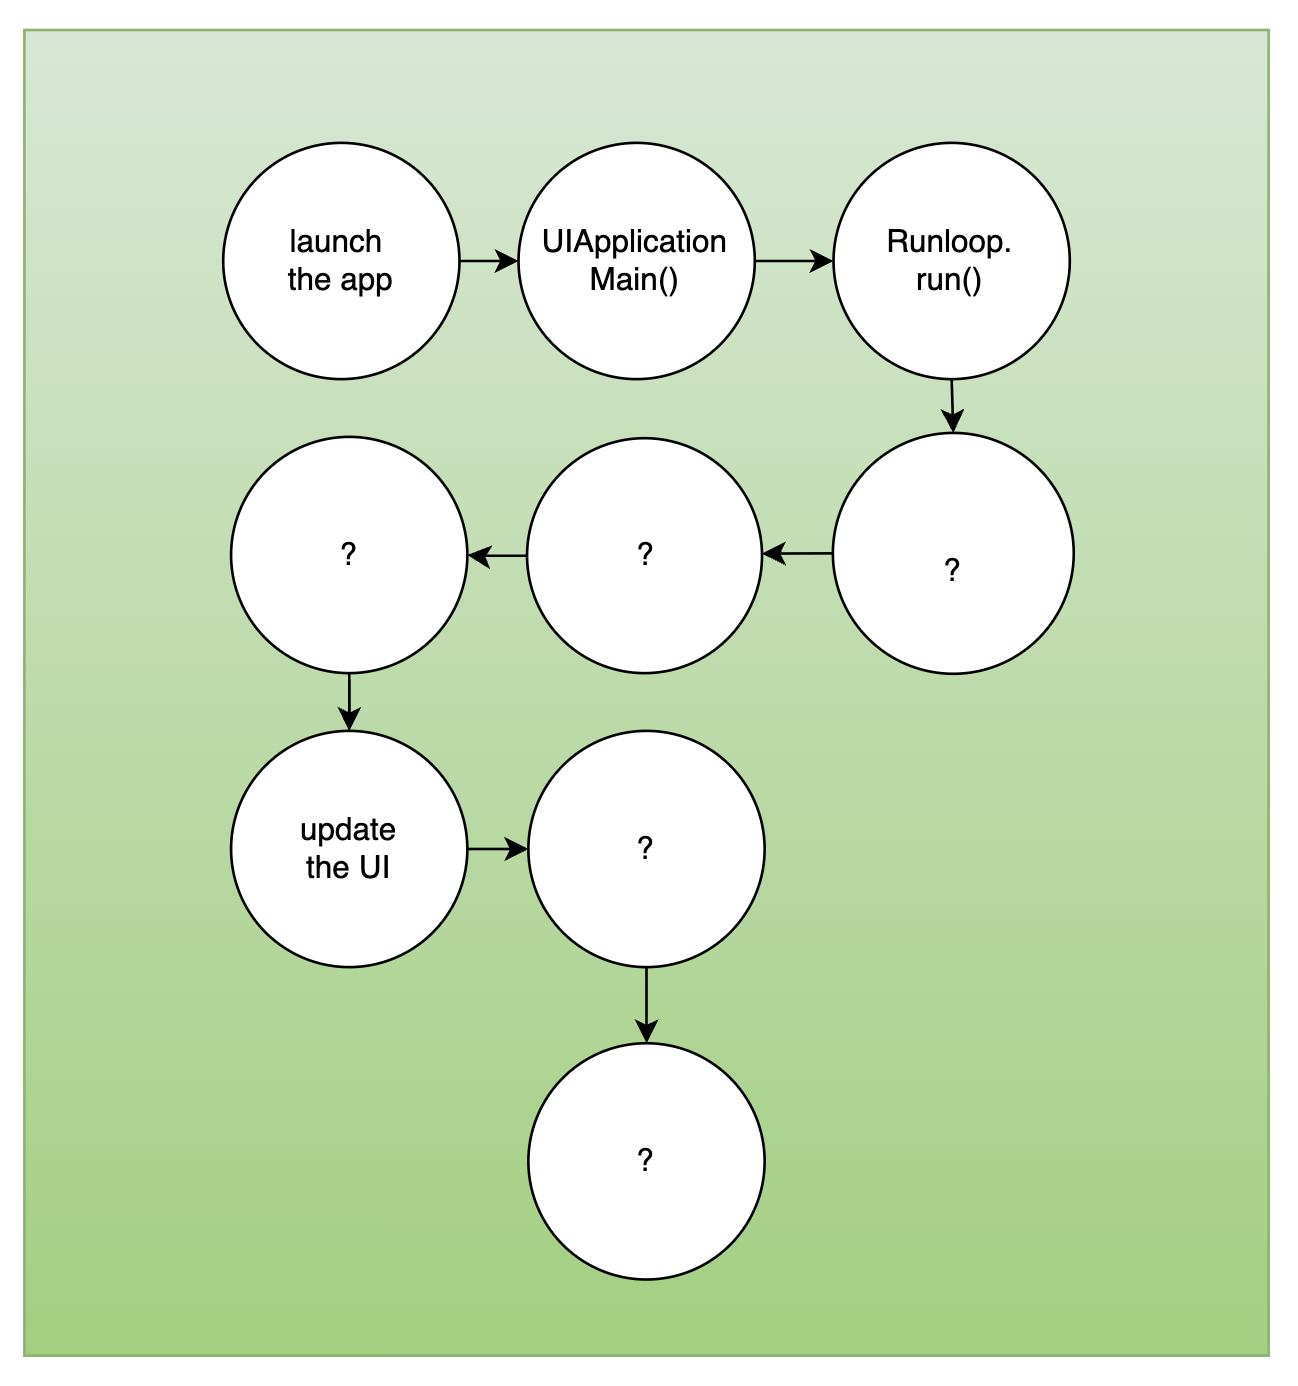
If you haven’t heard about Runloop so far, next chapter is for you.
Runloop

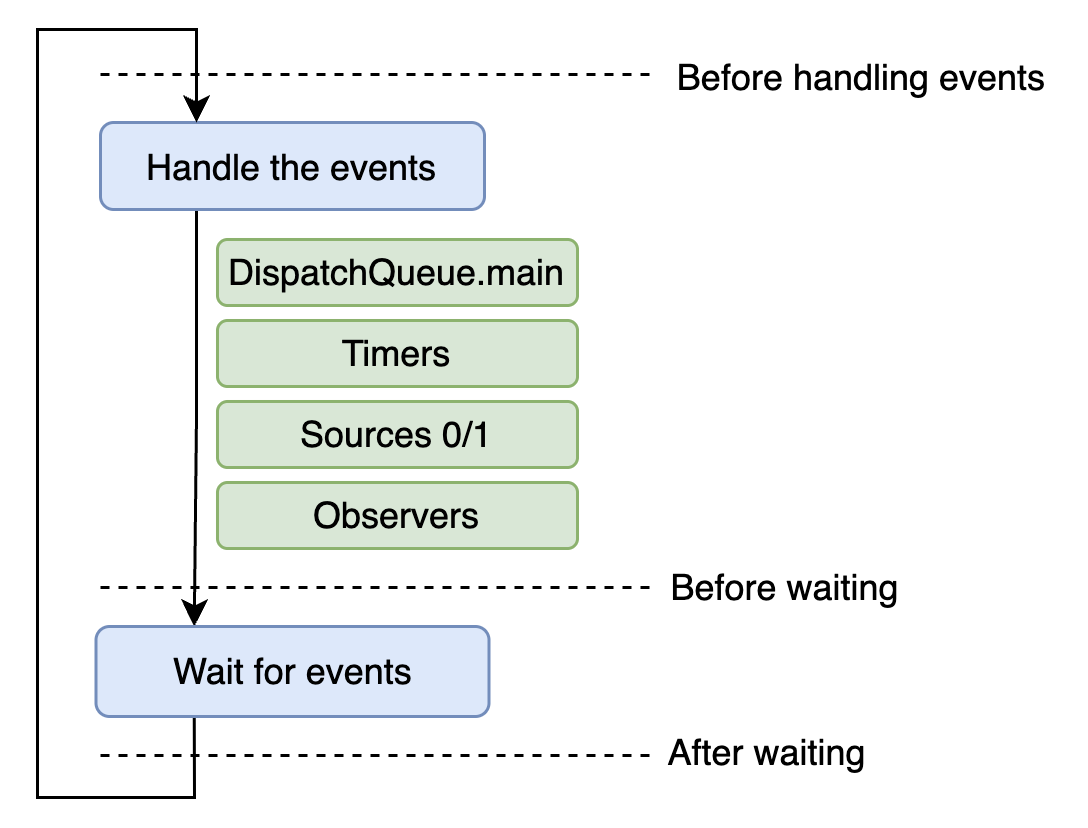
Simply speaking, Runloop is the infinite cycle of events happening in the app.
Runloop is the reason why main() and UIApplicationMain() calls will actually never return.
Every iteration Runloop has three main jobs to do:
Handle the events;
Notify observers about runloop’s state changes;
Put the thread to a sleep when it have nothing to do.
NOTE 1: Similar to many other things in high-level frameworks like UIKit or Foundation, Runloop (aka NSRunloop) is like a Foundation side proxy for CFRunloop (CF stands for Core Foundation), created to hide some interface CFRunloop have like adding event sources, observers or a new runloop mode.
NOTE 2: You can read about the runloop iteration steps more here and here. If needed, you can find the detailed iteration steps directly in code here once Core Foundation is open-source.
NOTE 3: The Runloop is associated with a thread, with only one runloop linked to each thread. It automatically runs on the main thread from the app's start, but for other threads, you must explicitly run it.
NOTE 4: CFRunloop is thread-safe, but Runloop (NSRunloop) is not.
NOTE 5: You might be wondering how many runloop iterations occur per second. However, this question isn't correct to ask. The run loop frequency isn't fixed and isn't bound to the screen refresh rate either. The run loop frequency and the screen refresh rate operate independently. (Usually, run loop frequency surpasses potential screen refresh rates unless the main thread is blocked)
Runloop events
Runloop handles several different event types:
Blocks of GCD main queue
Timers
Sources (0 and 1)
Observers
If you place a breakpoint at nearly any line of code in your app, you'll likely encounter one of the functions listed below in the bottom of the call stack. These functions serve no purpose other than helping in debugging within the stack trace. RunLoop ensures that all main thread code is executed through one of these functions. They also allow you to understand the exact type of event processed by the runloop that triggered the execution of the code where you've set a breakpoint.
static void __CFRUNLOOP_IS_SERVICING_THE_MAIN_DISPATCH_QUEUE__();
static void __CFRUNLOOP_IS_CALLING_OUT_TO_A_BLOCK__();
static void __CFRUNLOOP_IS_CALLING_OUT_TO_A_TIMER_CALLBACK_FUNCTION__();
static void __CFRUNLOOP_IS_CALLING_OUT_TO_A_SOURCE0_PERFORM_FUNCTION__();
static void __CFRUNLOOP_IS_CALLING_OUT_TO_A_SOURCE1_PERFORM_FUNCTION__();
static void __CFRUNLOOP_IS_CALLING_OUT_TO_AN_OBSERVER_CALLBACK_FUNCTION__();
Main queue block or timer events are usually clear to developers who have ever created timer or used GCD main queue. Conversely, sources and observers hold more mystery regarding their usage and purpose. Let’s shed a light on them next.
Runloop Sources
Simply speaking, runloop source is just a way to say to runloop that some event happened at some other point of the app or even in the different process and runloop should handle this event by calling related callback. Sources allow the run loop to be aware of external events and handle them appropriately.
As you probably noticed there are 2 type of sources - source0 and source1. Not really a clear naming in terms of purpose, right? They named so because the version field of their context is 0 or 1.
But they serve different goals:
Version 0 sources are for inner-app communication;
Version 1 sources are for inter-process communication (IPC).
Version 0 sources (inner-app communication)
They managed by the application (kind of inner-app messaging mechanism). When a source is ready to fire, some other part of the application, perhaps code on a separate thread, must call CFRunLoopSourceSignal function to tell the run loop that the source is ready to fire so the related callback must be called. RunLoop must be awaken (with CFRunLoopWakeUp()) for the source to be handled.
Examples of version 0 sources are:
performSelector(onMainThread:with:waitUntilDone:) of NSObject
UIKit’s touch events fetching. If you put a break point into UIButton tap selector you will notice that UIEvent that triggered this action was fetched using version 0 source.
Version 1 sources (inter-process communication - IPC)
Version 1 sources managed by the kernel. These sources are automatically signaled by the kernel when a message arrives on the source’s Mach port. Mach ports are primarily a mechanism for inter-process communication (IPC) within the macOS and iOS operating systems. They allow processes (and our app is one of them) to send messages and data between each other.
CADisplayLink which can be used to synchronize your code to the display refresh rate, uses a type 1 source under the hood.
let displayLink = CADisplayLink(target: self, selector: #selector(update))
displayLink.add(to: .current, forMode: .common)

@objc func update() {
    print("Updating!")
}
CFMachPortis another example of version 1 source.Even though mach ports are not used directly for network communication, they may be used internally by the operating system or by networking components to facilitate communication between processes, which can indirectly impact network-related functionality.
NOTE: You can also create custom sources for both versions 0 and 1 if needed.
Run Loop Observers
We already know from runloop iteration discussion that runloop has observers it needs to notify when runloop’s state has changed.
The CFRunLoopObserver API lets you observe the behavior of CFRunLoop and be notified of its activity: when it processes events, when it goes to sleep, etc.
You can associate run loop observers with the following CFRunLoopActivity events in your run loop:
The entrance to the run loop. (
kCFRunLoopEntry)When the run loop is about to process a timer. (
kCFRunLoopBeforeTimers)When the run loop is about to process an input source.(
kCFRunLoopBeforeSources)When the run loop is about to go to sleep. (
kCFRunLoopBeforeWaiting)When the run loop has woken up, but before it has processed the event that woke it up. (
kCFRunLoopAfterWaiting)The exit from the run loop. (
kCFRunLoopExit)
You probably won’t ever need to create runloop observers in your app, but being aware of the existence and purpose of runloop observers can be useful for understanding how UIKit operates. But before we will try to understand connection between runloop observers and UIKit, we need to understand what is hidden behind the UIKit.
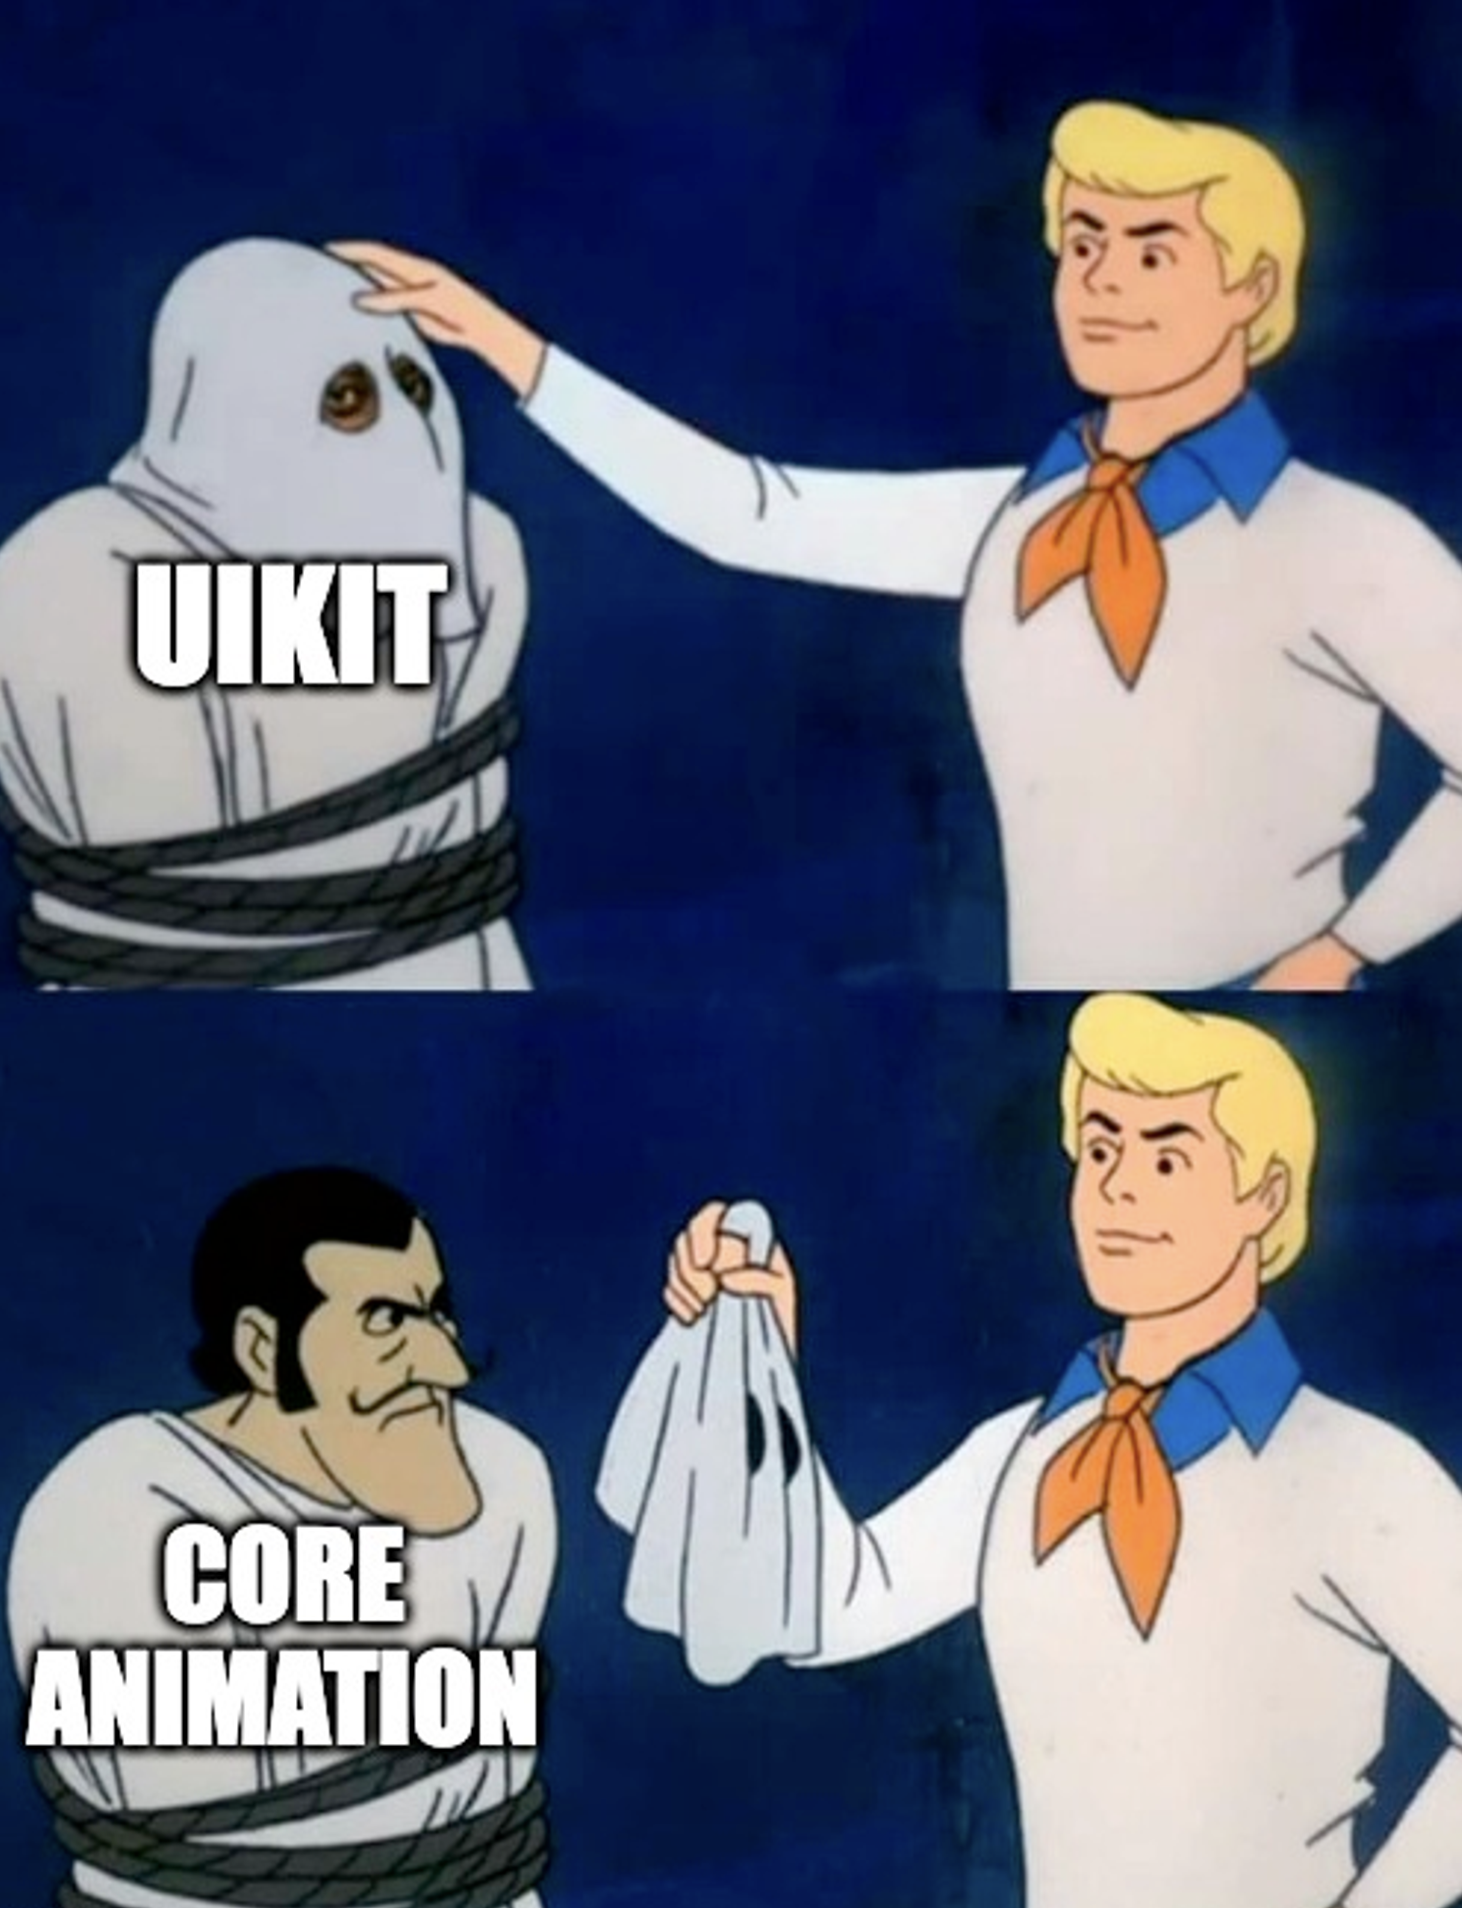
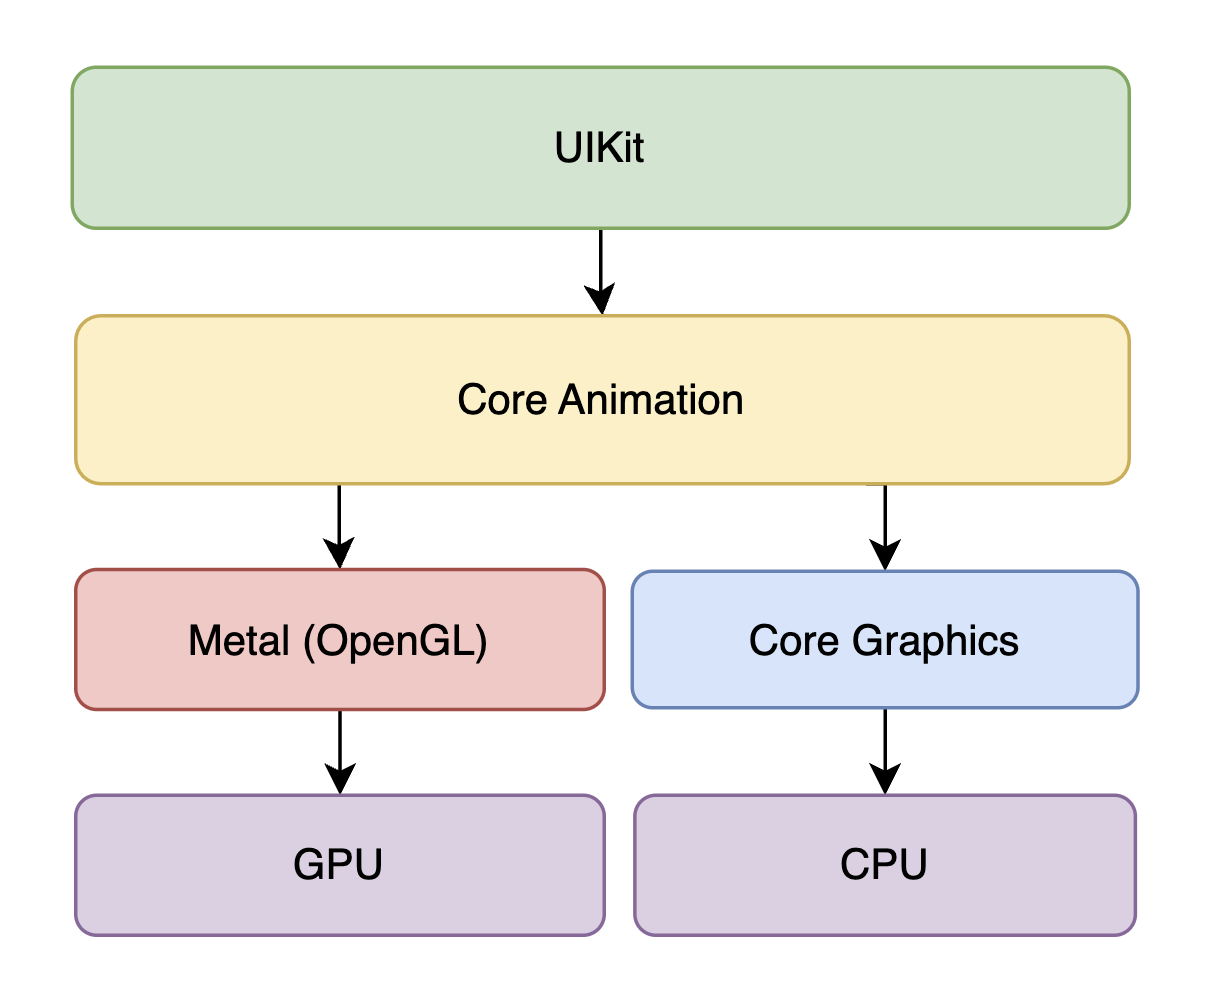
Under the hood of UIKit lies a lower-level framework called Core Animation, responsible for numerous aspects of UI, animations and rendering. Let’s look on CoreAnimation more closely now.
CoreAnimation
UIKit is a well known framework from Apple. We use it every day to create UI in our apps. UIKit contains all kinds of components. But surprisingly, UIKit delegates a significant portion of UI-related tasks such as animations, layout, and rendering to Core Animation under the hood.
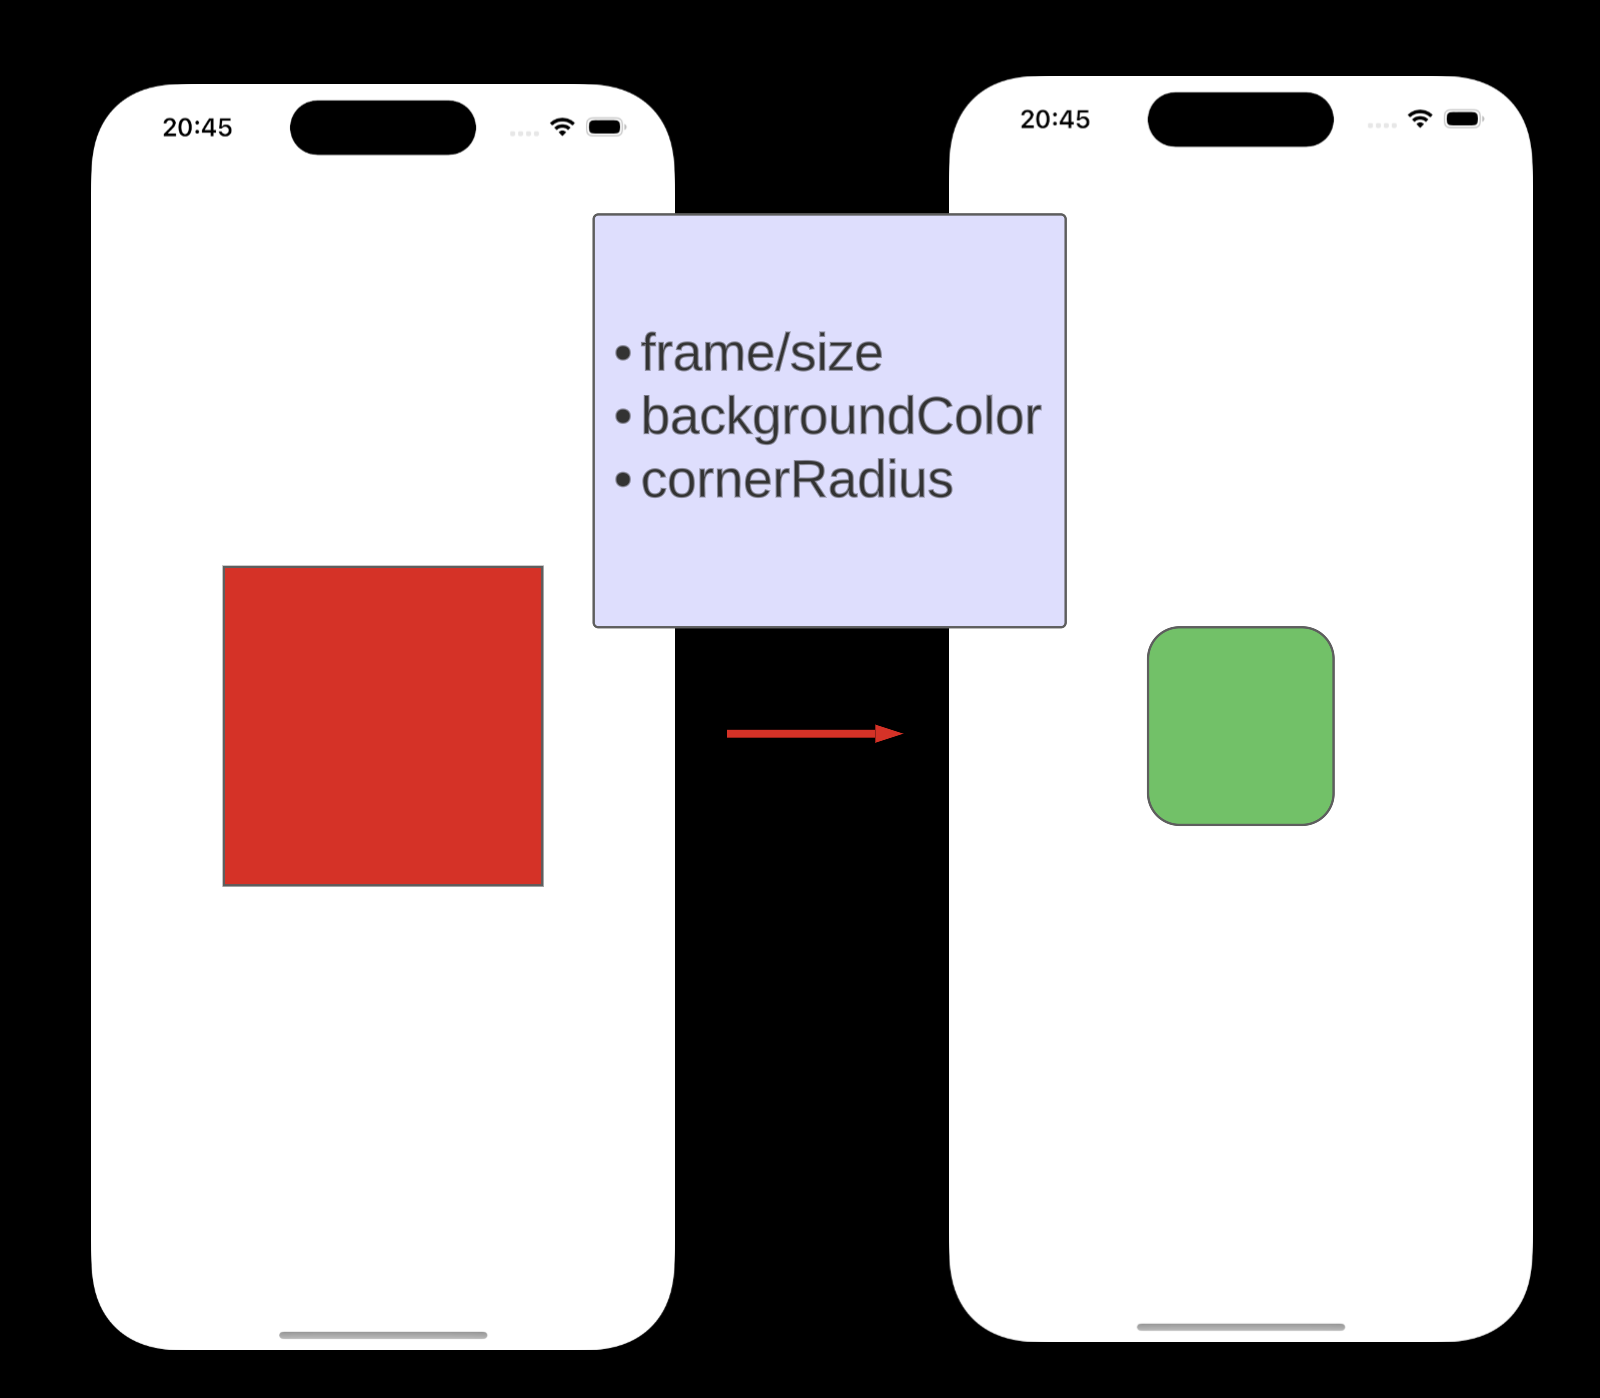
Behind every UIView hides CALayer. When UIView is created it creates CALayer under the hood and sets itself as a CALayerDelegate which is responsible for several things such as providing the layer's content, subviews layout and animating property changes. For example, UIView is actually the reason why UIView properties are not animatable by default (opposite to CALayer), UIView disabled default animations as a CALayerDelegate to it’s layer. Properties and methods of UIView that somehow change the view appearance are actually just proxied properties of CALayer. For example, frame, bounds, backgroundColor or isHidden are actually proxied properties of CALayer.
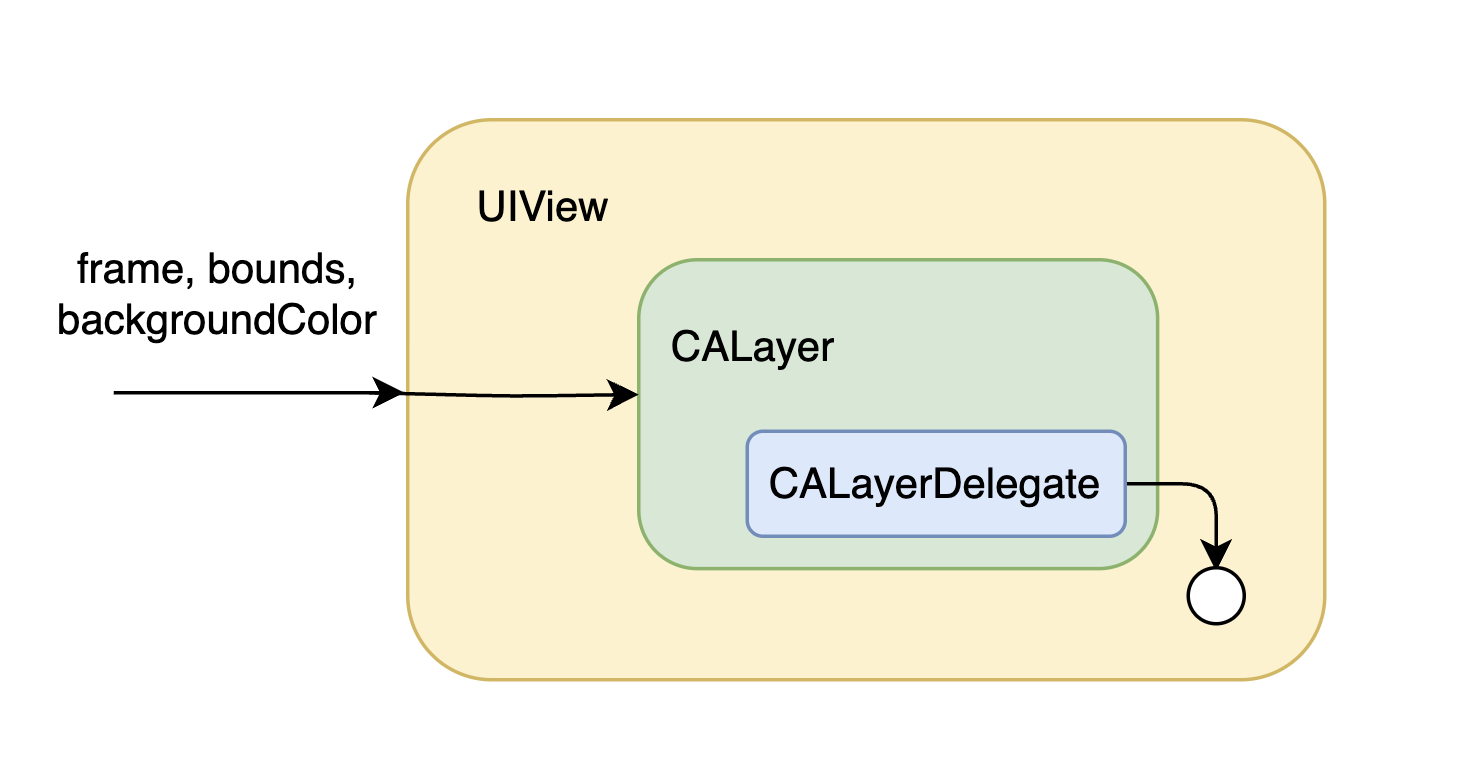
NOTE: The several things that truly handled by UIKit are user interaction (like touches and gestures) and accessibility.
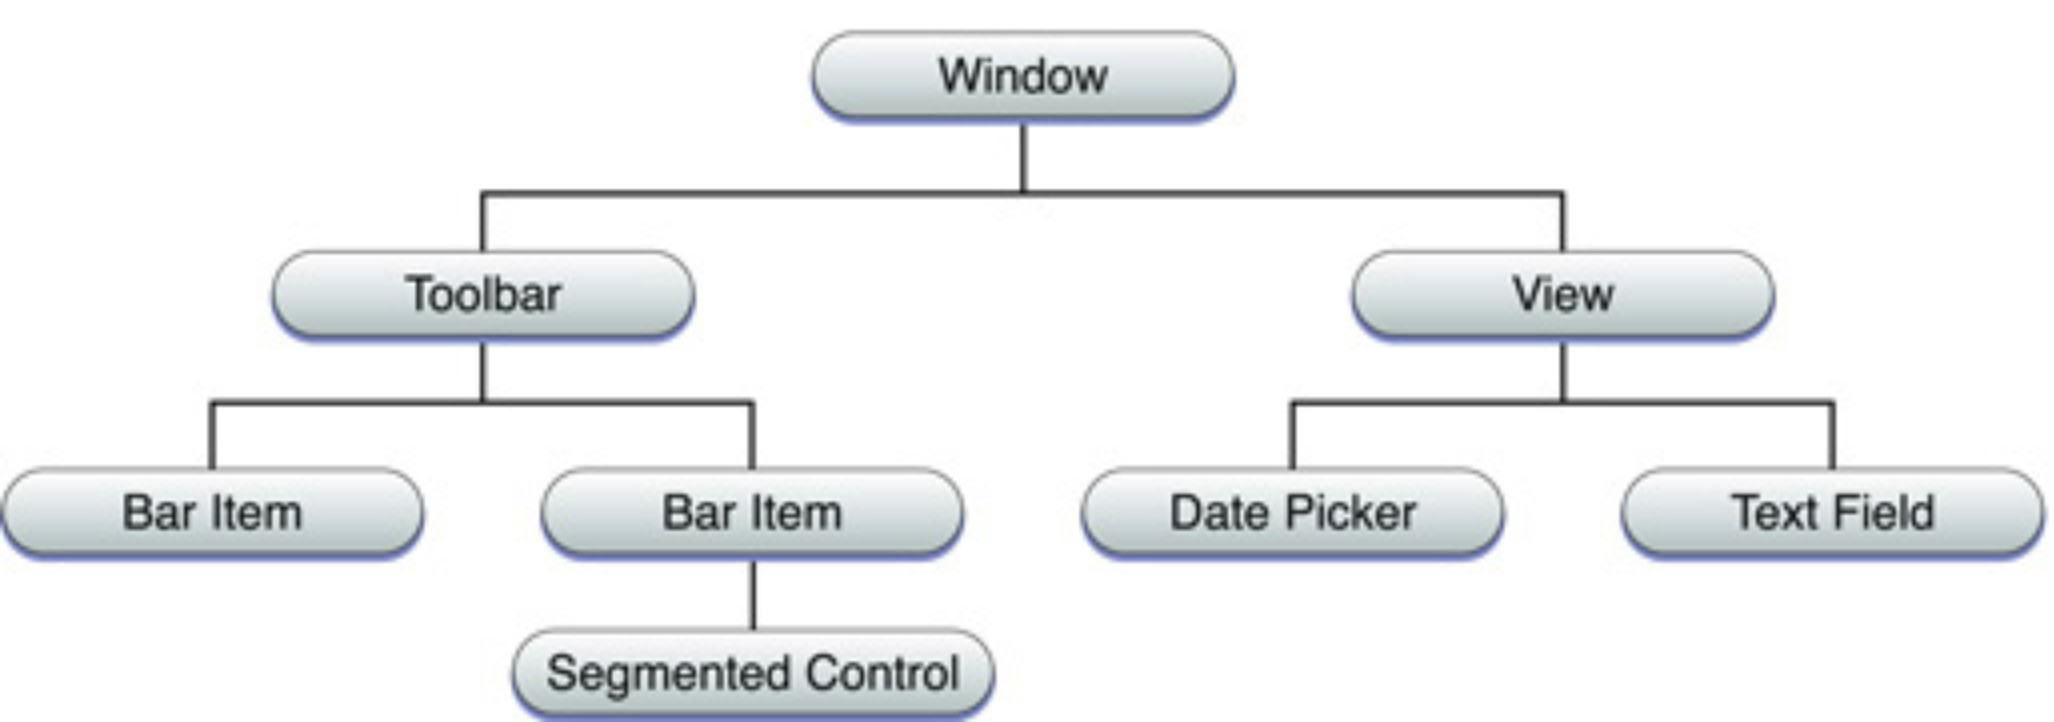
Views on the screen together create the view hierarchy or view tree.
Similarly, CALayers form the layer hierarchy in parallel with views, so behind the view tree, there exists a layer tree. In fact, Core Animation handles not only one layer tree but three of them:
Model layer tree;
Presentation layer tree;
Render layer tree (not accessible from the app).
You can access model tree and presentation nodes by using model() and presentation() methods of CALayer.
Each layer tree has a different role in making the content of your app appear onscreen:
Model layer tree (or simply “layer tree”) is the one your app interacts with the most. The objects in this tree are the model objects that store the target (final state) values for any animations. Whenever you change the property of a layer, you use one of these objects.
Presentation tree contains the in-flight values for any running animations. Whereas the layer tree objects contain the target values for an animation, the objects in the presentation tree reflect the current values as they appear onscreen. You should never modify the objects in this tree. Instead, you use these objects to read current animation values, perhaps to create a new animation based at those values. You should access objects in the presentation tree only while an animation is in flight. While an animation is in progress, the presentation tree contains the layer values as they appear onscreen at that instant. This behavior differs from the model layer tree, which always reflects the last value set by your code and is equivalent to the final state of the animation.
Render tree perform the actual animations and are private to Core Animation (not accessible from the app). It is the closest layer tree to the actual screen state.
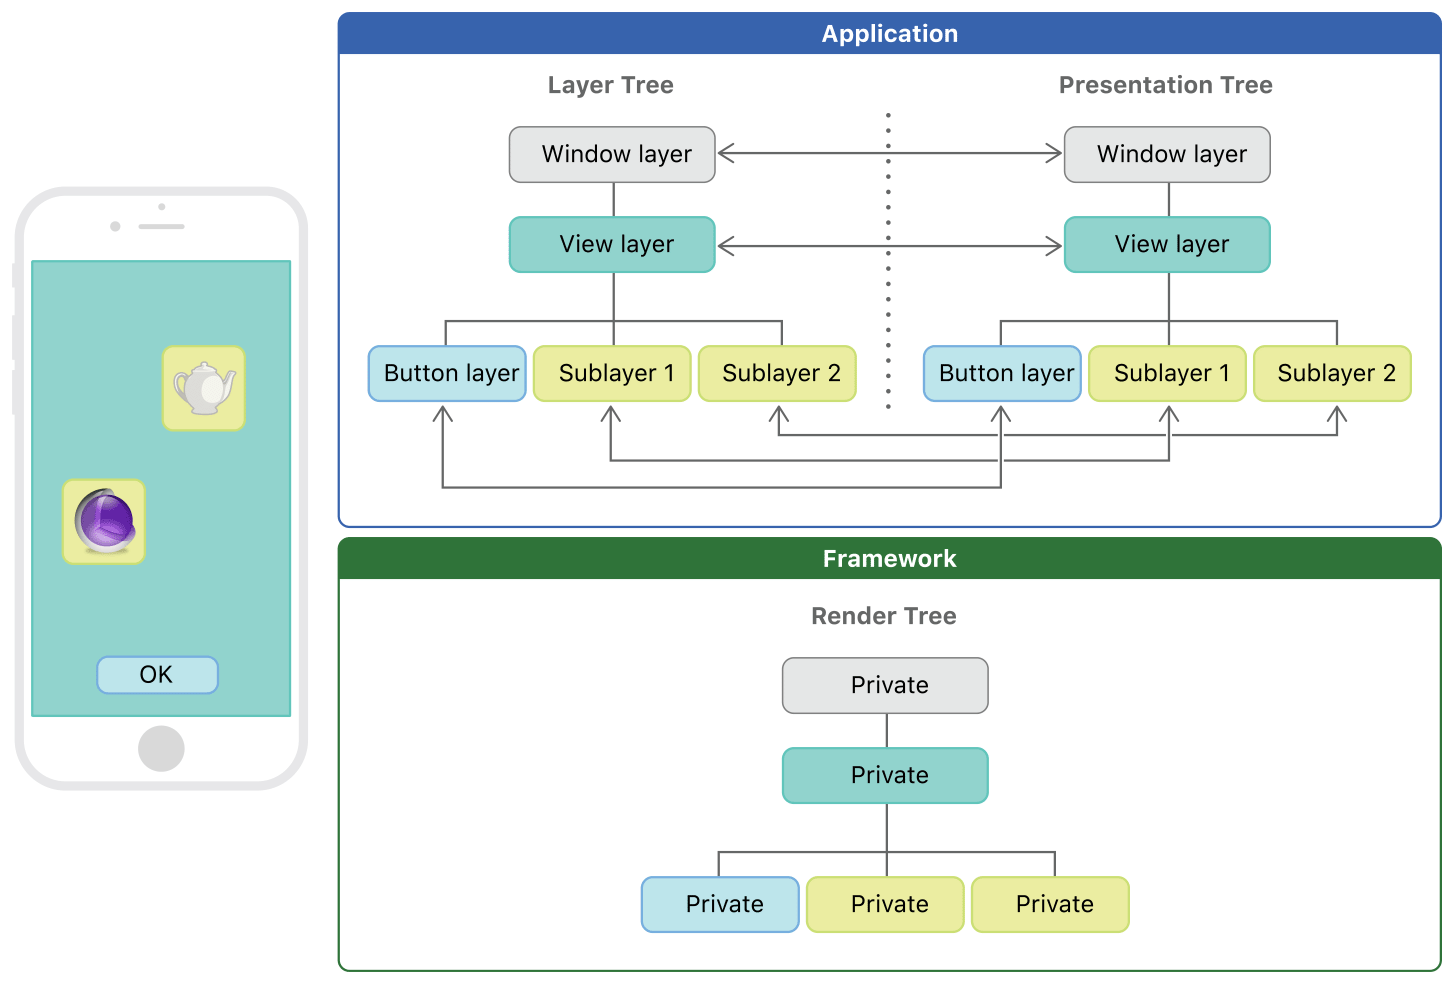
REMEMBER: The presentation layer is not the original layer, just a temporary ‘ghost‘ layer. It is approximated state of render tree layer. Can be useful to use its current values to create new animations or to interact with layers while an animation is taking place.
NOTE: The initial structure of each tree matches the structure of the view hierarchy exactly. However, the app can add additional layer objects (layers not associated with a view) into the layer hierarchy if needed.
Ok, now we know that view we have 3 layer trees behind view tree but once the render tree is the closest tree to the screen state how changes of the model layer tree are actually applied to the render tree?
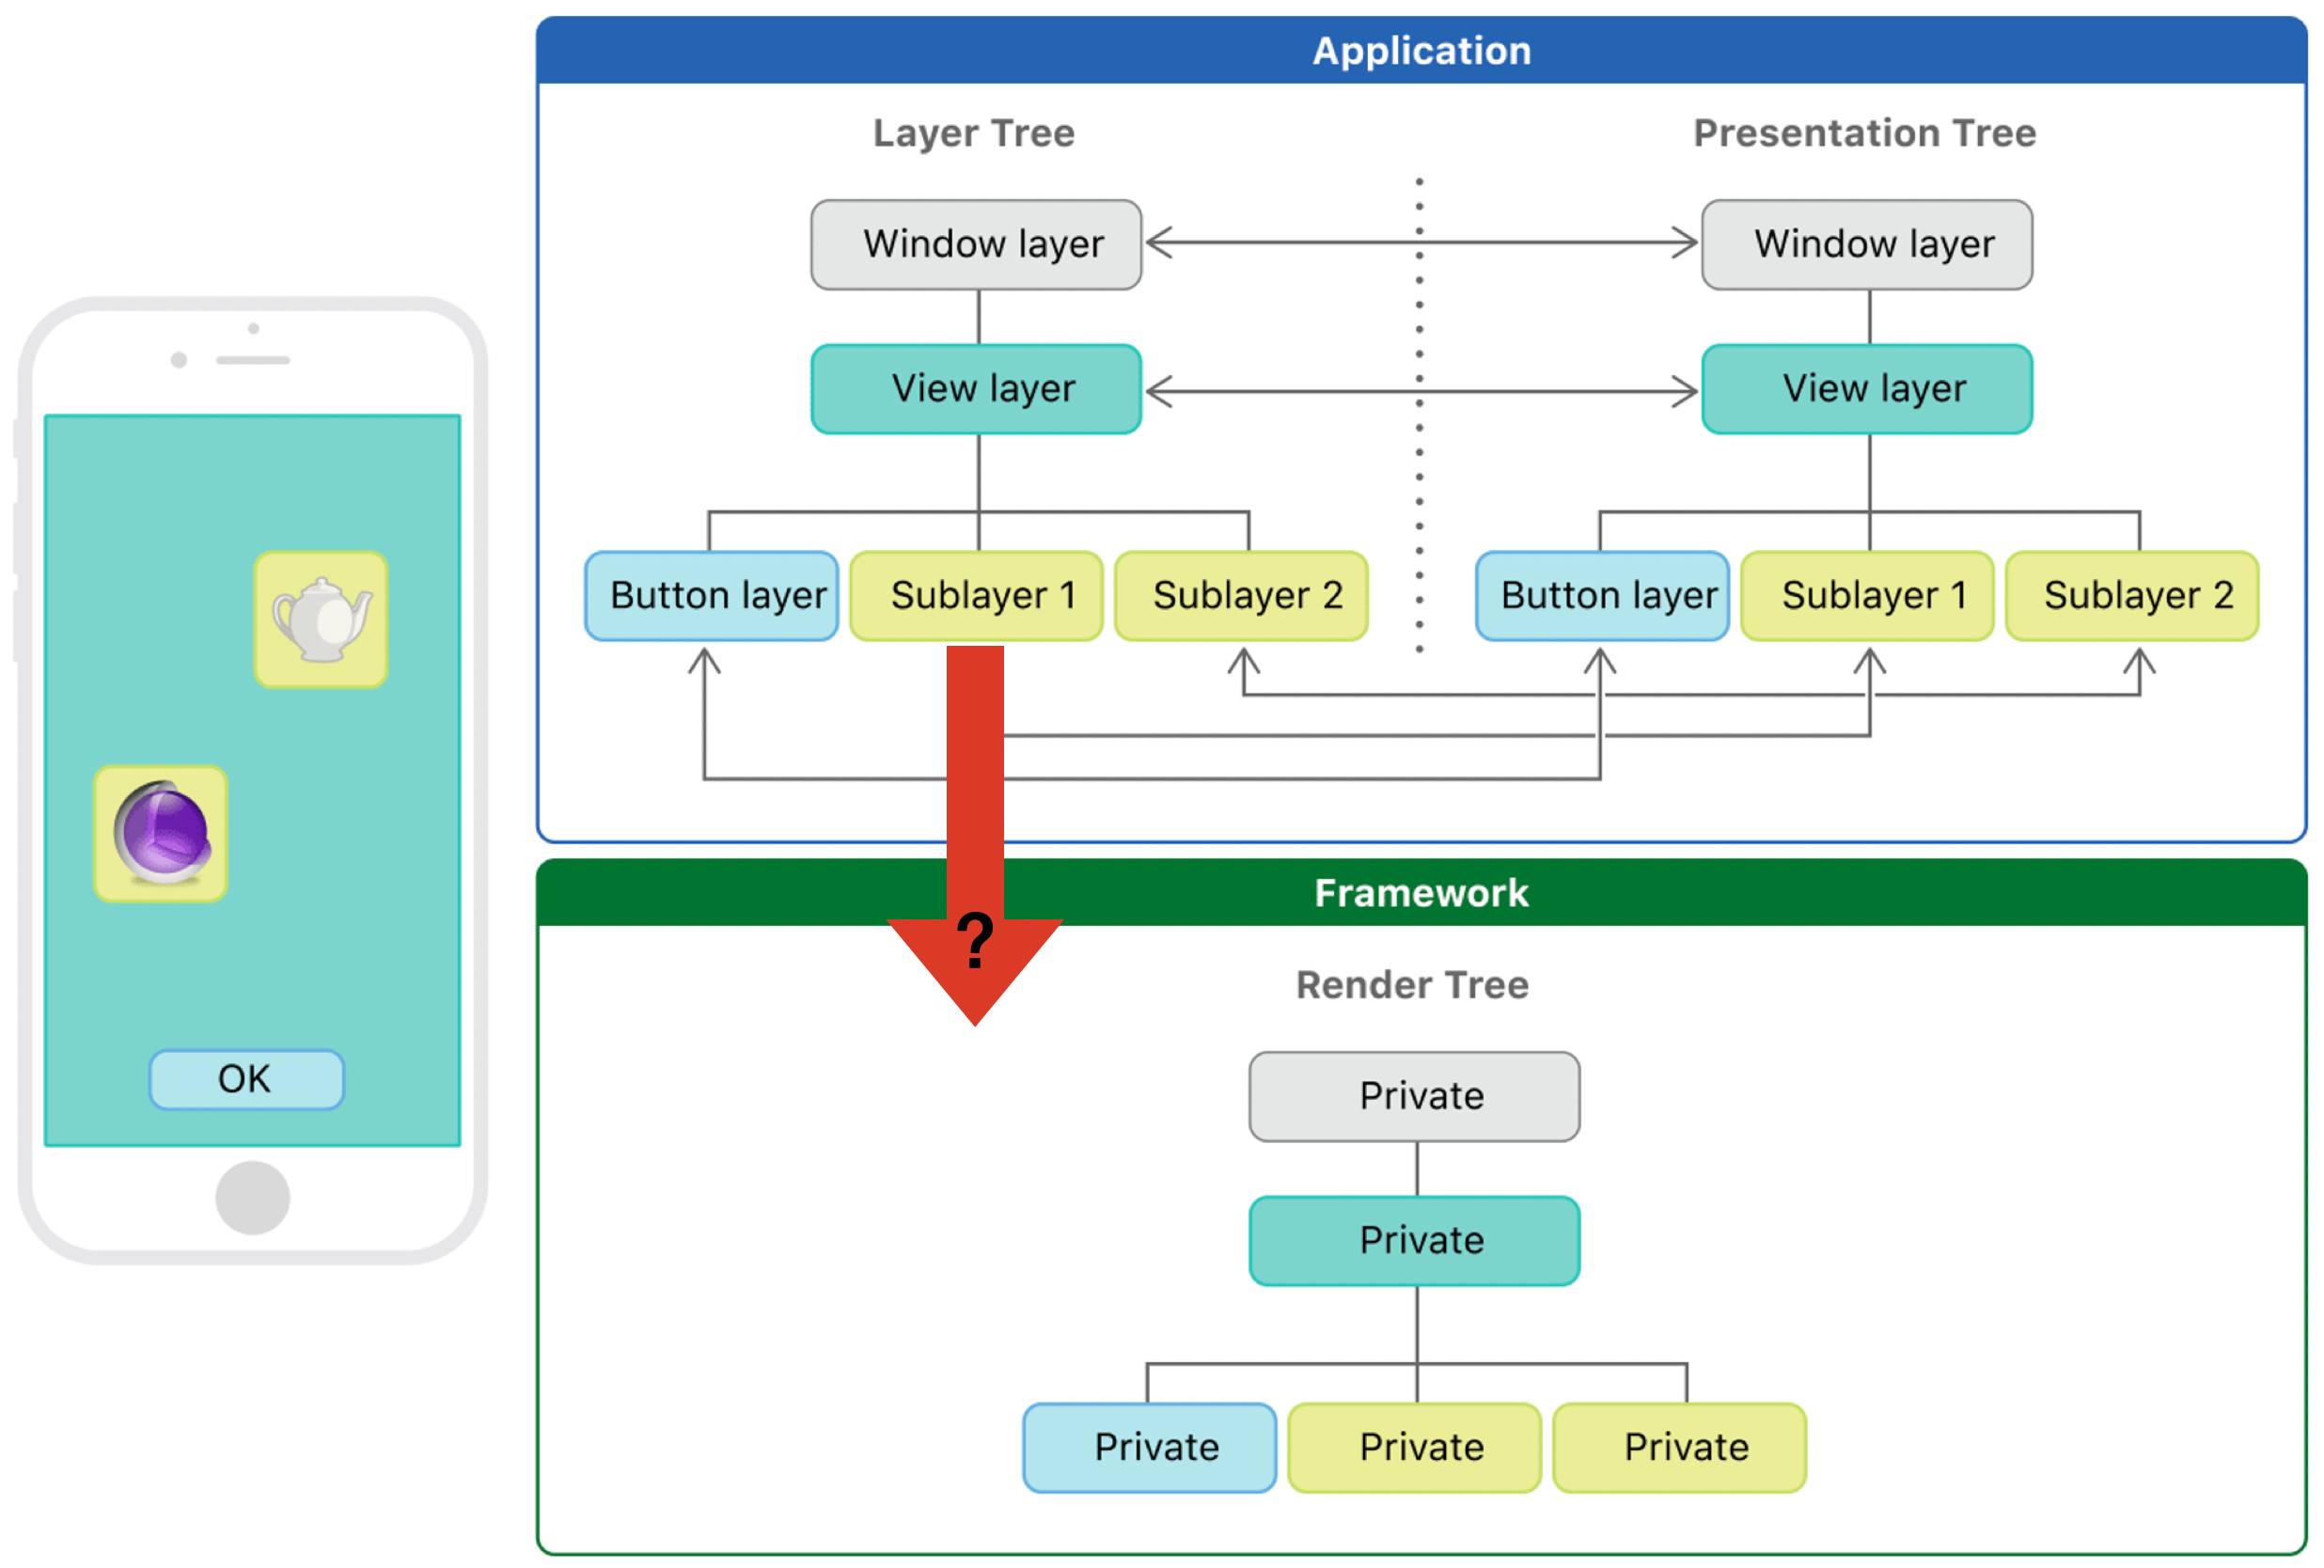
Important to understand that UI changes are not applied to be updated on screen every time something is changed. CoreAnimation groups changes to the layer tree into CATransaction - a mechanism for grouping multiple layer-tree operations into atomic updates to the render tree.
CATransaction
When we want to modify a layer and there are several properties that require changes, applying these changes one by one wouldn't be efficient due to optimization reasons. Even if we modify a property multiple times consecutively, Core Animation consolidates these updates into a single transaction update sent to the render tree.
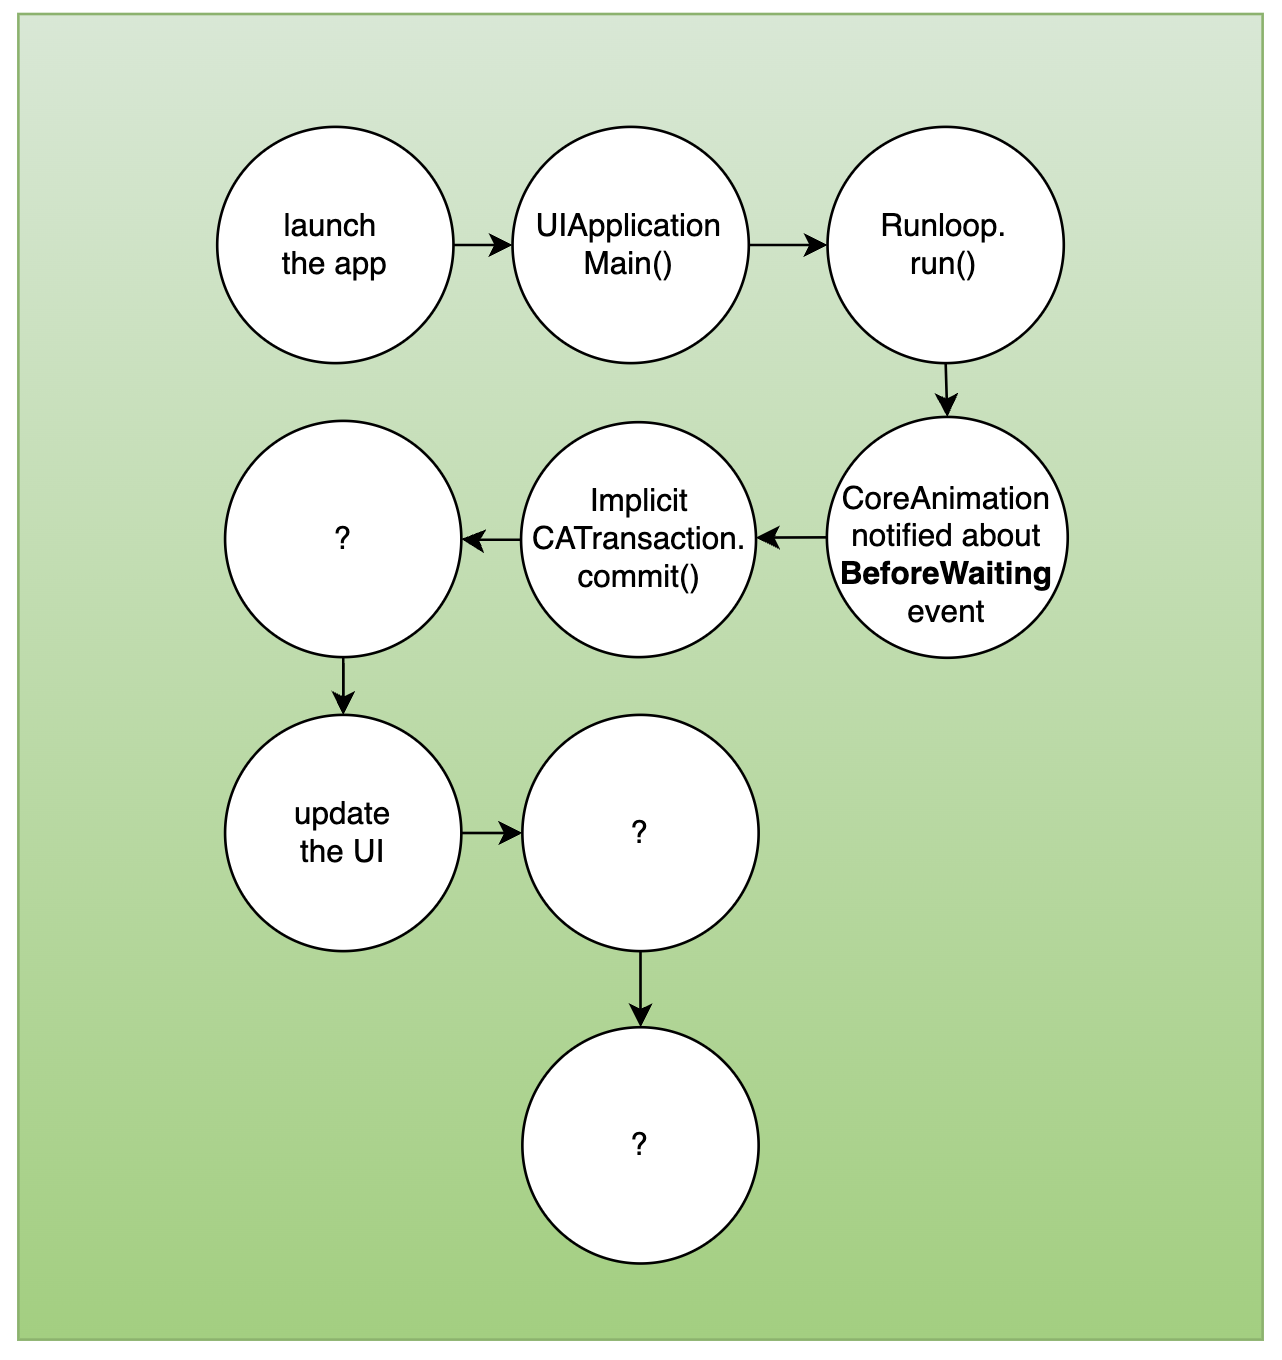
But when and where exactly is this CATransaction happening? Do you remember I mentioned the connection between UIKit and Runloop observers? Well, it’s actually a connection between CoreAnimation and Runloop observers. The thing is that Core Animation observes the CFRunLoopActivity.kCFRunLoopBeforeWaiting event; when this event fires at the end of every runloop iteration, if any changes happened to model layer tree (like bounds changed or animations added), CoreAnimation groups a bunch of changes into single transaction (called implicitCATransaction ) and commits it to be applied to the render tree altogether at once. Implicit transaction is created only if there were changes to model layer tree.
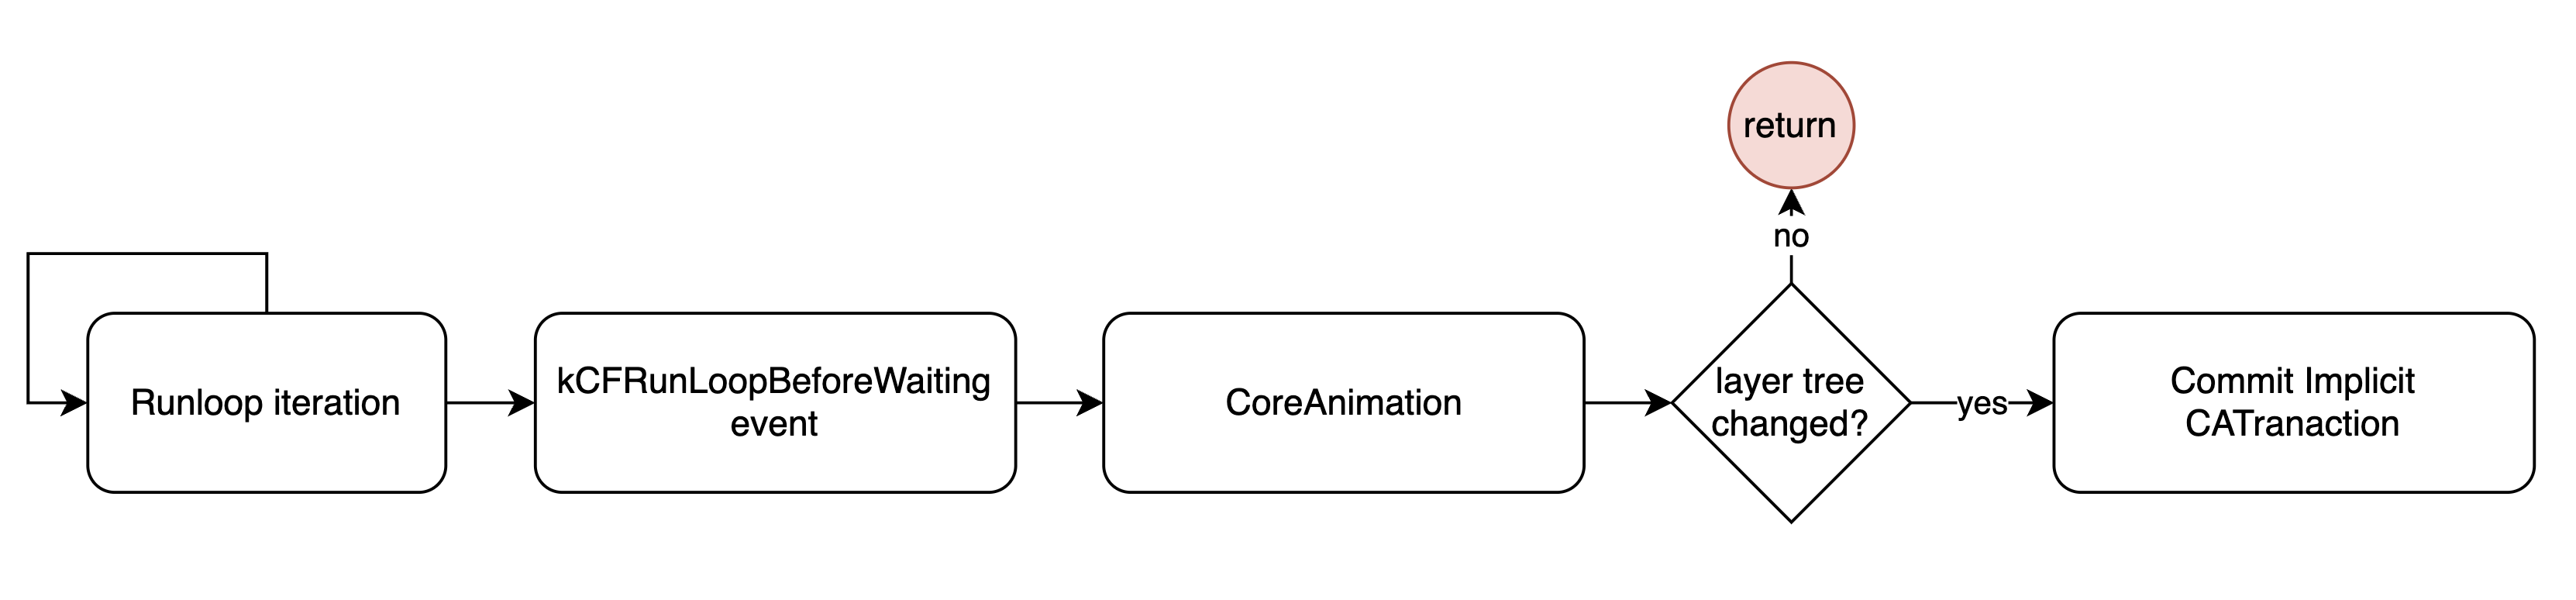
If you put a breakpoint into layoutSubviews() method of your view, you will see that it is called from runloop observer callback function by discovering corresponding function on the call stack: __CFRUNLOOP_IS_CALLING_OUT_TO_AN_OBSERVER_CALLBACK_FUNCTION__();
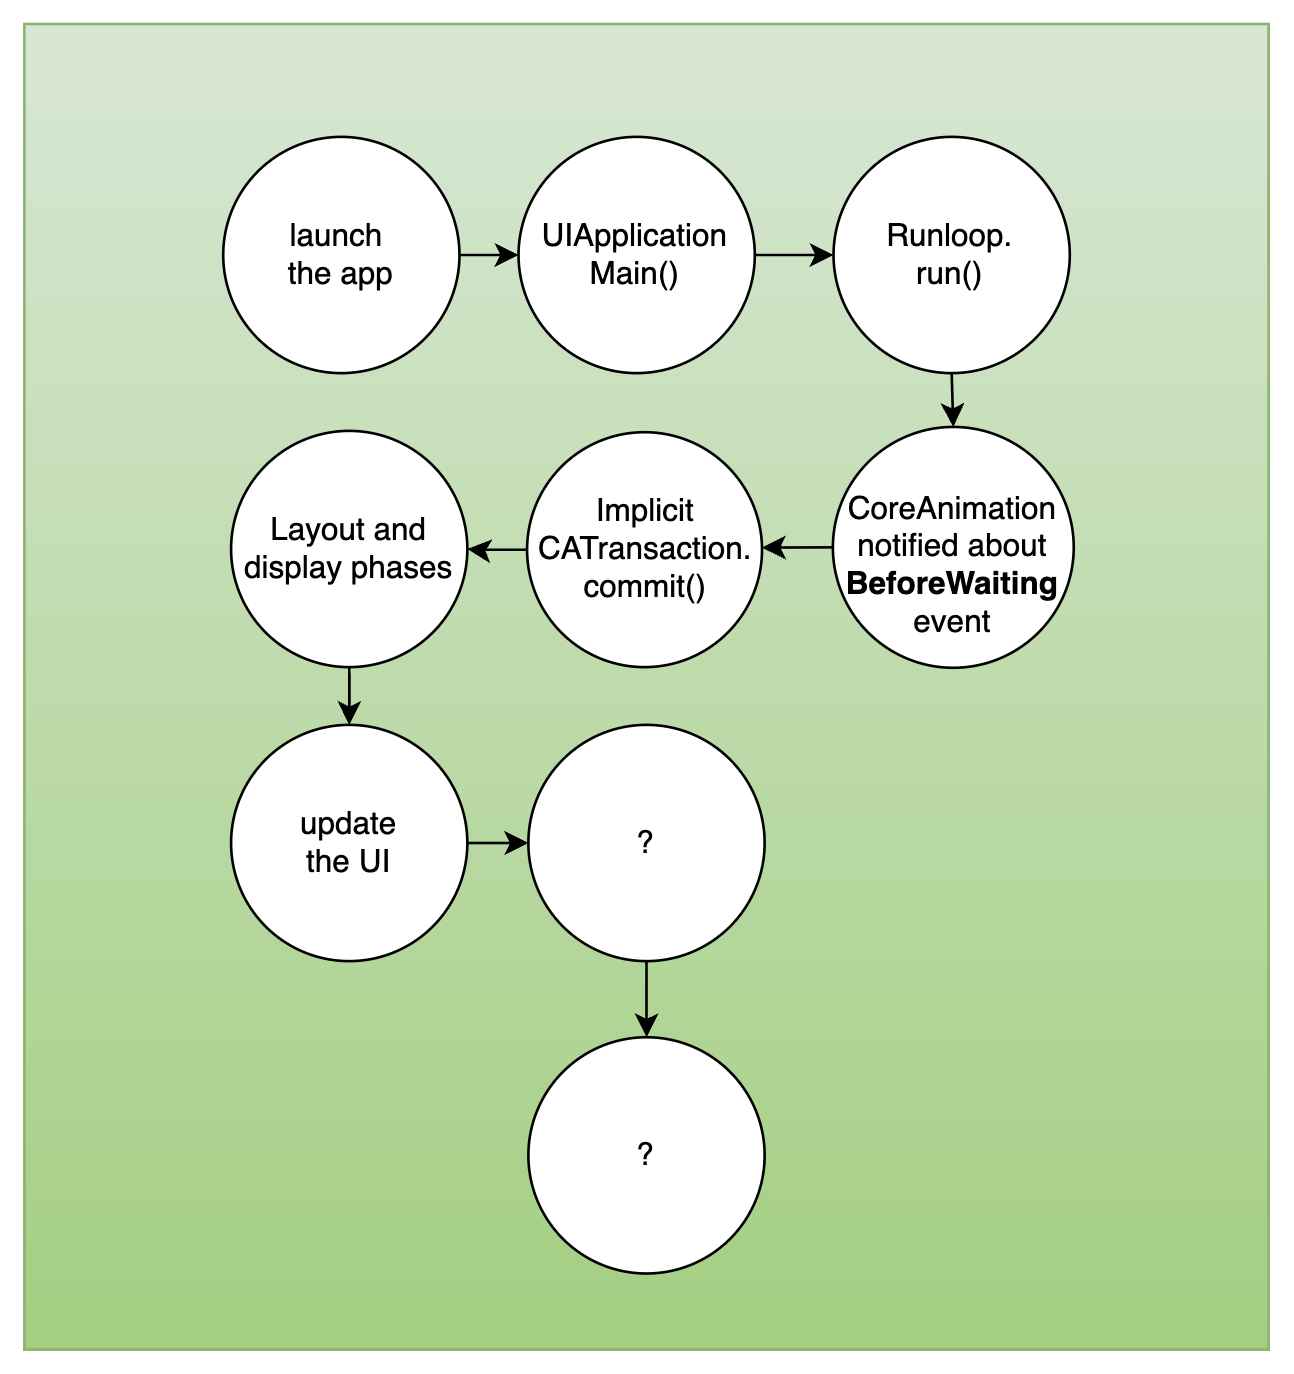
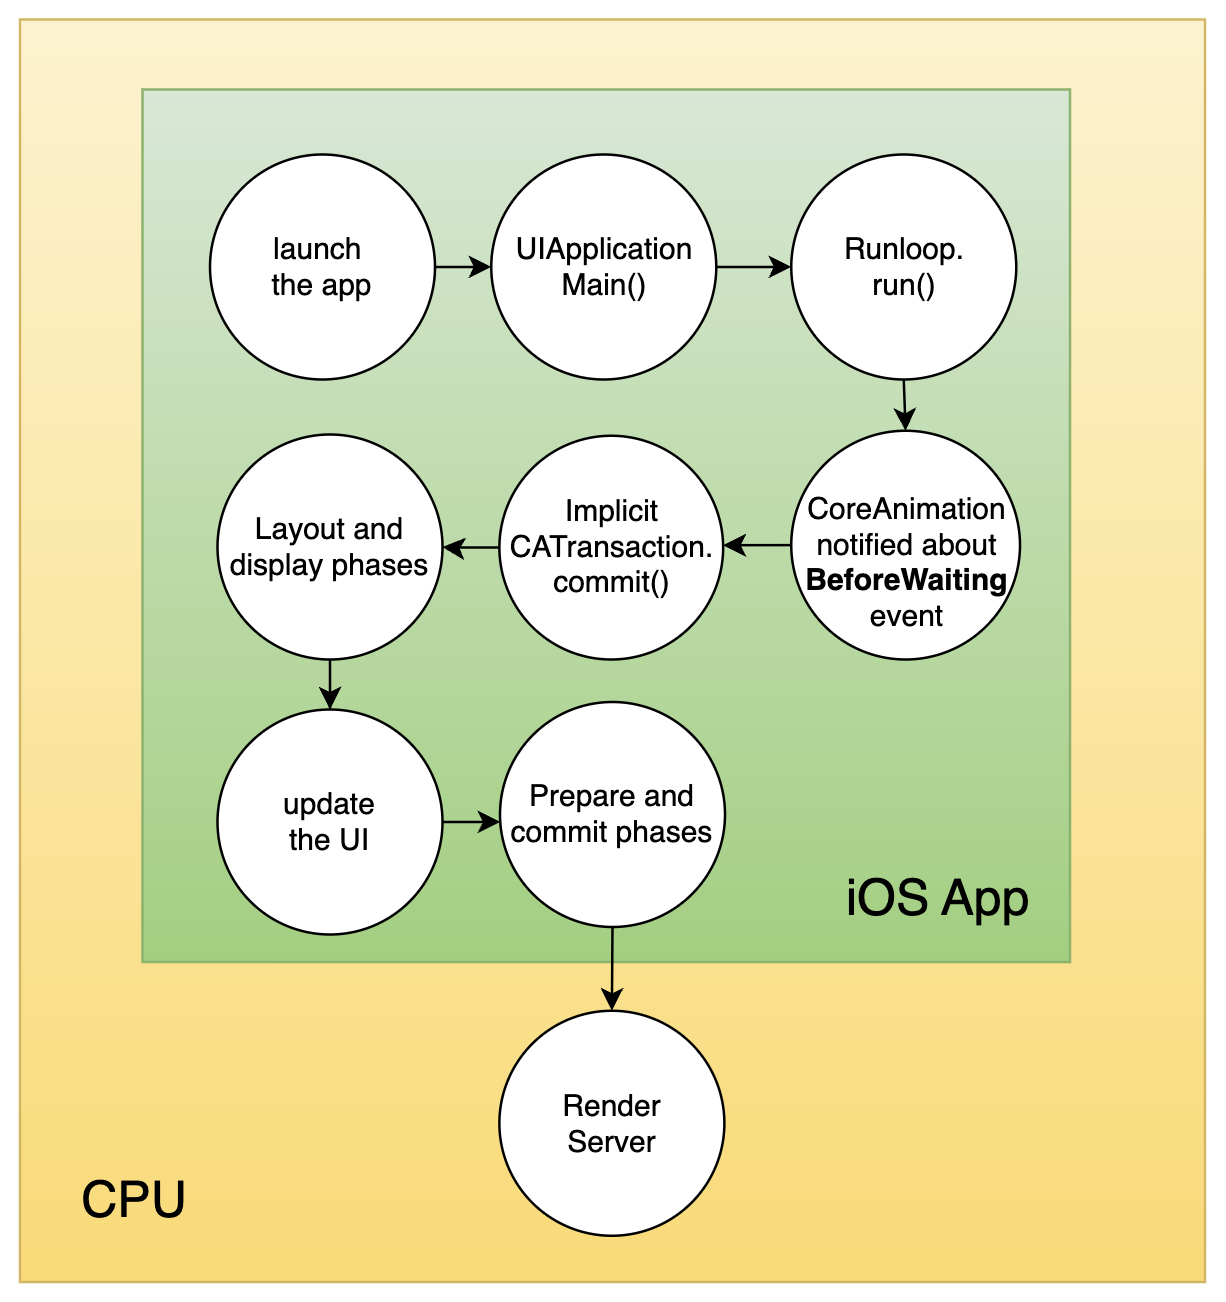
Let’s update our scheme with several new steps:
CATransaction by examples
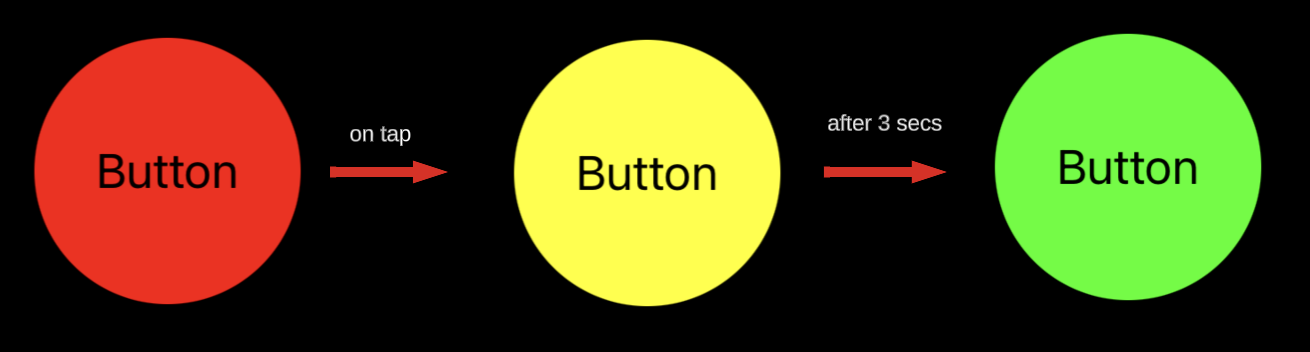
To understand CATransaction better lets consider few examples inspired by this cool post. Lets imagine we have a button with background color initially set to .red:
button.backgroundColor = .red
...
@objc func buttonTapped() {
    button.backgroundColor = .yellow // implicit transaction begins here
    sleep(3) // blocks the main thread for 3 seconds
    button.backgroundColor = .green
}
When we tap on button we:
change the
backgroundColorto.yellowblocks the main thread for 3 seconds with
sleep()functionchange the
backgroundColorto.green
How do you think this code will work?

It's not immediately clear why the yellow color wasn't visible, right? This occurred because after setting the yellow color and changing the model layer tree, we blocked the main thread, suspending the runloop iteration. So, the implicit CATransaction wasn't committed until a 3-second interval had elapsed. However, immediately after these 3 seconds, we changed the color to .green. This "green" change is committed with the implicit CATransaction at the runloop cycle's end. So the yellow color has never become visible.
Explicit transactions
We mentioned earlier that CoreAnimation sends implicit transaction on every runloop iteration but transaction can be also explicit if you create it in your code like this:
CATransaction.begin()
button.backgroundColor = .yellow
// change anything else here if you want
CATransaction.commit()
Any changes made to layer properties between CATransaction.begin() and CATransaction.commit() are grouped together and committed atomically.
NOTE 1: Explicit and implicit transactions are the same CATransaction. The only difference is that whether we begin and commit it manually or it is done automatically by CoreAnimation on any layer change.
NOTE 2: Now you know about
beginandcommitmethods of CATransaction we can address implicit transaction logic with more details. An implicit transaction is begun by CoreAnimation when you change the layer tree for the first time during the current runloop iteration. It then groups any subsequent changes during the runloop iteration inside of this transaction. Finally, at the end of the current runloop iteration when kCFRunLoopBeforeWaiting fires, the implicit transaction is committed.
Let’s see how our previous example result will change with explicit transaction:
button.backgroundColor = .red
...
@objc func buttonTapped() {
    CATransaction.begin()
    button.backgroundColor = .yellow
    CATransaction.commit()
    sleep(3) // blocks the main thread for 3 seconds
    button.backgroundColor = .green // implicit transaction begins here
}
Now we see yellow color state. Cool, but why?
We committed the “yellow state” change with explicit transaction right before blocking the main thread so it was changed instantly after the tap. Then after 3 seconds we do “green state” change that goes with implicit transaction at the end of runloop cycle.
NOTE 3: You are probably wondering now what is the case for using explicit transaction. I guess it was more useful long time ago when UIKit animation API was not as developed as it is today. For example, animate(withDuration:) became available only since iOS 4. Before that, explicit transaction was a good way to commit animation and easily change the duration, timing function, or other parameters of animation. But actually, explicit transactions still can be useful today in some rare cases of animating layer and view properties together.
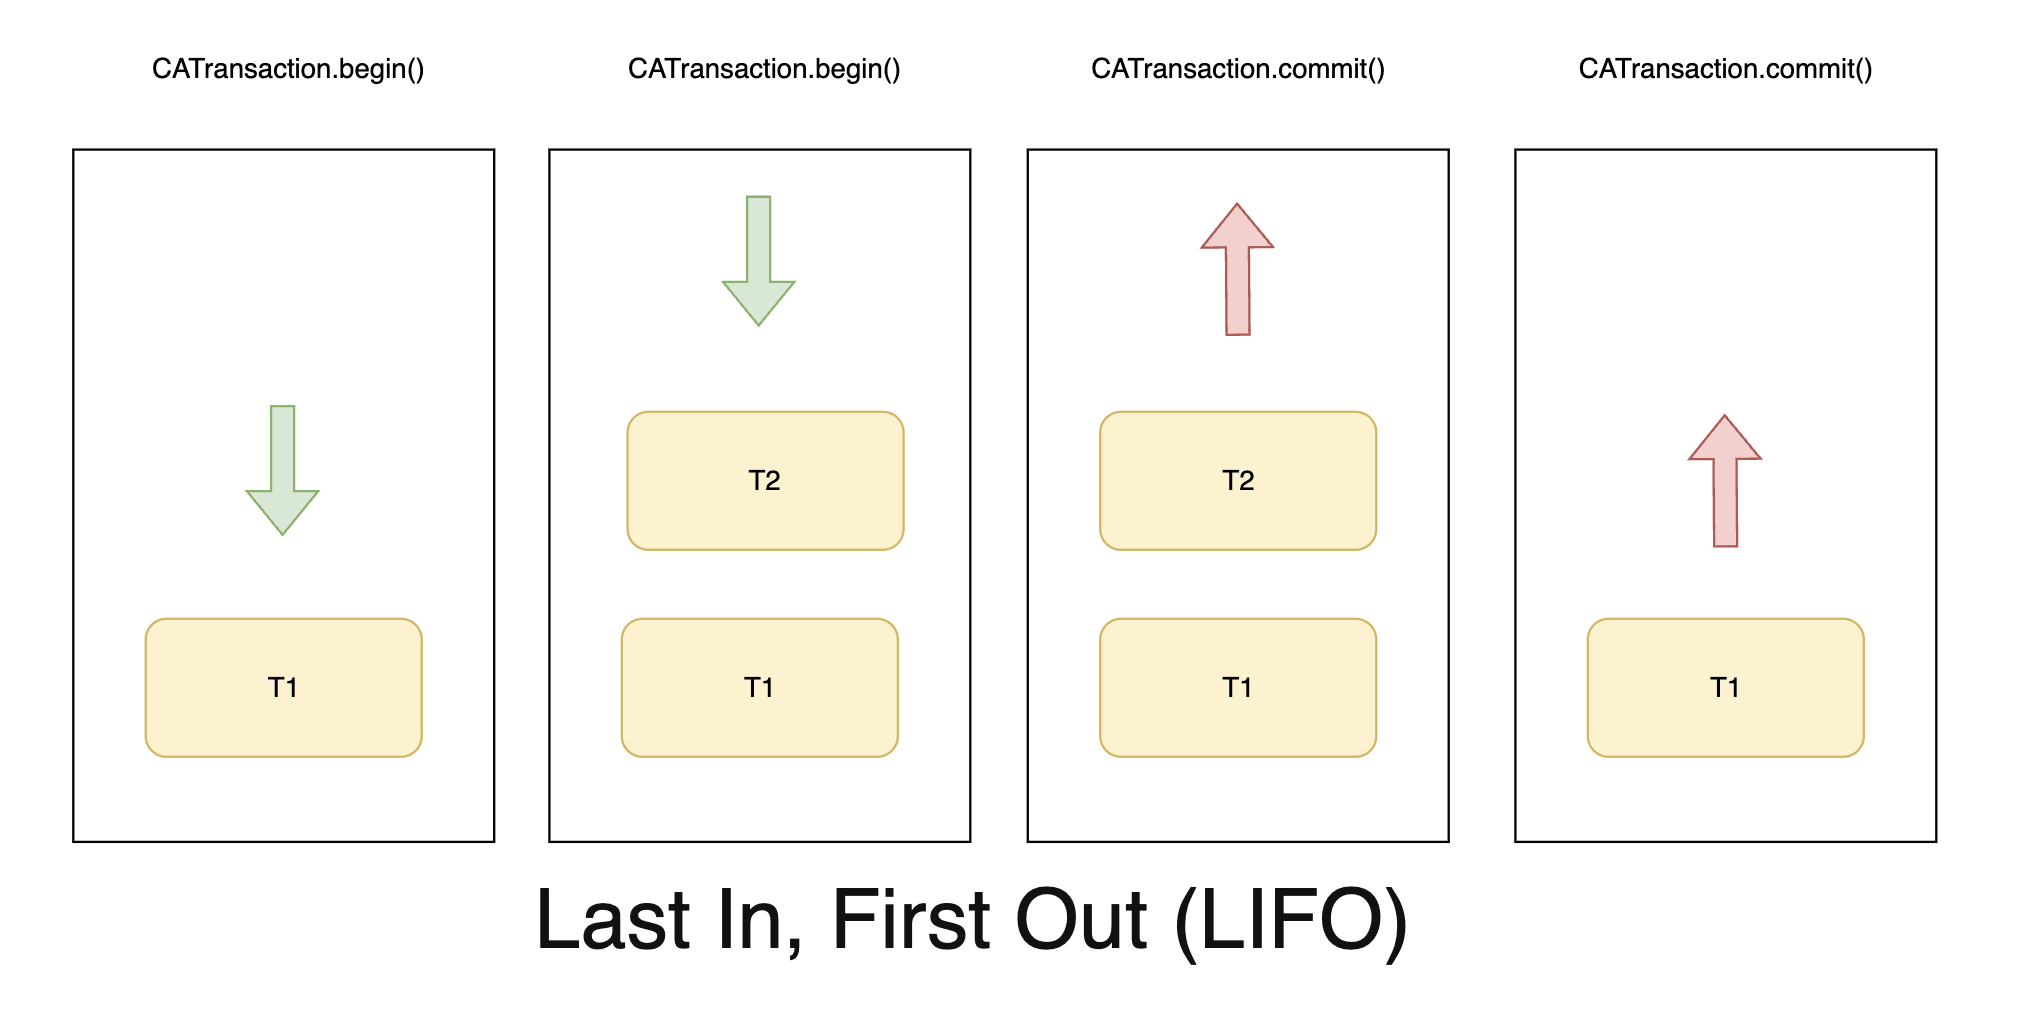
Nested transactions
Let’s update our example once again. Let’s put our explicit transaction inside another explicit transaction.
button.backgroundColor = .red
...
@objc func buttonTapped() {
    CATransaction.begin()
    CATransaction.begin()
    button.backgroundColor = .yellow
    CATransaction.commit()
    sleep(3) // blocks the main thread for 3 seconds
    button.backgroundColor = .green
    CATransaction.commit()
}

As you can see it produces the same result as the first example. No yellow state appeared.
That occurred because transactions can be nested. When one transaction is nested within another, the commit of the "internal" (child) transaction only takes effect when the parent commits. To better understand why nested transactions function this way, consider that transactions are managed by a transaction stack (LIFO - last in, first out). When you begin a transaction, it's added to the transaction stack, and upon committing, it's removed. If you insert several transactions inside transaction stack they become nested and those transaction(s) will really be committed when the stack becomes empty.
NOTE: Implicit transaction can’t be nested inside explicit one once implicit transaction begins when you change layer tree outside of explicit transaction. So it also means that implicit transaction can be added to the transaction stack only when the stack is empty.
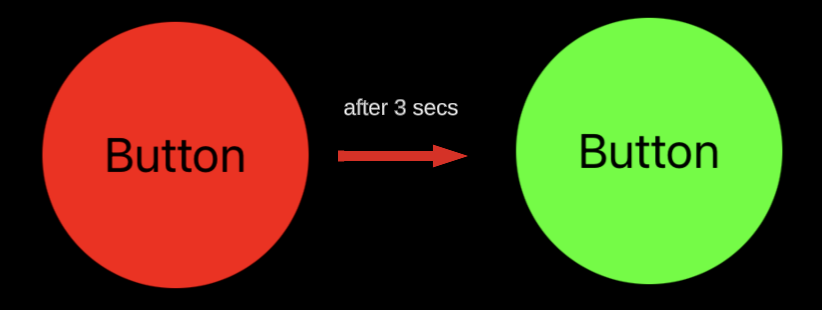
Implicit transaction
Last example shows us how implicit transaction works.
button.backgroundColor = .red
...
@objc func buttonTapped() {
    button.backgroundColor = .white // implicit transaction begins here
    CATransaction.begin()
    button.backgroundColor = .yellow
    CATransaction.commit()
    sleep(3) // blocks the main thread for 3 seconds
    button.backgroundColor = .green
}
Looks very similar to the example with explicit transaction when yellow state was visible. Except one detail - we changed the model layer tree by assigning button.backgroundColor = .white first which triggered implicit transaction to begin so our explicit transaction was nested into implicit one and was not sent to the render tree until the implicit one was committed later. So that’s why we saw only green state after 3 seconds in this case.
NOTE 1: How many transactions created per runloop cycle?
0 - if nothing changed;
1 - if layer tree changed outside of explicit transaction OR 1 explicit transaction was created;
N+1 - if layer tree changed outside of explicit transaction AND N explicit transactions were created.NOTE 2: You could notice that transaction has also a flush method. It commits any extant implicit transaction. Flush is typically called automatically at the end of the current runloop iteration, regardless of the runloop mode. You should attempt to avoid calling
flushexplicitly. By allowingflushto execute during the runloop your application will achieve better performance, atomic screen updates will be preserved, and transactions and animations that work from transaction to transaction will continue to function.
Next thing we need to understand is the phases of transaction.
Phases of transaction
The CATransaction commit method is separated in four phases:
Layout phase
Display phase
Prepare phase
Commit phase
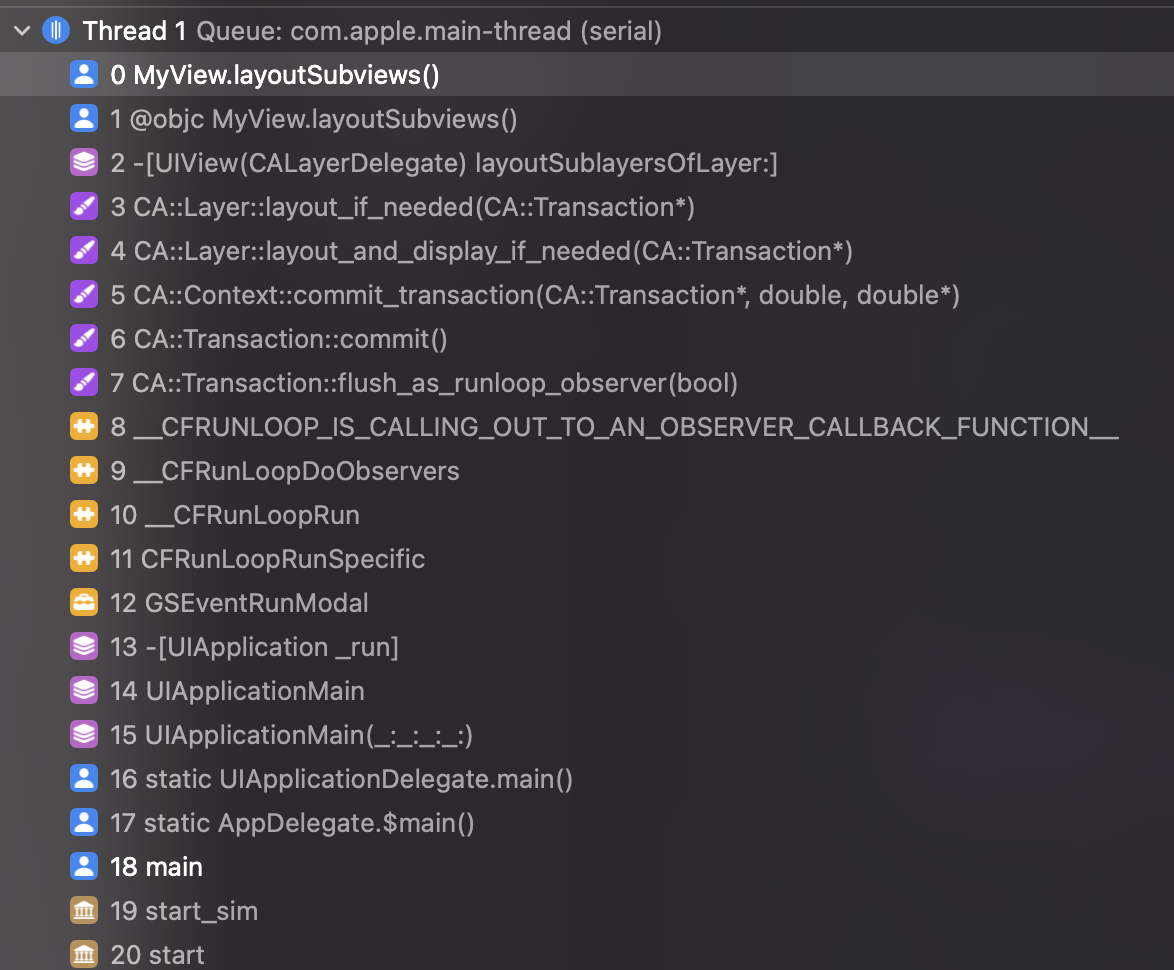
All of them are actually happening inside CA::Transaction::commit() method. We can see this method inside the callstack if we put a breakpoint inside layoutSubviews() method of your view.
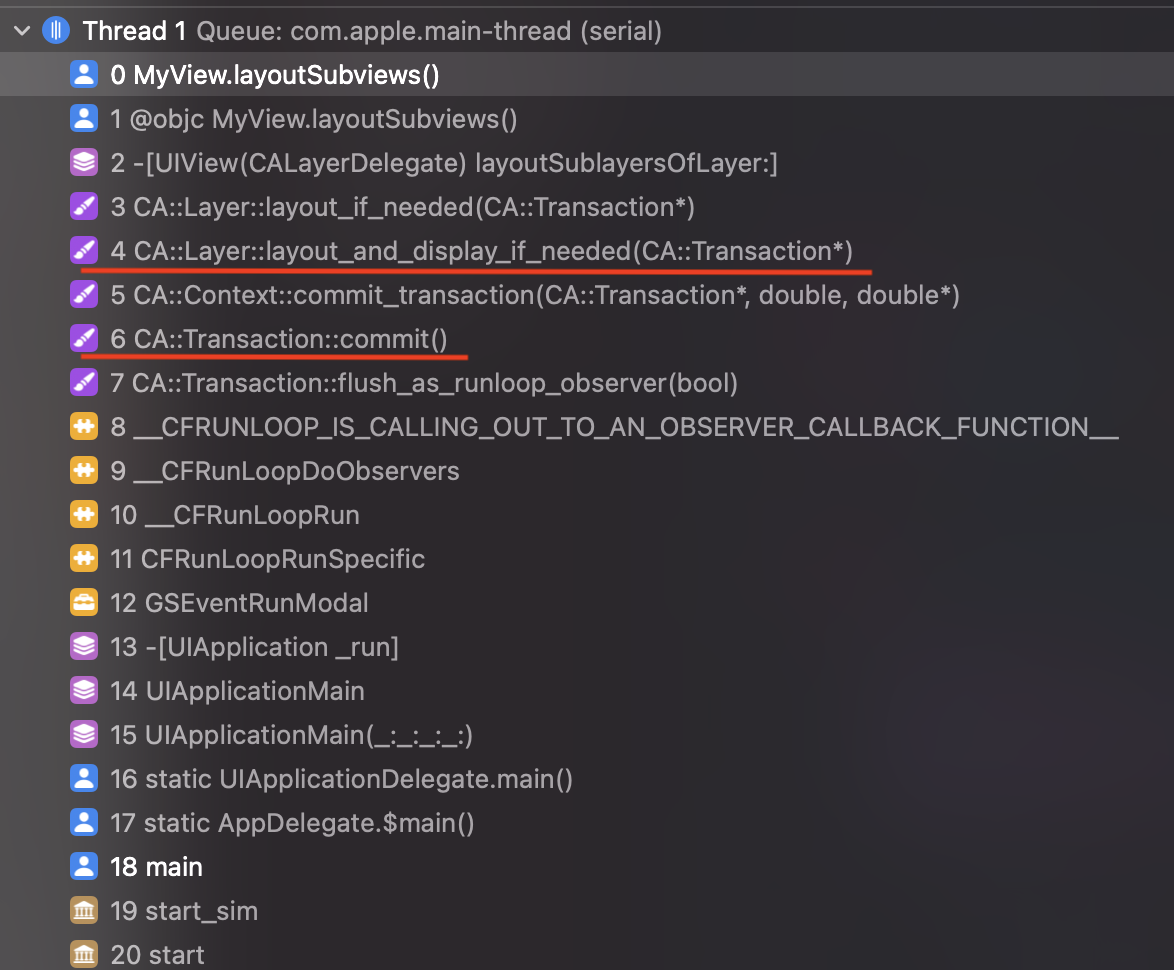
Lets go quickly over every phase.
Layout and display phases
In the screenshot above, you can observe the method CA::Layer::layout_and_display_if_needed(CA::Transaction*), responsible for executing two phases: Layout and Display. It's intuitive that the layout phase handles the layout update of the layer tree before the transaction is committed. Similarly, the display phase is responsible for updating the displayed contents within the layers. Core Animation initiates these phases before committing the transaction to ensure the layer tree's state is up-to-date and can be applied accurately to the render tree.
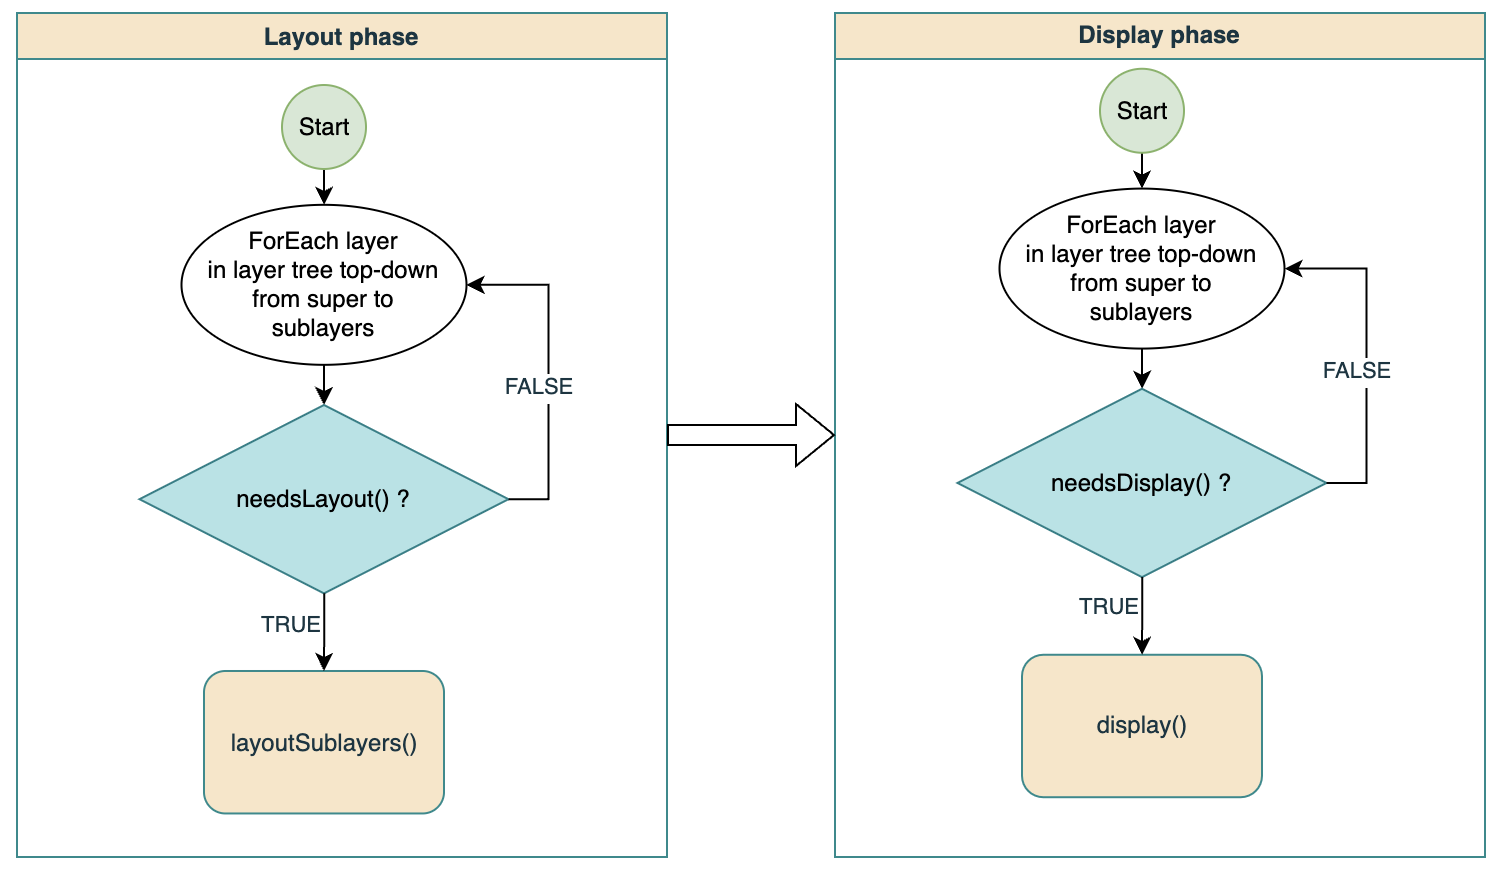
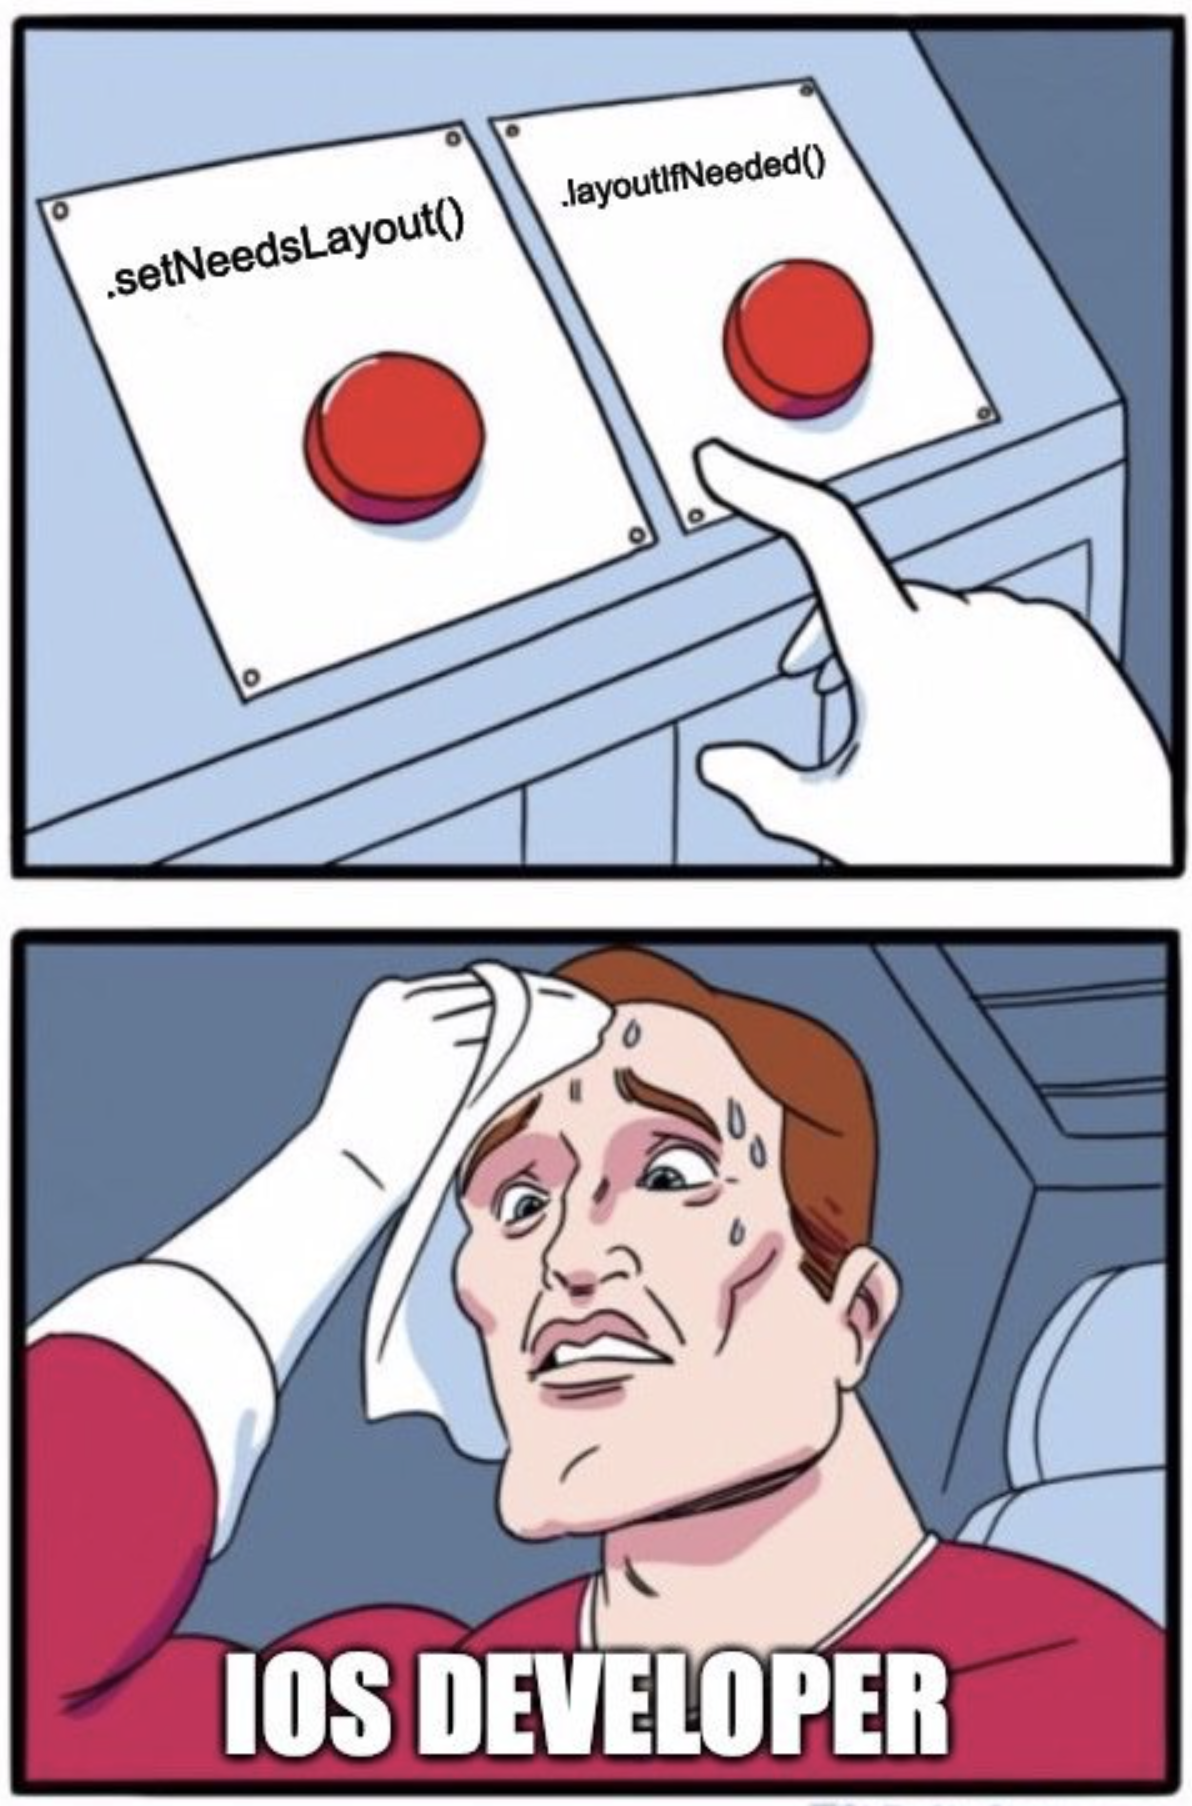
Both phases function in a similar manner. Core Animation traverses the layer tree using Depth-First Search (DFS), starting from the top superview (UIWindow) down to the bottom leaf layers. If the layer's corresponding flag (returned by needsLayout() / needsDisplay()) is activated, the layoutSublayers() / display() methods are called accordingly. These flags can be activated implicitly by modifying the layer's properties (such as bounds, for instance) or explicitly by invoking setNeedsLayout() / setNeedsDisplay().
NOTE: You don’t ever need to call layoutSublayers / display directly.
Layout phase
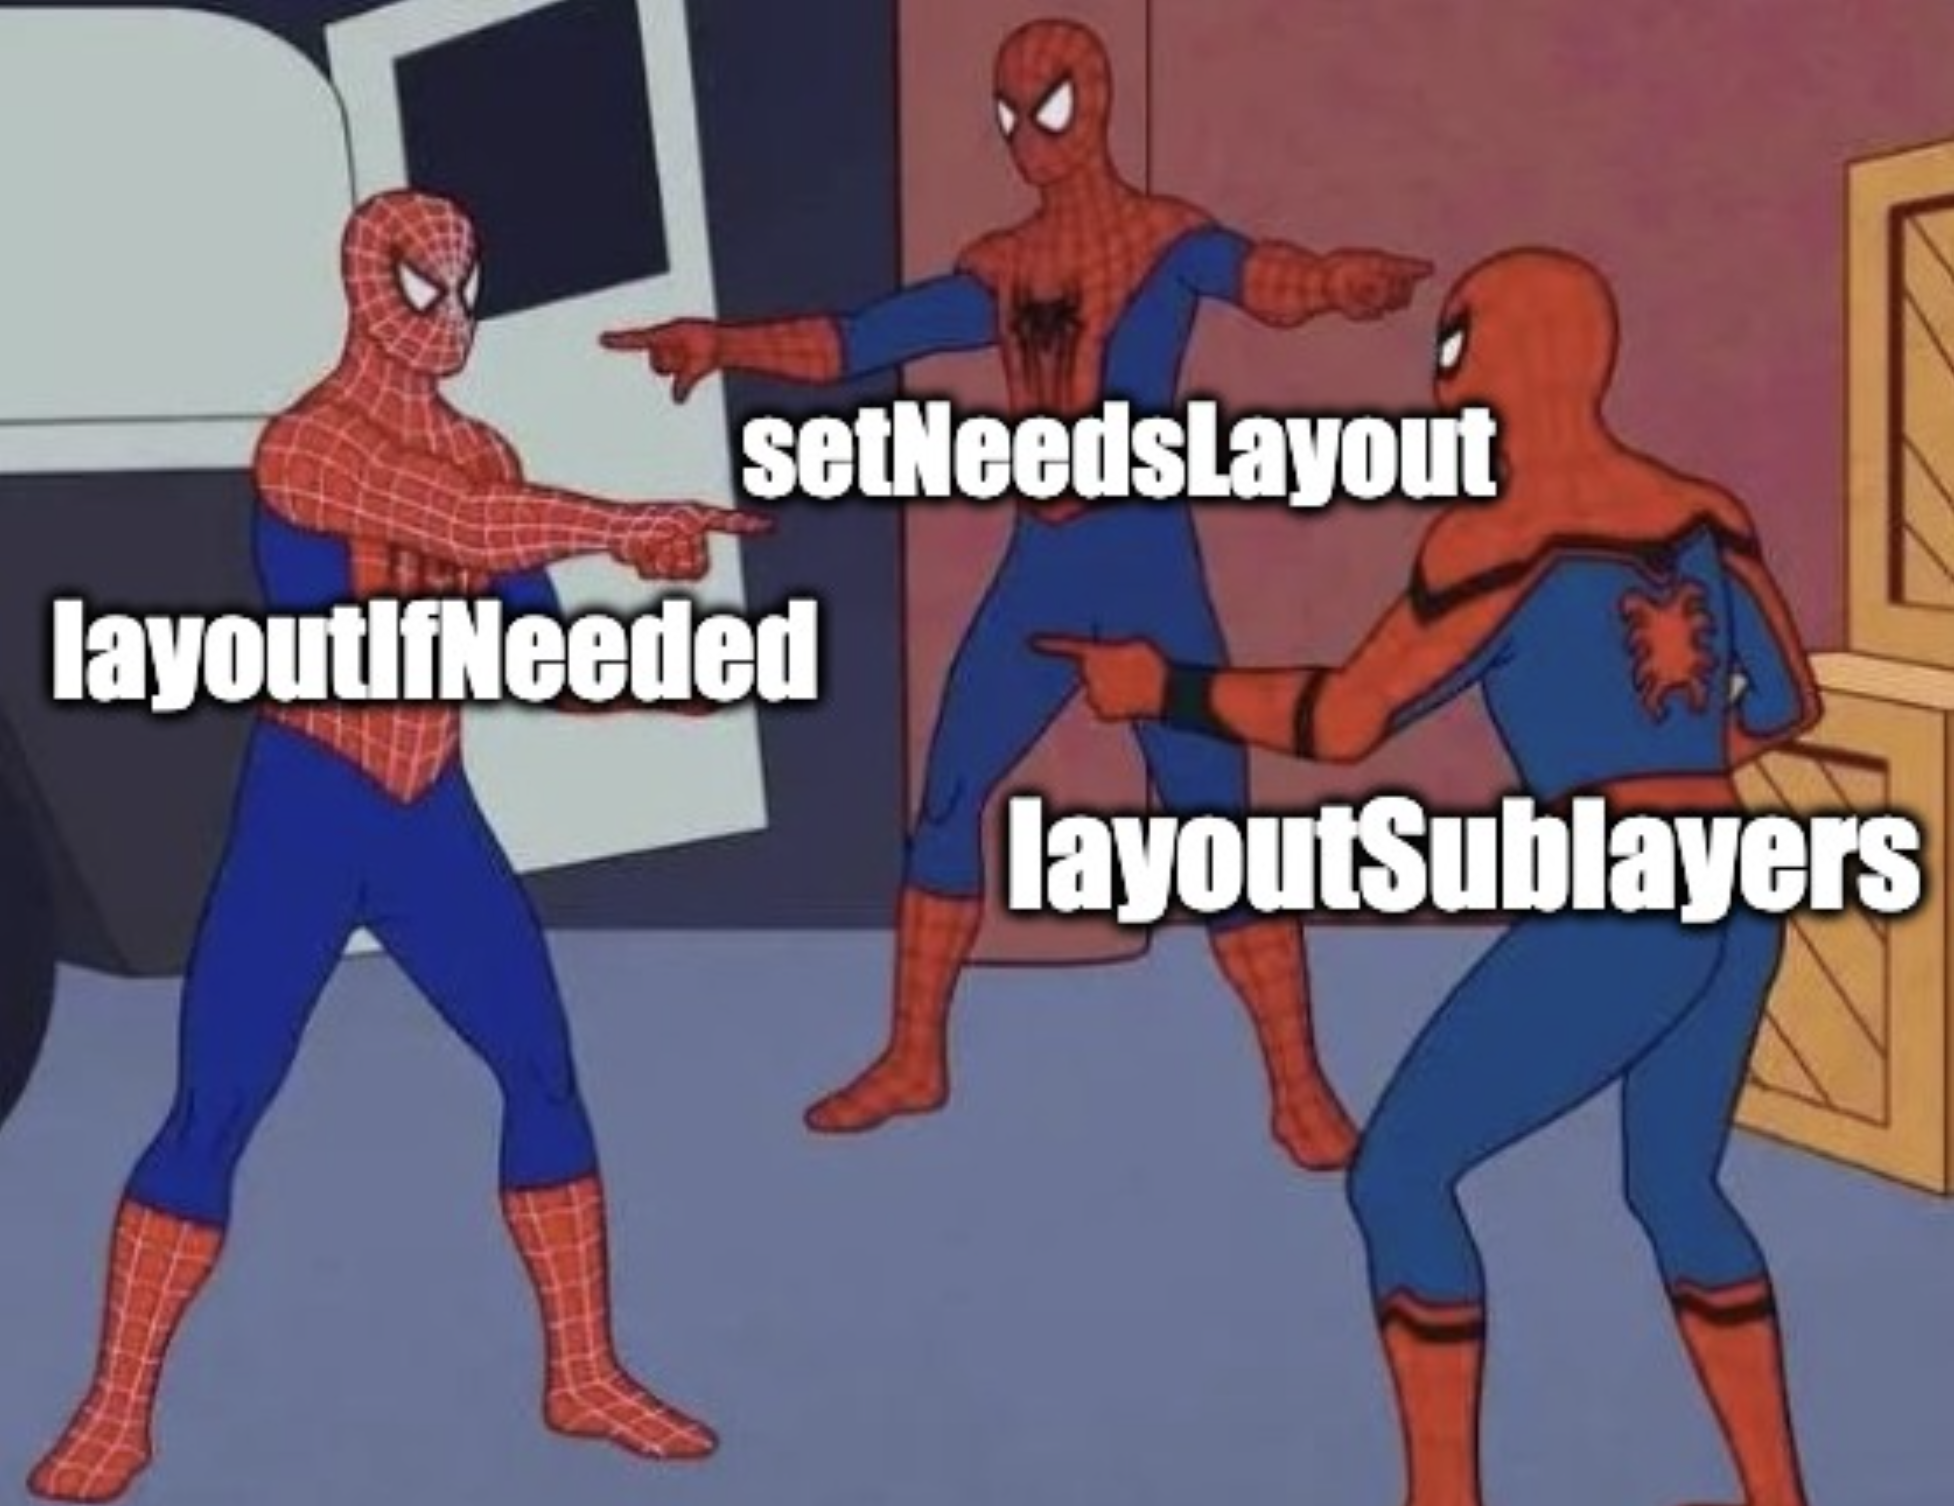
The layout methods in UIView, frequently used in UIKit - such as layoutIfNeeded, setNeedsLayout, and layoutSubviews essentially serve as proxies for the corresponding methods in CALayer. While UIKit incorporates additional logic to ensure the proper functioning of autolayout constraints, it consistently depends on CoreAnimation's fundamental layout process.
During the layout phase, Core Animation calls the layoutSublayers() method of CALayer from top to bottom on each layer within the current layer tree if they were invalidated by implicit or explicit changes to the needsLayout flag. Ultimately, at the completion of this chain execution, each layer acquires its final position and size.
If the entire layer tree is invalidated using setNeedsLayout(), during the traversal in the layout phase, layoutSublayers() will be invoked for every layer.
Most of the time tree is invalidated only partially. In that case layer tree will be fully traversed too but layoutSublayers() will be called only for invalidated layers (with needsLayout flag enabled).
As we mentioned above UIView sets itself as a CALayerDelegate of it’s backing layer.
Default implementation of layoutSublayers calls the layoutSublayers(of:) method of the layer’s delegate object if it is implemented.
UIView implements layoutSublayers(of:) method and calls UIView’s layoutSubviews() method, that you probably already familiar with and often use to customise layout of views.
extension UIView: CALayerDelegate {
    func layoutSublayers(of layer: CALayer) {
        layoutSubviews()
    }
}
layoutSubviews() is meant to help UIKit to support AutoLayout and it adds one addition step to layout phase - Constraints pass. This is the step UIKit does to solve constraints. It goes over the view tree bottom-up from leaf subviews to the root view and calls updateConstraints() method of the view if needsUpdateConstraints() returns true. It usually becomes true automatically when constraints where changed or if you call setNeedsUpdateConstraints() explicitly.
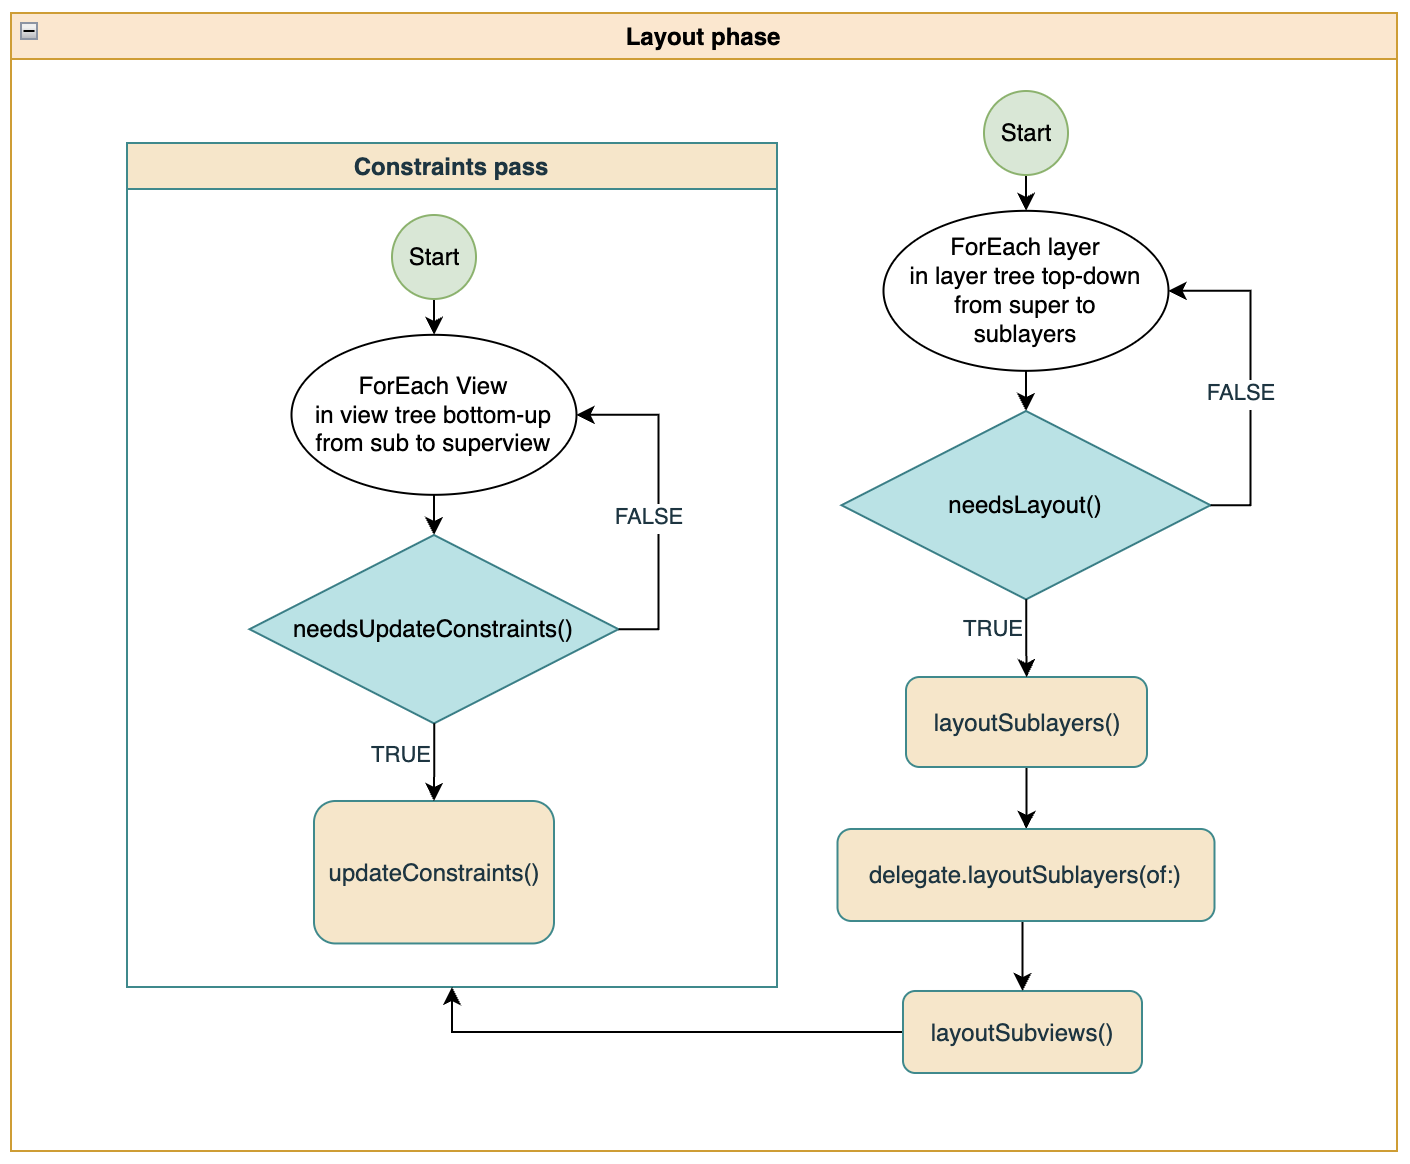
NOTE 1:
layoutSubviews()do the constraints pass if needed every time it is called.NOTE 2: One important difference of Constraints pass from layoutSublayers traversal logic is that it’s traversal is happening in opposite direction - bottom-up, from leafs to superview.
Display phase
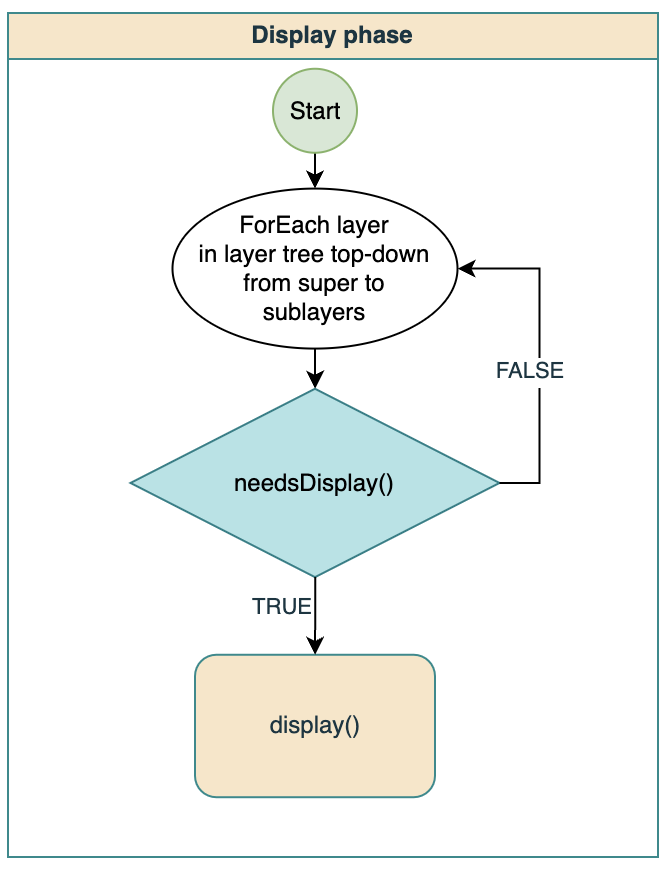
During the display phase, Core Animation invokes the display() method of each layer within the current layer tree, proceeding from top to bottom (from super to sublayers). This method is responsible for updating the layer's content. By the end of this phase, every layer has its content refreshed. Subclasses have the option to override the display() method, utilizing it to directly set the layer's contents property.
The mechanism involving setNeedsDisplay and needsDisplay is the same as for the layout phase.
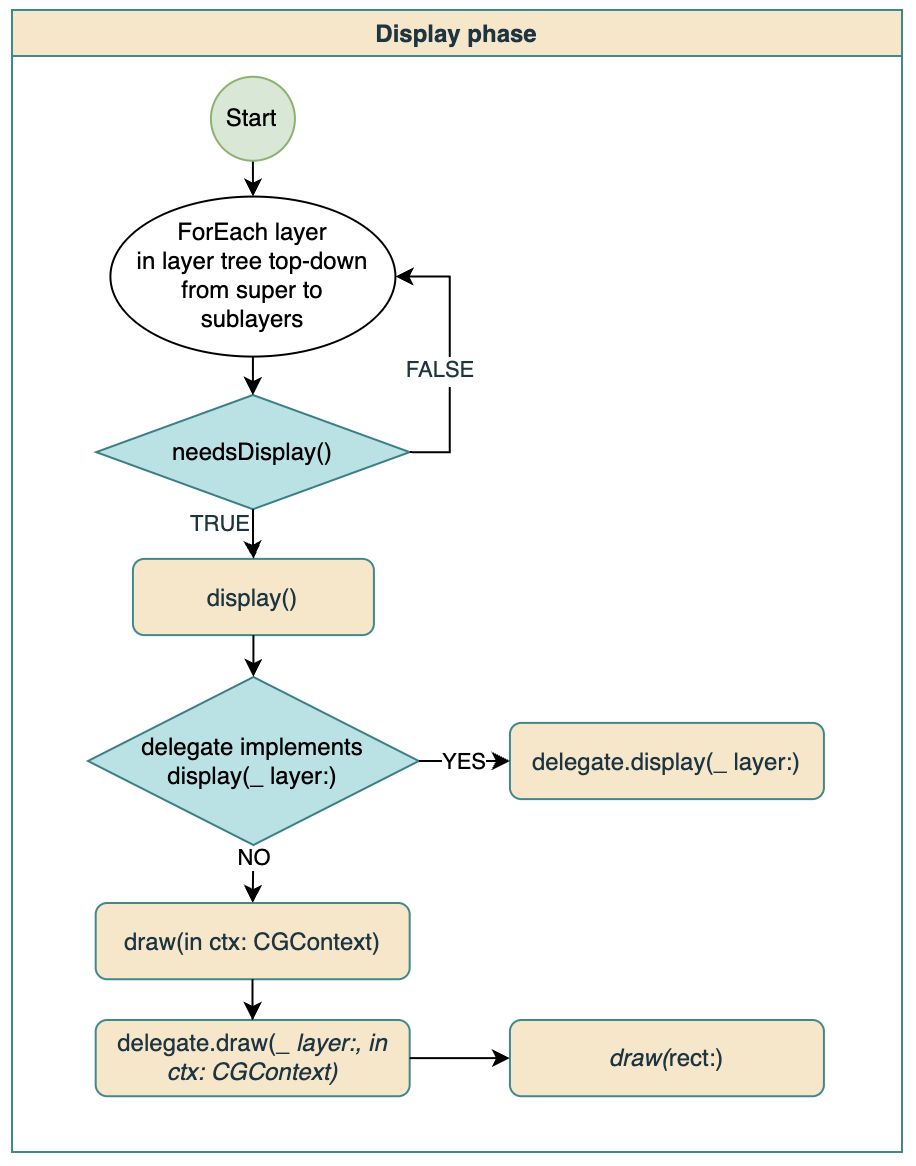
Let’s dive deeper into layer’s display logic:
Default implementation of layer’s display calls the display(_ layer:) method of the layer’s delegate object if it is implemented.
Otherwise this method creates a backing store (pixel bitmap, like an image) and calls CALayer's draw(in ctx: CGContext).
draw(in ctx: CGContext)by default does nothing except calling CALayerDelegate'sdraw(layer: CALayer, in ctx: CGContext)if it is implemented to fill the backing store with content using Core Graphics for drawing via CGContext.UIView as a CALayerDelegate of it’s backing layer doesn’t implement
display(_ layer:). But it implementsdraw(layer, in ctx: CGContext)where it calls UIView’sdraw(rect:)method.Default implementation if UIView’s
draw(rect:)does nothing. But can be overridden by subclasses to implement custom drawing with Core Graphics.
Understanding it all at once can be challenging. But the most important aspect here is that, in essence, UIKit empowers us to perform custom drawing using Core Graphics by overriding the draw(rect:) method. Let's build a diagram to create a clearer understanding:
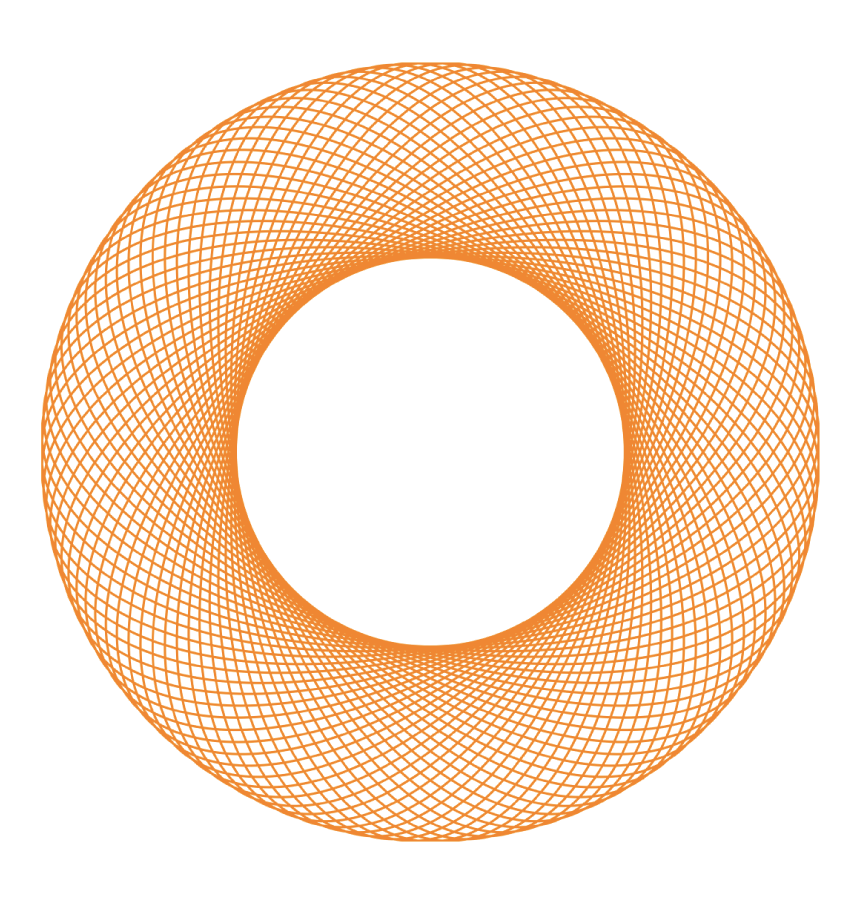
Even if you have never known about display phase you probably used draw(rect:) for drawing custom graphics in custom components in your apps. You can draw lines and shapes in the Core Graphics context. For example you can draw 100 ellipses to see a torus like this:
override func draw(_ rect: CGRect) {
    guard let context = UIGraphicsGetCurrentContext() else { return }

    context.setLineWidth(1.0)
    context.setStrokeColor(UIColor.orange.cgColor)

    context.translateBy(x: frame.size.width / 2.0,
                        y: frame.size.height / 2.0)

    let numberOfEllipses = 100
    let amount = Double.pi * 2 / Double(numberOfEllipses)

    for _ in 1...numberOfEllipses {
        context.rotate(by: CGFloat(amount))
        let rect = CGRect(x: -(frame.size.width * 0.25),
                          y: -(frame.size.height / 2.0),
                          width: frame.size.width * 0.5,
                          height: frame.size.height)
        context.addEllipse(in: rect)
    }
    context.strokePath()
}
But custom graphics drawing is not the only case. For example, UILabel use display phase and draw(rect:) to draw text (calls drawText(in rect: CGRect) there). You can override draw(*rect:) method for label and you see no text drawn.
class CustomLabel: UILabel {
    override func draw(_ rect: CGRect) {
        // super.draw(rect)
    }
}
NOTE: Keep in mind that Core Graphics drawing is performed by the CPU. CoreGraphics draws in CALayer backing store - it is a bitmap data, that later will be pushed to the GPU.
Now we know that committing transaction triggers Layout and Display phases to happen. Layout an display are phases where updates to UI usually happen.
CATransactions actually has 2 more phases. Usually developers don’t interact with them but they are important because of what they do.
Prepare phase - does additional Core Animation work like image decoding (JPGs, PNGs) and image conversion (if in format not supported by GPU, e.g. index bitmap).
Commit phase - packages up layer tree and sends the transaction to the Render server to be applied to the render tree.
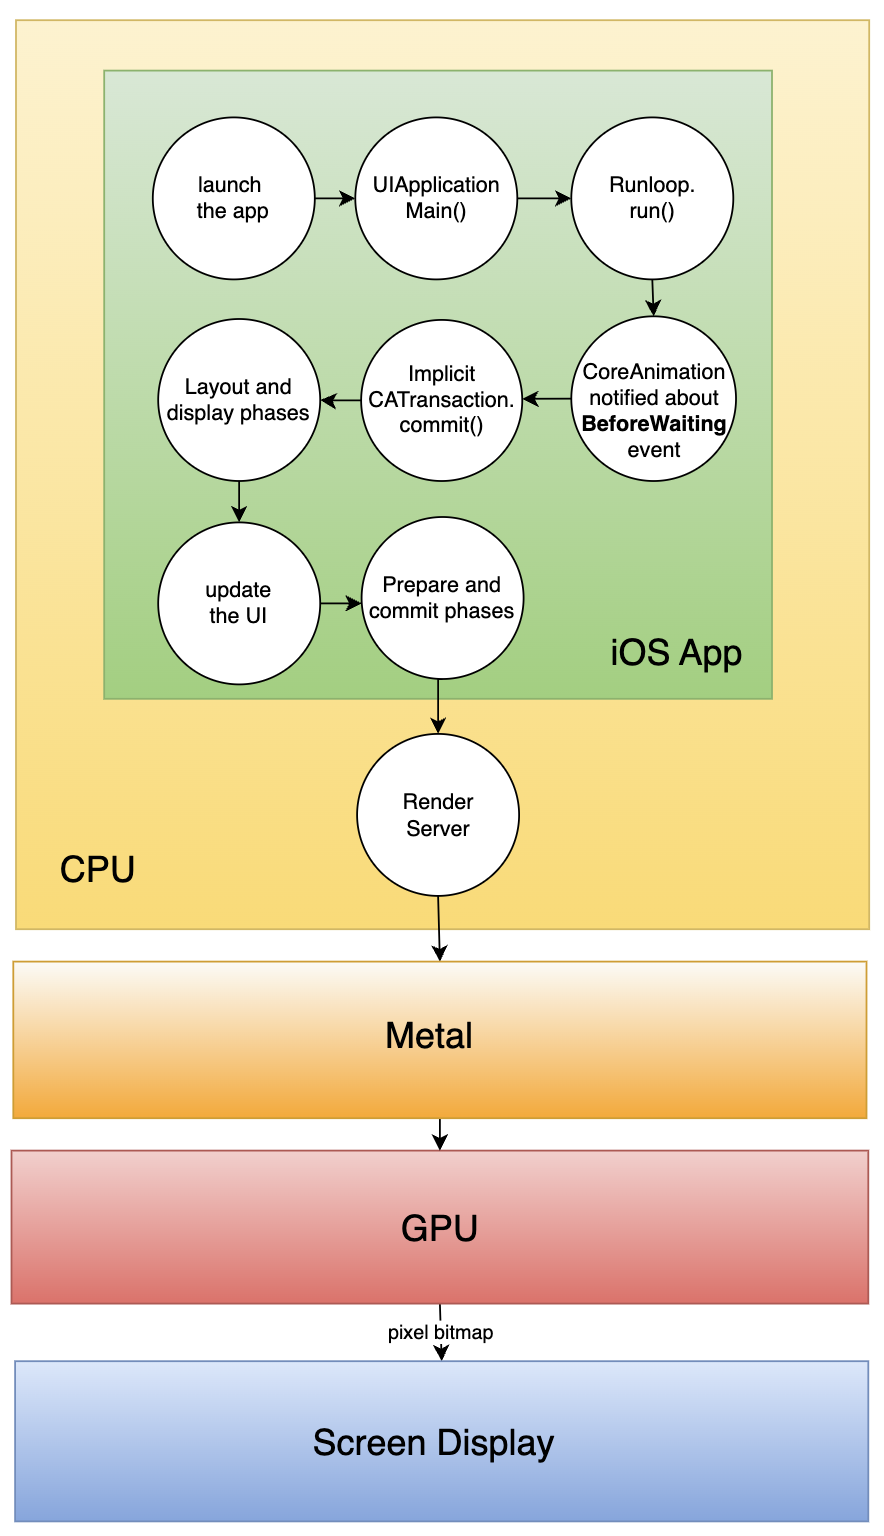
You probably noticed a new keyword here - Render server. Until this moment we didn’t discuss where exactly render tree is located. Surprisingly, not inside the application. Render tree is managed by separate process called Render server that issues drawing calls for the GPU using Metal. This process performs most of the magic of the Core Animation framework.
Render server
After transaction is committed it will be sent over IPC (Inter-Process Communication) to the Render server process.
NOTE: Render server for simplicity can be considered as Core Animation back end.
Maybe you were wondering when you debug your application why progress indicator is continuing to spin even though your application is paused. Now you can guess why - it is spinning in another process - Render Server. It will happen with any other animation as well. If you commit the transaction with animation added before you block your main thread, you will see how it continues to work.
Once render server receives the transaction, it decodes it to apply updates to render tree.
For every display update iteration render server need to provide next frame for the GPU so it does the following:
Calculates the intermediate values for the render tree’s layers properties if related animation is in progress.
Uses the Metal commands to perform the layer tree rendering.
- NOTE: How Metal works is a great topic for the next post, but for now to explain it simply Metal has a commands queue and it puts commands there to be rendered by GPU.
The output of rendering on GPU is a pixel bitmap to be shown on the screen.
So we can update our scheme of questions into the final state:
Recap

UIApplicationMain:
main()is the app “entry point” called by the operating system's runtime environment during app launch. main function itself doesn’t do much. It’s main purpose is to callUIApplicationMain()function.UIApplicationMain()manages app setup and runs the main event loop - Runloop.
Runloop:
Infinite cycle managing app events.
Manages events handling - runloop Events:
GCD main queue blocks
timers
sources (version 0 and 1)
observers.
CoreAnimation:
UIKit internally delegates UI-related work to Core Animation.
UIViews are backed by CALayers, handling rendering, layout, and animations.
CoreAnimation holds in parallel three layer trees: model tree, presentation tree, and render tree.
CoreAnimationrenders our app view hierarchy at each run loop pass and not at each view hierarchy modification. To do so, it observesCFRunLoopActivity.kCFRunLoopBeforeWaitingevent and begins an implicitCATransactionif layer tree was changed. In the end of every runloop iteration,CoreAnimationfinally commits this transaction just before the thread is put to sleep.
CATransaction:
CATransactionis Core Animation's tool for combining multiple layer-tree operations into atomic updates to the render tree.Explicit Transactions can be created manually with
beginandcommitmethods.Transactions can be nested, but when nested within an ongoing transaction, changes within the nested one only commit when the parent transaction does.
Transactions consist of four phases: Layout, Display, Prepare, and Commit.
At the end of every runloop iteration CoreAnimation commits implicit CATransaction through IPC (Inter Process Communication) to another process - Render Server.
Render Server:
The Render server manages the render tree and is responsible for animations and rendering.
The Render server uses Metal commands to perform the render tree rendering. The output of rendering on GPU is a pixel bitmap to be shown on the screen.

BONUS: if you like to have the full picture, here is a complete scheme:
ONE MORE BONUS: Best book about UIKit is… actually the book about Core Animation 🤣
- iOS Core Animation: Advanced Techniques by Nick Lockwood
It was published back in 2013 but it is still relevant if you want to master UIKit.
Thank you for reading and see you in the next post about SwiftUI.